
How To: Enforce ZIP+4 in Client Demographics

Some payors are beginning to require that client addresses utilize the ZIP+4 ZIP code in order to get paid.  The ZIP code field in myEvolv has a datatype of Zip Code which appears to be a string field that allows up to 10 characters.  This means that you can store a 5-digit ZIP code or a ZIP+4 in the field.  Furthermore, the functionality for auto-filling the city and state fields based on the ZIP code will work with either type of ZIP code.

One thing that is lacking is the ability to force users to input a ZIP+4 in the ZIP code field.  The following guide will show how you can add some form validation to the Client Demographics form that will help to prevent users from entering only the 5-digit ZIP code.  While we will be looking at only one set of forms, you should be able to apply the same changes to other forms and address subforms to achieve the desired result elsewhere in the system that addresses are collected or edited.

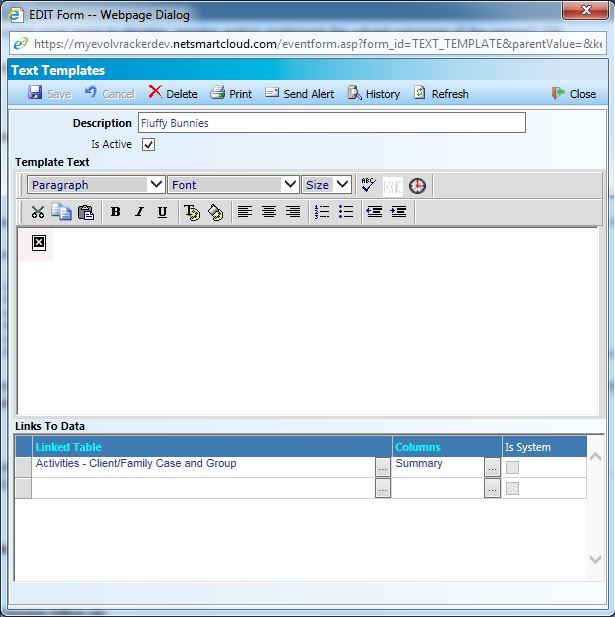
Setup New Demographics Formset Member

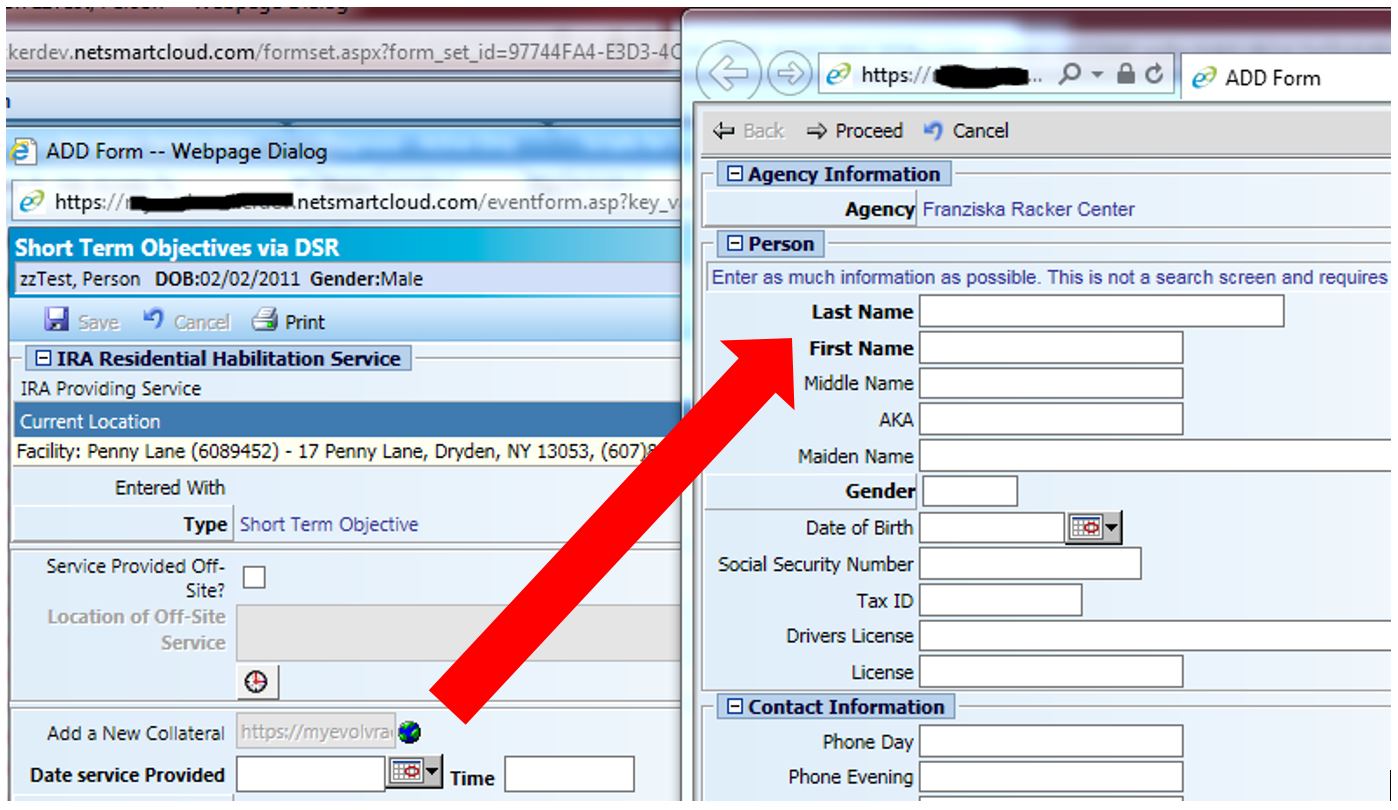
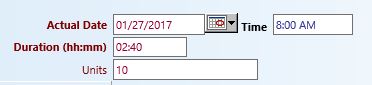
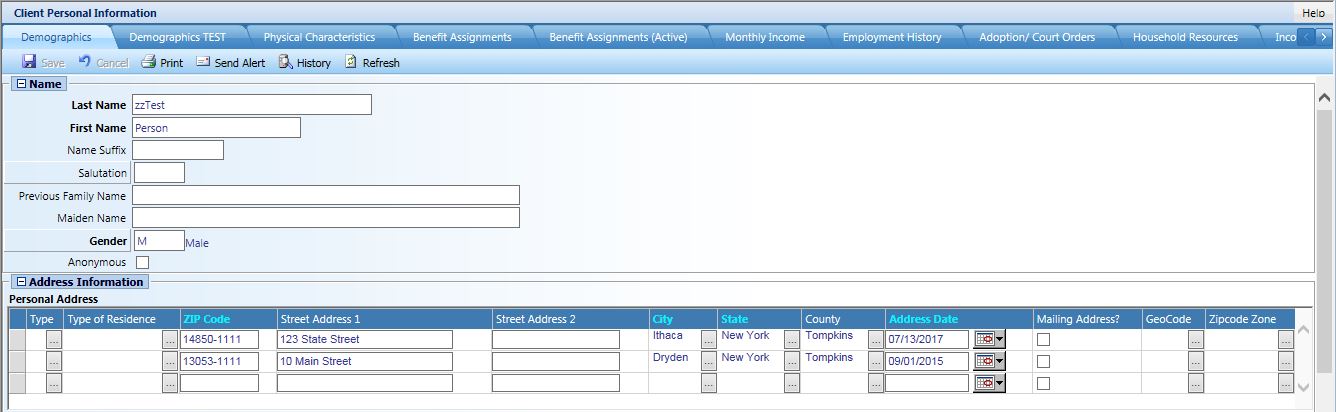
For the purposes of this demo, we are going to modify the Client Demographics form.

This is a system form and we cannot directly make changes to it so instead, we must create a custom demographics form, address subform and formset member so that we can make the changes we want.

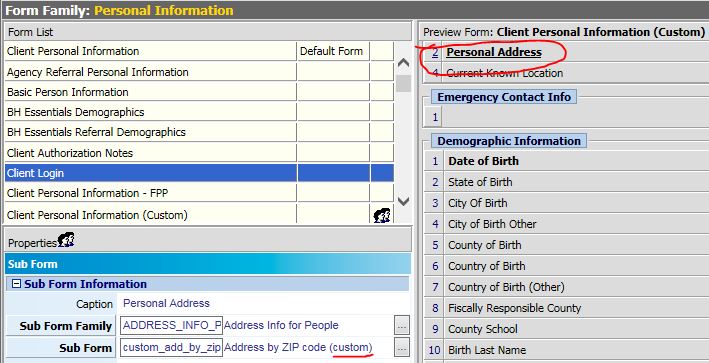
Copy the ‘Address by ZIP code‘ Form

This form is in the Address Info for People form family. This is the form that is used for the Personal Address subform on the Client Demographics.

Copy the ‘Client Personal Information‘ Form

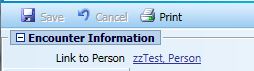
This form is in the Personal Information form family and is listed at the top as the default form. This is the main form that loads when you go to the Client Demographics formset.

On your newly-copied, custom version of this form, swap your custom Address by ZIP code subform in for the default Address by ZIP code subform.

Remember that when you copy and begin editing these system forms, a good rule of thumb is to only add to the form or carefully edit what is on the form so that you do not have downstream effects. Avoid deleting elements. If you don’t want them to be visible, simply hide them.

Create New Formset Member

Select the Client Personal Information FormSet in Formset Maintenance. By Default, the Client Demographics formset member is ordered #1. Add a new formset member and copy the settings for it just like the system default Demographics formset member EXCEPT that we will be using our custom Client Personal Information form instead of the system form in the Default Form field.

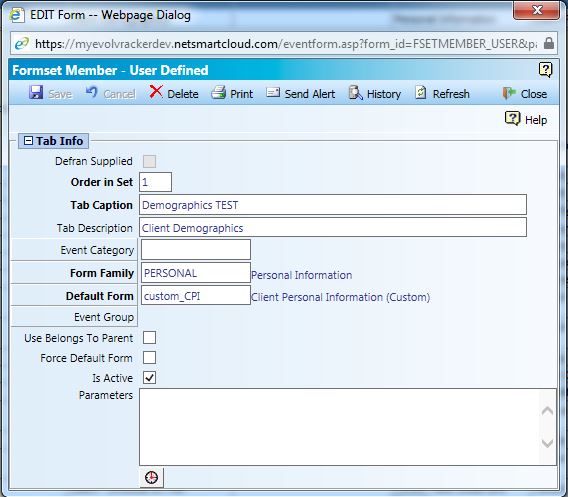
With the new formset created, remember to make it available to all navigation schemes which need the ZIP+4 validation. In order to avoid confusion, you can make the default formset member unavailable to those with the new formset.

Pro Tip: I temporarily put “TEST” in the Tab Caption of my custom formset so that I could find it easily when adding it to the navigation schemes.

You now have a separate and customizable Client Demographics formset to play with in your system

Modify Forms to Validate for ZIP+4

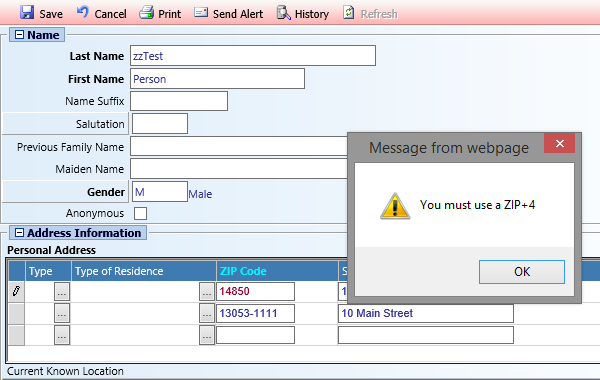
We will need to make changes to both of our forms in order to cover all of our bases. Our method for validating is to check the subform zipcode field when it is changed and determine if the zipcode entered is comprised of 10 characters. If the zip code is other than 10 characters, we will alert the user that they must enter a ZIP+4. If they ignore the warning and attempt to save anyway, we will prevent the save and alert them again that a ZIP+4 must be entered.

Custom ‘Client Personal Information’ Form

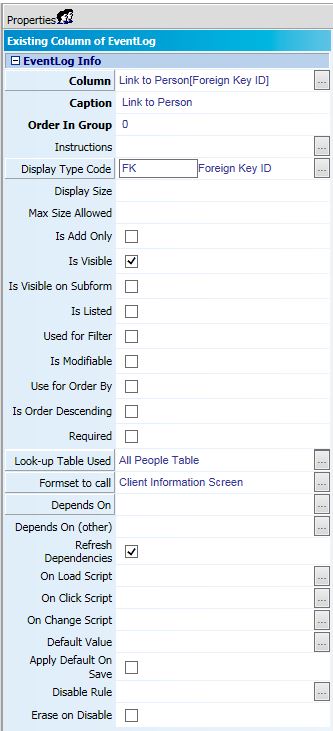
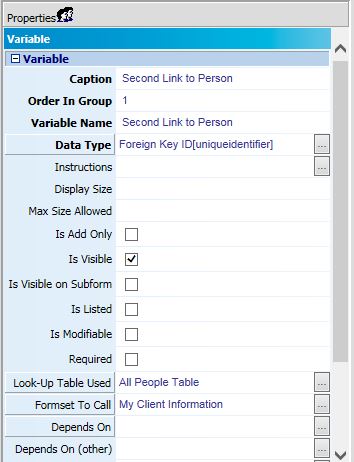
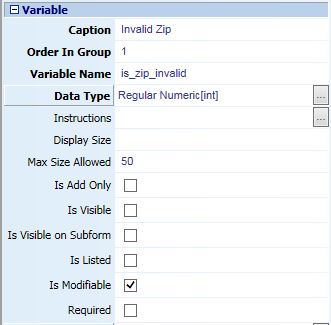
Step 1) Add a variable to the form just above the Personal Address subform. This variable will be used to store our ZIP code validation state that we will check before saving.
I named my variable is_zip_invalid and gave it a Regular Numeric datatype. You can set your variable to be not visible.

Step 2) Add the following code to the form’s “Before Save Code” property:

if(getFormElement('is_zip_invalid') == '1'){{
alert('You must use ZIP+4');
formValid = false;
}}

The code above checks to see if the value of the variable we just created is ‘1’. If it is, then it gives an alert and tells myEvolv to abort the save because this form is not valid. On the subform, we will add code that will set the value this variable based on what is entered in the zip code fields.

Custom ‘Address by ZIP Code’ Form

Step 1) Add the following code to the ZIP Code field’s “On Change” property:
This code can go under the setAddressFromZip(this); line.

var zip = self.getElementFromXML(currentRowXML, 'zip_code');
if(zip.length != 10){{
window.parent.window.alert('You must use a ZIP+4');
window.parent.setFormElement('is_zip_invalid', 1);
}} else {{
window.parent.setFormElement('is_zip_invalid', 0);
}}

The code above creates a variable named zip and assigns it the value that user enters into the ZIP Code field. The script then checks to see if the value is 10 characters long. If it is not, the code produces an alert to remind the user that a ZIP+4 is required and then sets the value of is_zip_invalid on the parent form to 1. If the value is 10 characters long, the script sets the value of is_zip_invalid on the parent form to 0.

Step 2) Add the following code to the form’s “Before Save Code” property:
Since it is possible for users to open the subform in a new window, we also need to do some validation on the subform itself in case a user ends up adding or editing addresses via this method/

var zip = getFormElement('zip_code');
if(zip.length != 10){{
alert('You must enter a ZIP+4 in order to save');
formValid = false;
}}

The above code does the the same thing that the “Before Save Code” from the other form does. The only difference here is that we have direct access to the value entered in the ZIP code field so we use that to validate the form rather than the variable flag.

When put altogether, you will have a custom Client Demographics formset that will warn users at the time of changing a ZIP code field if they are not entering a ZIP+4 and will not allow saving until the ZIP code is fixed.

One Vulnerability

The way that this is setup, the value of our variable is_zip_invalid is changed any time a zip code is updated so if the last zip code altered is valid, all zip codes will be accepted as valid. So for example, let’s say that I edit two zip codes on the form. On the first one, I only put in the 5-digit ZIP code. I get an alert telling me to use the ZIP+4 and my variable gets assigned a value of ‘1’. Next, I close the alert and alter the second ZIP code and this time I enter the ZIP+4. Our code executes to check that the ZIP code I entered here is valid. It sees that it is and assigns our variable a value of ‘0’. The form will successfully save even though I still have a 5-digit zip in the first address that I edited.

More complicated code might be able to do a more thorough job of validating multiple zip codes before save but I haven’t figured that out yet.

How To: Default a Date Field Value Based on Another Date Field

NOTE: THIS POST IS AN UPDATED VERSION OF THIS POST

When working on treatment plans in myEvolv, you will notice that many of the treatment plan component forms contain both a start date and a target completion date.  One of the programs I was building a treatment plan for wanted to have the target completion date on the form but always wanted it to be 90 days from the start date.  Instead of making each clinician calculate 90 days from the start date and fill it in themselves, I used this method to take the date value from the start date and update the target completion date field with a value that is 90 days later.  I will walk you through the JavaScript that I used so that you can make adjustments based on your needs.  The full snippet of JavaScript will be at the end.

two-fields

Where does the code go?

The first consideration is where to put the JavaScript.  In this case, used the ‘On Change Script’ field property on the field that will be modified by the clinician, ‘start_date’.  myEvolv provides us with access to 3 events that we can use to trigger our JavaScript handlers (the code we want to execute):  ‘On Change’, ‘On Click’ and ‘On Load’.  The ‘On Change’ event is fired when the value of the field has been changed.  This is the most suitable event to use in this situation since I do not want the new date value to calculate until there is a value in the first date field.  Furthermore, if a clinician makes a mistake entering the start date, I want the new date to recalculate when the clinician makes an adjustment.  Both of these scenarios are covered when using the ‘On Change’ event.

Get the ‘start_date’

The first line of JavaScript code’s purpose is to get the value that has been placed into the ‘start_date’ field and convert it into a proper JavaScript Date object so that we can manipulate the date easily. I declared a variable named date and set it to be a new Date object passing the value of the ‘start_date’ field as its argument:

var date = new Date(getFormElement('start_date'));

Calculate the ‘target_date’

Now with the date entered by the clinician converted to a Date object, I can perform some calculations on the date using the ‘getter’ and ‘setter’ methods built in to JavaScript Date objects. In my scenario, I need the ‘target_date’ field to be +90 days from the ‘start_date’ so I used the getDate() and setDate() methods:

date.setDate(date.getDate() + 90);

If I wanted to do +3 months instead, I would use the getMonth() and setMonth() methods:

date.setMonth(date.getMonth() + 3);

If I wanted to do +1 year, I would use the getFullYear() and setFullYear() methods:

date.setFullYear(date.getFullYear() + 1);

There are also methods for getting and setting hours, minutes, seconds, and milliseconds, but I am dealing with Date Only fields in this scenario.

Format the ‘target_date’

Now that the date object has my new date stored in it, I need to put that value into the ‘target_date’ field. However, the date in the date object is not formatted in a way that myEvolv’s date fields like so I need to pull the individual date elements from the object and build a string value to place in the date field. I accomplish this first by declaring variables for the month, day and year:

var mm = date.getMonth() + 1;//+1 is needed because in JavaScript Date objects, January is 0
var dd = date.getDate();
var yyyy = date.getFullYear();

Now I declare a new variable called formatted_date and set its value to a concatenated myEvolv-friendly string:

var formatted_date = mm + '/' + dd + '/' + yyyy;

Set the ‘target_date’

setFormElement(‘target_date’, formatted_date);


One Caveat

You may be inclined to disable the ‘target_date’ form field so that clinicians cannot change the value after it has been calculated. I was unable to get that to work, however. When a form field is disabled, it is excluded from being saved so for now it would seem that you have to keep the form field modifiable. If you used this same similar* code in the ‘On Change Script’ property for ‘target_date’, you could prevent the ‘target_date’ from being changed by effectively reverting any attempts at changing the ‘target_date’ manually.

*You will need to also add some JavaScript to validate that the ‘target_date’ has been changed because if you just put this exact same code in the ‘On Change Script’ property for ‘target_date’, you will end up in an infinite loop when ‘actual_date’ is changed on the form and you will crash the browser.

The Full Code

var date = new Date(getFormElement('start_date'));
date.setDate(date.getDate() + 90);
var mm = date.getMonth() + 1;
var dd = date.getDate();
var yyyy = date.getFullYear();
var formatted_date = mm + '/' + dd + '/' +yyyy;
setFormElement('target_date', formatted_date);

How To: Launch Forms from Other Forms

I have found that it is often small things that can make all the difference in how user-friendly our myEvolv processes are. One problem that we ran into with myEvolv was that if you were in the middle of working with a form where you needed to select, say, a collateral but that collateral had not yet been added for the client, you would need to save the form as a draft (if allowed), navigate to the collaterals formset member to add one and then return to the original form to select the collateral. If you have experienced this, then you know how annoying it can be.

My solution to this issue was to add urls to our forms that would launch the collaterals wizard without the need to close the form at all. Users are then able to add collaterals on the fly. This could be used for other relationships like health providers or families and possibly even things outside of the relationships formset. This post will demonstrate how to create a URL form variable to launch the collaterals wizard but you should be able to apply the same steps to other formset members and achieve the same results.

Adjust Your Browser Settings

myEvolv creates popup windows just like any other website by opening a new browser window with it’s own URL. The default browser settings for Internet Explorer allow myEvolv to hide the URL of those popups but we want to examine the URL because we want create our own URL’s to display on our forms that will open the same windows. To make the URL visible on popups:

1) In Internet Explorer, go to Internet Options
2) Click on the “Security” tab
3) Make sure you are in the “Trusted Sites” zone and click “Custom level…”
4) In the “Miscellaneous” section of the “Security Settings”, DISABLE “Allow websites to open windows without address or status bars”
5) Click “OK” and then close Internet Explorer Settings

security-settings

With this setting disabled, you will now see the URL for all popups that myEvolv creates. See the image below for the before (top) and after (bottom).

url-vs-no-url

What’s in a myEvolv URL?

I am interested in getting the URL for the popup window that is created when I go to create a New Manual Event for a Personal Collateral so I pick any client and open the form to add a new personal collateral. The URL for that window is long so let’s break it down and see what we can determine about it. Below, I have the URL and have added a line break before each &

https://myagency.netsmartcloud.com/new_person_form.asp?process_code=COLLATERAL
&form_id=NEW_COLLAT_SEARCH
&parentValue=CA333940-AC8A-4DB0-962D-5E70C6DFB13B
&key_value=
&addAllowed=true
&editAllowed=true
&deleteAllowed=true
&isAmendment=false
&isCompleteScheduledEvent=false
&mode=ADD
&sessionID=309a0ab9-74a9-495f-bb67-9b0789939d57
&data=SERVER
&serviceTrack=EE353446-DEC8-4ECF-81AA-D97CA183B0D5
&event_id={2274E0EF-10D8-4341-A75B-490F7947B922}

We want to keep this URL the same as much as we can but there are some variables we need to identify in here so that we can generate a unique URL for each form instance based on whose client record we are working on. If I just dumped this URL onto a form statically, I would always be creating collaterals for the client whose record I had open when I grabbed this URL along with some other problems. The parts we need to examine more closely are anything with a GUID.

The pieces of this URL that we will need to generate dynamically on our form are

  • parentValue – this is the people_id of the client for whom we would be creating the collateral
  • sessionID – this is the id of your current session. If this is not updated for each login session, the popup window will take you to a myEvolv login screen
  • serviceTrack – this is a client-related id similar to the parentValue

event_id does not need to be changed. I am not sure what it is but the value stays the same no matter which client record so its safe to bet you can keep it static.

Form Design – Adding a URL Variable

On your form, insert a new variable wherever you want it to display on your form. You can name the variable whatever you would like and caption it however you would like. I typically make the field not modifiable so that users can’t make changes to the url that might have an adverse effect. You might also want to shorten the display length so that it looks better on the form.

url-properties

We then need to concentrate on generating the URL string that will be our default value for this variable. For those of you who have not done URL string building, it just involves a lot of string concatenation. We first create a variable and assign it a string value that is equal to the first chunk of static text. Then we concatenate our first variable. Then concatenate the next chunk of string that is static and so on until we have our full url.

The first section of the url that is completely static is https://myagency.netsmartcloud.com/new_person_form.asp?process_code=COLLATERAL&form_id=NEW_COLLAT_SEARCH&parentValue= so the first line of our code will be

var myUrl = 'https://myagency.netsmartcloud.com/new_person_form.asp?process_code=COLLATERAL&form_id=NEW_COLLAT_SEARCH&parentValue=';

Then we need to append our variable for parentValue, which is the people_id of the client whose record we are in. That comes to the current form already loaded in a variable called parentValue so we can just plug that in here

myUrl += parentValue;

Then we can append the next chunk of static url

myUrl += '&key_value=&addAllowed=true&editAllowed=true&deleteAllowed=true&isAmendment=false&isCompleteScheduledEvent=false&mode=ADD&sessionID=';

And now we have to append our sessionID, which is also already loaded into a variable by the same name

myUrl += sessionID;

Then the next static chunk

myUrl += '&data=SERVER&serviceTrack=';

And the serviceTrack variable (again, handily available in a variable already)

myUrl += serviceTrack;

And then the last bit of the url

myUrl += '&event_id={2274E0EF-10D8-4341-A75B-490F7947B922}';

Now that we have our url loaded into a variable, we just need to output it so our final line is simply

myUrl;

url-field-on-form

Full Code Block

***Remember to change myagency at the beginning of the url to match your agency’s url if you are copying and pasting this code.***

var myUrl = 'https://myagency.netsmartcloud.com/new_person_form.asp?process_code=COLLATERAL&form_id=NEW_COLLAT_SEARCH&parentValue=';
myUrl += parentValue;
myUrl += '&key_value=&addAllowed=true&editAllowed=true&deleteAllowed=true&isAmendment=false&isCompleteScheduledEvent=false&mode=ADD&sessionID=';
myUrl += sessionID;
myUrl += '&data=SERVER&serviceTrack=';
myUrl += serviceTrack;
myUrl += '&event_id={2274E0EF-10D8-4341-A75B-490F7947B922}';
myUrl;

Troubleshooting Tip

You can see the results of your concatenation in the URL variable on the form so if you keep it modifiable and give yourself a generous display size, you can check to see where you might have left pieces out by mistake.

launching-form-url

Quirky Behavior

If you built your URL string correctly, you should launch the Add Collateral window from your form. One thing I have noticed is that after you fill out the form and hit save, the form does not close or give any indication that the collateral had been added successfully. One challenge in getting the form to behave any different is that these forms are system not-modifiable so we don’t have the ability to go in and add a window.closeAfterSave = true snippet to them. Users must be trained to close the window manually after they have saved the form without triggering an error for things like blank required fields.

Tips and Tricks: Two Methods for Finding a GUID

In a previous post I used Crystal Reports to find the GUID associated with a program in my tables. Since Crystal Reports is not an option for everyone, I thought I would share two methods that everyone has for discovering the GUID of a picklist item in myEvolv.

Method 1: Form Field Manipulation

If you are trying to determine the GUID value for a picklist field, you can make a quick change in the for designer to expose the GUID.

In this example, I am going to try to figure out the GUID for my Preschool – Classroom program. On the form below, I have the program_providing_service field which uses the “Program Listing – All” lookup table. I have selected ‘Preschool – Classroom’ on the form and will save the form with this value.

program providing service field as foreign key

Next step is to go to the form designer and edit this form. The program_providing_service field on the form is a Foreign Key field and it is associated with a lookup table. This accounts for how it displays on the form as a picklist field where instead of seeing the GUID of the program providing service, you see its description value from the lookup table.

program providing service field properties

If we change the Display Type Code of the field to Regular String and clear the value for the lookup table, the Program field will display on the form as a text field and expect the user to type in a GUID. However, on forms where the value already has been entered and saved, the value will display as the GUID of the item selected. So we will change the Display Type Code to Regular String and then Save the form.

Upon re-opening the saved event from before, we see the GUID of ‘Preschool – Classroom’ program displayed in the Program column. Once you have your GUID, you can revert the changes made to the form.

program providing service displayed as guid

Method 2: Data Insight Report

This method requires a little knowledge about the tables in myEvolv but works when you can’t edit the form to use method 1.

Navigate to Reports >Data Insight Report Writer >Custom Reporting >Custom Reporting

Click Configuration then Click “Create a new virtual view”

Give your virtual view a name and friendly name and then use a simple SQL statement to get everything from the table that contains GUID. In my example, I am looking for everything from the program_info table because that is where all of the programs are kept. user_defined_lut contains all of the user defined lookup table values combined together.

So I will use SELECT * FROM program_info

virtual view

Save the view and then click “Report Management” and click “Add”. Select “Tabular Report With Header”

Select your virtual view as the data source and click “OK”.

In the Report designer, add the Primary Key Column (in this case program_info_id) – it is usually the one with the same name as the table and then _id at the end.
Also add the description column – in some cases this column might have a different name – for my example, the column I want is program_name.

At the bottom of the screen, you will see a preview of your report with the GUID and the Description so that you can tell which GUID belongs to which item.

report results

How To: Carry Referral Source and Referral Reason Forward on Intake from Accepted Referral

This post comes from a reader request. The scenario she was facing is that when a referral is created in myEvolv, you must enter a referral source and a referral reason on the form. When you go to perform an intake from the referrals, this information is not pulled into the client record. She wanted to have the Referral Source and Referral Reason fields on the client initial enrollment AND also have those fields pre-populate with the options that were selected on the referral.

Intake Form Setup

The Initial Enrollment from Accepted Referral form is in the Agency Intake form family. Agency intake events are not user modifiable so we have to modify the system form to add the fields for Referral Source and Referral Reason.

Referral forms use the refrerrals_to_agency table and the intake forms use the service_track table, so we will need to add new database fields to the intake form to hold our Referral Source and Referral Reason values. We will set them up just as they are on the referral form, using the same picklist and and dependencies.

Referral Source

We add a new database field called udf_referral_source and give it the following attributes:
Data Type: Foreign Key ID
Foreign Key Column: group_profile: group_profile_id
Look-up Table Used: Referral Source – Referral In
Formset to call: Outside Organizations Stand Alone
Depends On: Agency

Referral Reason

We add a new database field called udf_referral_reason and give it the following attributes:
Data Type: Foreign Key ID
Foreign Key Column: referral_reason: referral_reason_id
Look-up Table Used: Referral Reason Table

Default Values

At this point, the intake form has a place to store the referral source and referral reason but the user would have to manually re-select those values, which is a pain and also error-prone. We know the information is in the referrals_to_agency table, so we can use the getDataValue() form function to obtain the data but how do we know which row to select.

When you perform a client intake from accepted referral, the intake event “belongs to” the referral made event. The referral made events are the subform entries for Program Recommendations on the Referral form. In turn, those referrals made events “belong to” the referral form that houses the referral source and referral reason data we need. Once you have selected the accepted referral from which you are completing the intake, myEvolv sends a belongs2Event parameter to the intake form so that when the intake is saved, the intake is linked to the parent referral made. That value is equal to the event_log_id of the referral made event, which means we can plug it into the getDataValue() form function to get the value that referral made event’s parent event_log_id and then use that value to return the referral source and referral reason values.

referral-form-explanation

Referral Source

We use this code in the Default Value attribute:
var parent = getDataValue('event_log', 'event_log_id', belongs2Event, 'belongs_to_event');
getDataValue('referrals_to_agency', 'event_log_id', parent, 'referral_source');

Referral Reason

We use this code in the Default Value attribute:
var parent = getDataValue('event_log', 'event_log_id', belongs2Event, 'belongs_to_event');
getDataValue('referrals_to_agency', 'event_log_id', parent, 'reason_id');

Explanation of Code

First we use the belongs2Event value that is passed to the intake form from the referral made event so that myEvolv can properly link the two events in the tables. We use that value to get the event_log_id of the referral made event’s parent event which is the referral event using the form function getDataValue()

We then use referral event’s event_log_id to get the value of the referral source and referral reason fields on that referral event again using getDataValue()

Conclusion

With this setup in place, when you perform an intake from accepted referral, the referral reason and referral source from the related referral should be on our intake form. Note that this setup enters duplicate data to what is on the referrals_to_agency table into your service_track_x table. If we wish to avoid saving duplicate data to the database, we can setup the new fields on the Intake form as variables instead. This will allow us to display the referral source and referral reason on the intake form when it is opened in myEvolv but no data from the variables will be saved to tables when the intake is saved.

How To: Use a Default Value on a Progress Note

EDIT 8/3/2018: Reader Rosemary asked about using text templates in conjunction with this code rather than including the raw HTML in the JavaScript code. Indeed there is a way to do that, so I have included that method at the bottom of the post. Reviewing the post also exposed that my code had a syntax error so I fixed that. Thank you, Rosemary!

Progress notes in Evolv are system fields in myEvolv that have special properties that make them particularly useful in certain situations. For example, the Progress note field is included in many of the views available to subreports so being able to use the progress note column on a form allows the data contained therein to be fed back on other forms via subreport.

Unlike other form fields, however, you do not add a progress_note field to your form in the form designer. Instead, you add the progress note in the Event Setup area by checking the “Has Single Note” checkbox.

has-single-note-checkbox

Just like with the Service Related Encounter Information that I addressed in another post, checking this checkbox will append fields to your form at the time that the event is launched. Unlike the Service Related Encounter Information, however, there is no way to add the progress note field to your form in the form designer so that you can manipulate its attributes. It is therefore tricky to set a default value for the progress note, but not impossible. The following guide will show how you can use jQuery and the form header attributes to simulate the use of the default value attribute on a progress note field. This can be useful for defaulting in a template when you know only one template would be used and you want decrease the risk that the clinician forgets to apply the template.

How Memo Fields Render

One of the things that makes manipulating a Memo field more difficult in myEvolv is that they are a much more complex field being rendered on the form. With a custom_string type of field, for example, there is just a label/caption and an html input field so you can use some pretty basic javascript to get and set the value of the field or use some of the formfunctions.js functions to get or set the form elements.

Memo fields, on the other hand, have their own menus for manipulating the formatting of the text and spellcheckers, etc. When you are dealing with a Memo field, you are actually dealing with an iframe element that contains a series of div elements that hold those buttons and then finally, buried deep in the iframe you will find a div with the id of “Composition”. That is where the text value of the memo resides.

Further complicating things is the fact that unlike other types of fields that you can easily target by column name, Memo fields must be targeted by their id, which is the GUID that represents their form_lines_id.

Accessing the Text Value of a Memo Field

To target the divelement that contains the text value of your memo field, you must turn to jQuery and use the following code:

var memo_text = $(form_lines_id).contents().find('#Composition').html();

Since the Progress Note field is a system column that has existed for a long time, it has the same form_lines_id in everyone’s system, so to get the memo text of a Progress Note memo field, plug in the form_lines_id:

var memo_text = $('#BFE6BE66-7983-4C3B-8374-1606E7D909A5').contents().find('#Composition').html()

Explanation of Code

var memo_text =
This creates a variable called “memo_text” that will hold the value of the memo field we target.

$('#BFE6BE66-7983-4C3B-8374-1606E7D909A5')
This targets the element on the form that has and id of ‘BFE6BE66-7983-4C3B-8374-1606E7D909A5’, which is the progress note’s iframe. If you want to target a different memo field, you will need to determine the form_lines_id of that field and plug it in here.

.contents()
This gets all of the contents of the iframe targeted above.

.find('#Composition')
This searches the contents above for an element with an id of “Composition”. This is the element that contains the Memo field’s text.

.html()
This gets the html value contained inside the “Composition” div targeted above. We use the html() method because this will preserve the rich text formatting that has been applied to the text in the box.

Setting the Value of the Progress Note

You can set the value of the progress note field with very little changes to the above code. if I want to set the text inside the progress note to “Hello”, I use this code:

$('#BFE6BE66-7983-4C3B-8374-1606E7D909A5').contents().find('#Composition').html('Hello');

Since we are using the html() method, you can insert HTML markup with your text, which is what will allow you to insert a nice template. Remember that you have to escape your >’s and <‘s

Replicating the Default Behavior

Using the code above, we are able to manipulate the text inside the Memo field with On Change and On Click events on the loaded form just fine, but what can we do if we want to default a specific value into the progress note field when the form loads?

We can use the code above to set the value but we need that code to fire AFTER the form has been loaded. Fortunately, there is an attribute on the form called After Load Code that we can use as the trigger for this code.

after-load-form-attribute

But, it’s not as simple as just dropping the code in there because while the code in this field will fire after the form loads, it does not necessarily fire after the memo field iframes are loaded. it is therefore necessary to wrap the code in a javascript setTimeout() function.

setTimeout(function(){$('#BFE6BE66-7983-4C3B-8374-1606E7D909A5').contents().find('#Composition').html('Hello');}, 5000);

The setTimeout() function takes two arguments. The first is the code that you want to execute. In the example above, I wrapped the code into an anonymous function. The second is the number of milliseconds it should wait before executing the code. In my example, I set the timer for 5000 milliseconds or 5 seconds. You can tweak this number as desired to achieve what you want it to do. With this code in place in the After Load Code attribute of the form, 5 seconds after the form loads, ‘Hello’ fills in on the progress note field.

Using A Text Template

You can use a text template in myEvolv to make this all a little easier, especially when it comes to formatting your progress note text. Create your default text in the text templates area of myEvolv.

Then within the setTimeout function, before the line of code that sets the progress note html, add the following line of code:

var myTextTemplate = getDataValue('text_template', 'description', '<text template description>', 'template_text');
where <text template description> is the description you have given your text template (beware of special characters). This line of code will grab your text template, then you can just use the variable you just created in the html() method.

Here’s what the final code would look like if you wanted to use your Incident Narrative text template.

setTimeout(function(){
var myTextTemplate = getDataValue('text_template', 'description', 'Incident Narrative', 'template_text');
$('#BFE6BE66-7983-4C3B-8374-1606E7D909A5').contents().find('#Composition').html(myTextTemplate);
}, 5000);

How To: Calculate Units Based on Duration

Many programs bill for units that are calculated based on duration. For example, programs may bill where 1 unit = 15 minutes of service time. The myEvolv Finance module handles those calculations to generate an accurate claim based on the duration entered in the service documentation but there may be times when you would like the calculated units to display on the form itself. There are no system form fields that do this for you but you can calculate the value with JavaScript and put it into a custom string field for display on the form.

calculated-units-form-fields

Duration Fields

The first step is to obtain the value in the duration field and we want to do this every time the duration changes on the form so in the On Change code for the duration field, we will use the following code:

var dur = getFormElement('duration');

Duration fields have masked inputs. When you put in ’30’, the myEvolv converts that to 00:30. When you put in ’90’, myEvolv converts it to 01:30. Therefore when you go to retrieve the value in the field, you are given an HH:MM string. The first task in calculating units is to convert this value back to an integer representing the number of minutes.

Split the String

We know the mask for the time is HH:MM so all we need to do is break the string into hours and minutes. We can do this using JavaScript’s split method:

var a = dur.split(':');

Here we have created a new variable that is an array containing hours and minutes. If the initial input was ’02:45′, a is now equal to an array that looks like this:

('2', '45')

Calculate Minutes

Now we have to perform a little math to get the number of minutes.

var mins = (+a[0] * 60 + (+a[1]));

Here, we take the hours in a and multiply that by 60 to get the number of minutes and then add it to the minutes in a. The ‘+’ signs tell JavaScript to cast the values in the array as numerical values so that math can be performed on them. Remember that the value we got from the duration field was a string.

Calculate Units

For the sake of this example, we will use 15 minutes = 1 unit. We simply need to divide mins by the number of minutes that makes 1 unit to get the number of units. However, there is one tricky bit. Often these billing scenarios do not allow for the billing of partial units. That means if the duration is ’00:35′, we want to calculate 2 units, not 2.333333333 units. So in addition to the division, we will also use JavaScript’s Math.floor method so that partial units are rounded down to the nearest whole.

var units = Math.floor(mins / 15);

If you need to calculate a different unit formula, you can do that by changing the number of minutes. For 1 hour = 1 unit, you just make the ’15’ into a ’60’.

Set the Units Value

Finally, we just need to put the calculated units into our units field. I am using a custom string type field.

setFormElement('udf_calculated_units', units);

With this code in place for the On Change event on the duration field, the correct number of units should calculate into the udf_calculated_units field whenever the duration value changes.

Full Code Block

var dur = getFormElement('duration');
var a = dur.split(':');
var mins = (+a[0] * 60 + (+a[1]));
var units = Math.floor(mins / 15);
setFormElement('udf_calculated_units', units);

How To: Add Additional Links to Formsets on a Form

When you setup a service form in myEvolv, the Link to Person is usually setup in such a way as to make the name display as a link on the form. Users can then click the link and it will take them to a formset where they can look up additional information about the client or complete additional tasks related to the client.

link-to-person

There may be times when you want to add more than one link to a formset on a single form.

If you look at the Link to Person field in the form designer, you will see most of the setup that is required to create these links.

link-to-person-properties

Here, the people_id column is used to get the GUID for the client. Instead of just displaying that GUID, the All People Table is associated with the field. That renders the client’s name instead of the GUID. Then the Client Information Screen is used as the Formset to call. That renders the name as a link that opens the Client Information Screen when clicked.

Setting up another link might seem to be as easy as copying this setup on another field, but you quickly run into a couple hurdles that must be cleared.

Duplicate Fields

You cannot have the people_id column on your form twice so you need another way to add a link to the individual. Fortunately, myEvolv has a way to work around this using variables.

Variables are useful in this situation because we do not need the data stored in it to be saved to the database. We just want to hold some data while the form is rendered in the browser that will allow us to create the link and use it. We could go about this by creating a user-defined field that would be of foreign-key type and store a duplicate people_id GUID, but that would be overkill just to generate the link and clutter the database with redundant information.

When you create your variable, you can set it up similar to how you would set up a user-defined field.

In this case, you want the Data Type to be Foreign Key ID. You can use the All People Table as your Look-Up Table Used. Finally, you can choose the different Formset that you wish to call from this link to the person.

second-link-to-person-variable-properties-1

Default Value

If you saved your form at this point and tried it out, you would notice that your new variable field is empty and if you left it modifiable, you would need to select your client to get the link. That’s because we need to give the variable a default value.

The people_id field has some automatic default value functionality based on the fact that you are entering the event from a client’s record. myEvolv is setup to default some fields automatically based on the service track information – things like client, program and facility will fill in automatically when entering services from the Service Entry area because based on which program band and the client’s facility placement information, myEvolv is able to determine what the default value should be.

Our variable, on the other hand, has no such built-in functionality and so we must explicitly provide it with a default value to pre-populate.

To provide a default value in this case, simply put parentValue in the Default Value property of the variable. parentValue is equal to the selected client’s GUID and it is the value that people_id uses behind the scenes to pre-populate itself.

Now when you open your form from service entry, it should look something like this:

second-link-to-person

Each link to person opens a different formset.

Tips & Tricks: Use Images in Memo Fields

The following post outlines how to use images in memo fields as was shown in my presentation at CONNECTIONS2016.

memo-field-after-save

Memo fields in myEvolv are unique because they are rich text fields. This means that they will retain any markup that is done to them so that you can do things like change the font size and underline text that is being input into the field. When you are changing the formatting of the fields, HTML markup is being applied to the text behind the scenes. Because of this fact, we can use other HTML tags in a Memo field and have the browser render them just like it renders the rest of the webpage. One place where this can be useful is in adding images to treatment plans for individuals with intellectual and developmental disabilities.

With the Memo fields, you can just enter the HTML markup in the field itself and after saving, you will see the result. The challenge is therefore not in manipulating myEvolv to allow HTML but rather figuring out a way for clinicians who are not web developers to use pictures in their treatment plans.

Form Setup

There isn’t a lot to setting up the form but you have to keep this in mind: When you setup a text template, you must designate the table and columns for which the template will be available. In my agency’s case, the treatment plan had three fields where we wanted to use images: Likes/Interests, Dislikes/Fears, and Strengths/Skills. Each of these has it’s own user defined Memo field so that other programs using the progress_note field would not have the option of choosing one of my image text templates. It was also important to separate them so that someone didn’t accidentally put an image from the wrong category into the wrong field.

Note: If you setup a new Memo field before you setup the text templates for it, the template button on the Memo field may be disabled. You can fix that by making a change to the form so that it rebuilds the Form XML or run the Create Forms XML utility to awaken the button once a text template is linked to the field.

Preparing the Markup

The first step is to find the image that you want to use. The image needs to be on a web server somewhere because you are going to link to it rather than upload it. Ideally, your agency would set one up so that you could be sure the images that you use won’t ever disappear from the internet, leaving your old plans with broken image links. If that is not an option, you can use images from anywhere on the web. You will need the URL for the image itself. You can get that by finding an image on a website, right clicking it and selecting “Open Image in New Tab” or a similar option, depending on browser. Then you simply put the url into an img tag:

<img src='http://blog.corbinet.com/wp-content/uploads/2016/10/bunny.jpeg' />

bunny

The image tag that I created above will render an image is that is 543 pixels wide… too big for my plan, so I need to add some CSS styling to the image tag to make it smaller. Again, if you are hosting your own images, you could just make the raw image the size that you want and avoid this step. Another thing that I wanted to do is have the pictures site next to one another if I put multiple in a row so I am going to have the images styled to display inline.

<img src='http://blog.corbinet.com/wp-content/uploads/2016/10/bunny.jpeg' style='width: 150px; display: inline' />

bunny

You can add other styling as you see fit using inline CSS.

Setting up the Text Template

text-template-setup

Give your text template a descriptive name since this is all the clinician will see in the list of templates when they must choose.

At the bottom, link your template to the correct table and column that you setup on your form.

For the template text, you will enter the img tag that you created. Note: I have found that you cannot type this img tag into the field because it will begin to add markup to the url that you are using for the src and that breaks the image. Instead you must paste the img into the Template Text field and save without making any changes.

If you have entered syntactically correct HTML, after saving, you should see the image and not the text:

text-template-saved

If you see this, then you need to start again:

text-template-broken-image

When you revisit the Text Templates area in the future, you may or may not seethe image rendered in the list of text templates but you should when you open a text template for editing or viewing.

Applying Text Template in Memo Field

When the clinician goes to add the image to the Memo field, they can select the text template that contains the image. Unfortunately, when they select the text template, they will see the markup that will render the image once the form has been saved and not the image.

memo-field-before-save

After saving, the image should appear. You can also add text in the same field to label the pictures or explain them.

memo-field-with-captions

How To: Make a Field Required Based on Client Age

I haven’t yet figured out a great way to only toggle the required attribute for a form field so the typical workaround for a conditionally required field to be used on a form is to toggle the form field to be required all of the time but enable or disable the field based on the condition you want. myEvolv ignores disabled fields when it goes to save, even if they are required so you can get most of the functionality you would want in this way. The one scenario you don’t get is if you want the field to remain enable but no longer be required. That’s where being able to have a ‘required rule’ attribute in the form designer would be nice. I am not convinced that there isn’t a way to do this through some clever JavaScript but I haven’t had the opportunity to try anything out yet.

Form Setup

The nice thing about this approach to the problem is that you don’t need to add any additional information to the form itself. A lot of the disable rules that you might learn will involve checking the value of other fields on the form. In this case, we are going to use a form function to check a value in the database behind the scenes.

All you need to do then is setup the field that you want to make required. Be sure to check “Required” for the form field.

required-form-attribute

Disable Rule

The key to using the Disable Rule attribute in the form designer is that you have to put in a conditional statement that will resolve to true when you want the field to be disabled. It’s somewhat counterintuitive but basically true = disabled and false = enabled.

For this example, we want to figure out if the client is under the age of 18. If the client is under the age of 18, we want to enable the field and require that the clinician enter some data. If the client is over 18, we want to disable the field. So our statement should look something like this:

[[client_age]] > 18

If [[client_age]] is under 18, the statement resolves to false, so the field will be enable. If the client is over 18, the statement resolves to true and the field will be disabled. Now we just need to get the client’s age.

The getDataValue Form Function

One of the JavaScript form functions that myEvolv has included in it is the getDataValue() function. It is used to get a value from a column in the database based on the value of another column in the same table. It takes five arguments, one is an optional conditional statement that we will not get into here. For our purposes, we need to supply it with 4 things:

  1. the table we want to get data from
  2. the column we will match on
  3. the column value we will match on
  4. the column value we want returned

myEvolv has a view called the client_personal_view which contains a calculated column for the client’s age, so the work of calculating an age has been done for us already.

So to get the age of the client we are entering a service for, we call the function like this:

getDataValue('client_personal_view', 'people_id', keyValue, 'age')

Here we are saying, get the value in the age column from the client_personal_view table in the row where the value of people_id column is equal to client_id of our current client. keyValue is a variable that myEvolv creates to hold the client_id when a service event is launched so we can use that in our JavaScript here instead of getting the value from the people_id form field, though that is also a valid option.

The full code for our disable rule is now:

getDataValue('client_personal_view', 'people_id', keyValue, 'age') &gt; 18

Remember, the “>” and “<" signs are special characters so we have to use the ascii codes or else you will throw an error when the form loads in myEvolv.

We are using cookies on our website

Please confirm, if you accept our tracking cookies. You can also decline the tracking, so you can continue to visit our website without any data sent to third party services.