
JavaScript Fundamentals: String Concatenation

In my CONNECTIONS2019 presentation, I showed how I use SSRS to create “Pretty Print” versions of myEvolv Treatment Plan components to use as a handout for treatment plan meetings that can be accessed by clicking a URL variable on the treatment plan itself. Several people asked me to share the method and specifically how to do the JavaScript string concatenation, which can be used in many other places.

JavaScript Strings

In JavaScript, strings are any text characters inside of a single or double quote.

var myString = "Hello world.";

You can use concatenation to “glue” strings together. In JavaScript, the concatenation operator is + , just like adding numbers together.

var string1 = "Hello world.";
var string2 = "How are you?";
var newString = string1 + string2;

The value of newString would be Hello world.How are you? Notice that There are no spaces between the sentences because I didn’t include them in the strings.

If you have added a URL variable to a form, you have already used a JavaScript string because you probably entered a default value like this:

'http://www.example.com'

This created a static URL that will always point to example.com every time the form is opened in myEvolv. Using JavaScript variables and string concatenation, you can create dynamic URLs that will be unique to a client, event, staff, or any other things you can come up with and these can be very useful for making myEvolv more user-friendly and effective.

“Pretty Print” Reports

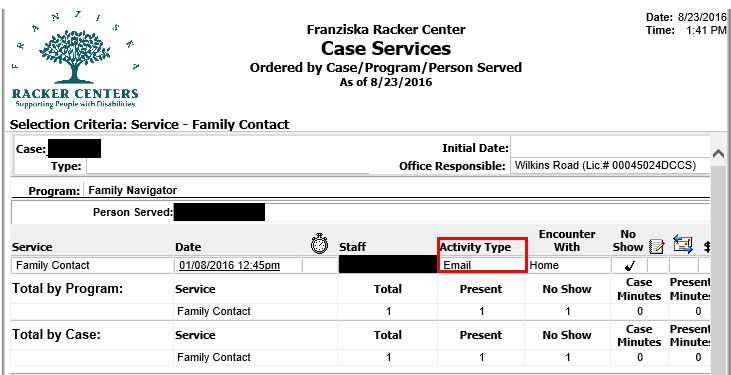
At my agency, we find that the default printouts for things like Treatment Plans are long and difficult to read, especially for people who are not using myEvolv day-to-day. When treatment teams get together to meet about the treatment plan with the client and family members, we were printing copies of the treatment plan to share at the meeting.

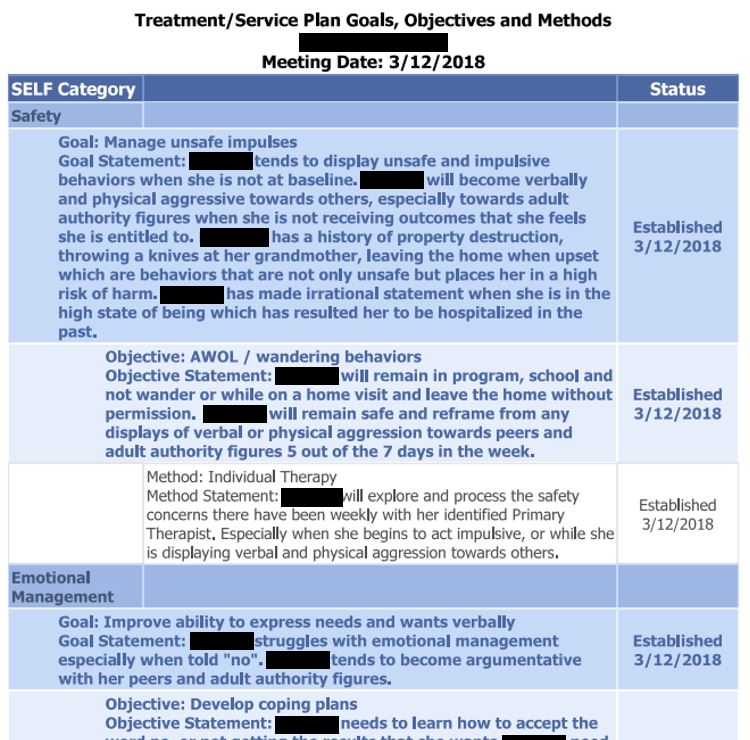
Through meeting with the staff in those meetings, we determined that the main focus was to use these printouts to review the component pieces of the treatment plans, so why not come up with a way to just generate a one-page print-friendly list of Goals, Objectives and Methods from the current plan?

I was able to accomplish this using our SSRS Report Server by creating a report that would pull in all of the service_details for a specific plan and displaying them neatly.

Example of “Pretty Print” report

The SSRS Web Portal would allow staff to access the report where I could have added parameters that would allow the staff to lookup a client and select the plan they were looking to print this report for. But it would be easier if they could just click a link and have the report generate for the plan they clicked the link from automatically.

Dynamic URL to SSRS Report
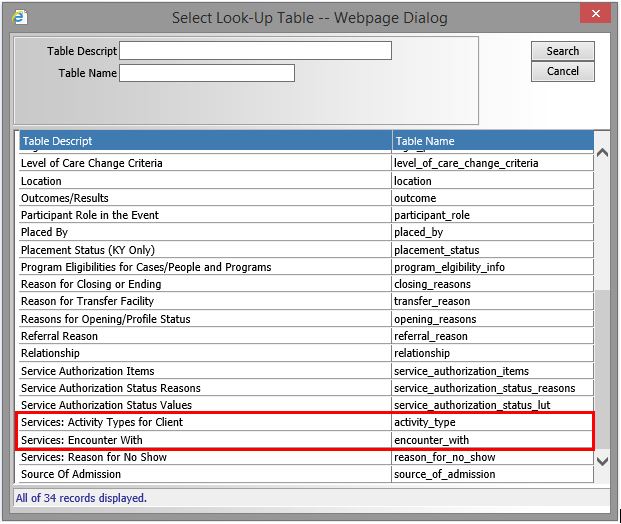
Query Strings

SSRS allows you to pass report parameters through query strings. You may have seen these in web URLs that you have browsed:

http://www.example.com/search?search_term=balloon%20animals&limit=20

The first section of the URL directs you to a search endpoint

http://www.example.com/search

The ? starts the query string and then the parameters and their values are listed. In this case, the search_term is “balloon animals” and we only want it to return (limit) 20 results.

We can do the same thing with SSRS. In the case of this Pretty Print example, I only need one parameter, event_log_id. My query includes a WHERE clause

WHERE event_log.event_log_id = @event_log_id

This creates a parameter called event_log_id that the report is expecting in order to run.

The event_log_id of the Treatment Plan is on the treatment plan so we can use string concatenation to glue the report endpoint and the parameter name to a variable on the plan that holds the value of the event_log_id.
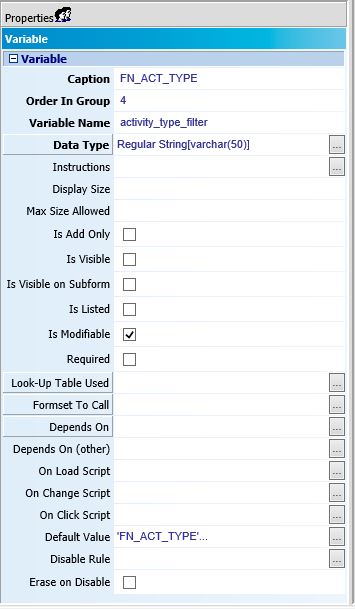
URL Variables

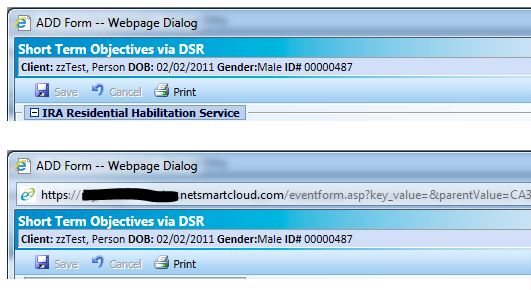
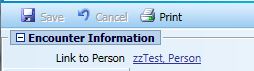
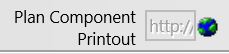
The URL form field type is used to create a clickable button on a form that will launch a new web browser window pointed to the URL value of the field.

You could add the field as a user-defined field and that might make sense if you are doing something like collecting a URL from someone. For example, if you wanted to get the website of an organization. In that case, you want to store the URL in the database.

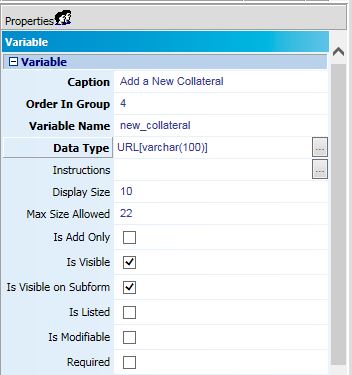
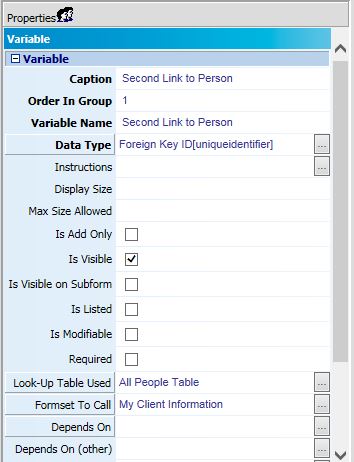
In this situation, however, we don’t need to store anything in the database. We just want to generate the URL and create the button every time an event is opened, so a variable is perfect in this case. I added mine like this:

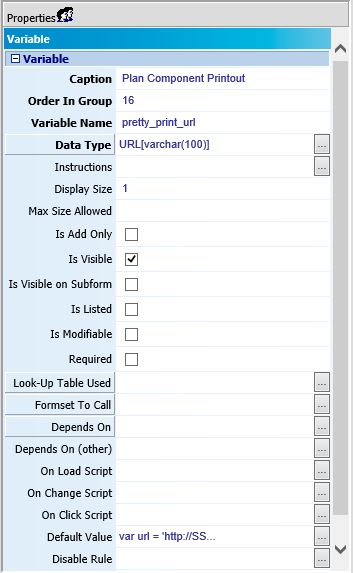
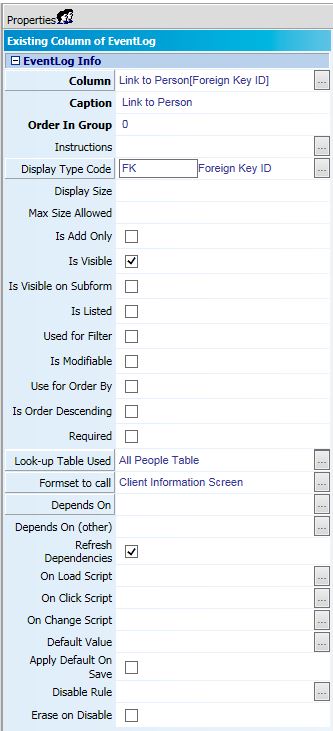
The URL field displays the URL in a ext box and then has a clickable globe icon to the right of it. I don’t like to display the url itself because they can sometimes be very long and look terrible so I put 1 in display size. That still shows the first few characters of the URL but that’s the smallest you can get it. As of this writing, the display size does not seem to effect how it looks in NX. I also make my URL variables not modifiable.

Default Value

Now for the JavaScript. We have our SSRS Web portal setup to work on the agency Network only so the url is

http://ssrs:8080/reports

The specific report I have created is located in the Pretty Print Reports directory and is called Plan Components:

http://ssrs:8080/reports/report/Pretty%20Print%20Reports/Plan%20Components

The %20 all stand for spaces

I also know that I have one parameter, event_log_id, so that is going to be a static part of the url:

http://ssrs:8080/reports/report/Pretty%20Print%20Reports/Plan%20Components?event_log_id=

And now all I have to do is concatenate the event_log_id to the end of the url and I will have my link. myEvolv stores the event_log_id of any given event in the variable keyValue, so I can just use that. So in the default value for the URL variable, I will use the following code:

var url = 'http://ssrs:8080/reports/report/Pretty%20Print%20Reports/Plan%20Components?event_log_id=';
url += keyValue;
url;

Explanation: I created a variable called url and gave it the string value of the static portion of my report URL. Then I concatenated the event_log_id of whatever event the form opens with to the end of the string using the myEvolv variable keyValue.

The url variable now holds a value like:

https://ssrs:8080/reports/report/Pretty%20Print%20Reports/Plan%20Components?event_log_id=2542C1F3-2D25-4840-97B3-A17C86652E9F

In the last line, I simply output the value of url, which becomes the default value of the URL variable.

One More Brief Example

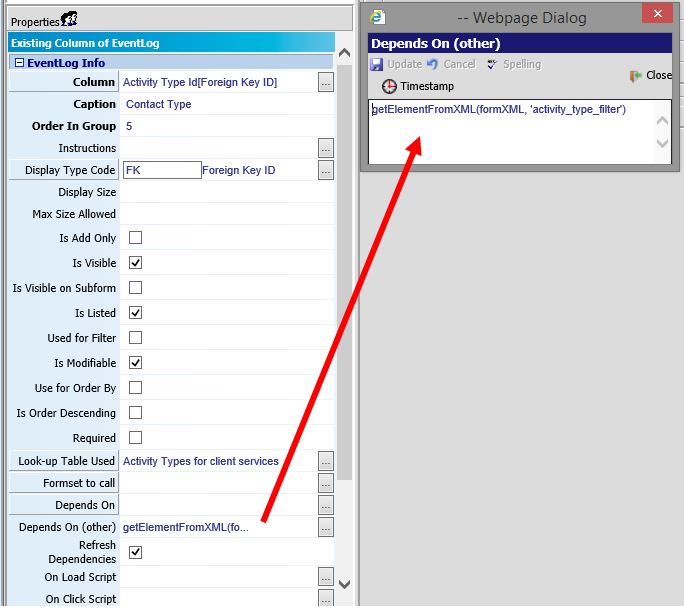
To give an idea of a slightly more complicated string concatenation for a URL variable, another place where I use this is on our Monthly Summary events. I have created a dynamic URL variable that will launch an SSRS report where the parameters are the client’s people_id and then a date range. The SSRS Report then pulls in the specified daily notes for that client between those dates so that the summary writers can easily review the months’ activities.

Here’s the code for the default value:

var url = 'http://ssrs:8080/reports/report/Raise%20the%20Age%20Reports/Action%20Step%20Specific%20Notes?people_id=';
url += getElementFromXML(formXML,'people_id');
url += '&start_date=';
url += getElementFromXML(formXML,'udf_summary_start');
url += '&end_date=';
url += getElementFromXML(formXML,'udf_summary_end');
url;

This is pretty similar to the first example but a few difference. One, instead of using a myEvolv variable, I am just concatenating values from the form directly to the string: people_id and two user-defined date fields, udf_summary_start and udf_summary_end.

I am using getElementFromXML() to get the value from the form’s definition rather than the rendered form elements. This works well when you have default values in the form. If you do not, then those values may be null until filled in on the form.

In that case, you might want to go a different route and use similar code to the On Change field of every form element that is used in the URL with t

var url = 'http://ssrs:8080/reports/report/Raise%20the%20Age%20Reports/Action%20Step%20Specific%20Notes?people_id=';
url += getFormElement('people_id');
url += '&start_date=';
url += getFormElement('udf_summary_start');
url += '&end_date=';
url += getFormElement('udf_summary_end');
setFormElement('monthly_summary_report_url', url);

***In this example, my URL’s variable name is monthly_summary_report_url

What this does is any time the client is switched on the form or the start and end dates are changed, a new URL is generated and entered into the URL variable as the value.

In either case, you can see that I am alternating between concatenating static parts of the query string with they dynamic parts to make a more complicated query string.

How To: Launch Forms from Other Forms

I have found that it is often small things that can make all the difference in how user-friendly our myEvolv processes are. One problem that we ran into with myEvolv was that if you were in the middle of working with a form where you needed to select, say, a collateral but that collateral had not yet been added for the client, you would need to save the form as a draft (if allowed), navigate to the collaterals formset member to add one and then return to the original form to select the collateral. If you have experienced this, then you know how annoying it can be.

My solution to this issue was to add urls to our forms that would launch the collaterals wizard without the need to close the form at all. Users are then able to add collaterals on the fly. This could be used for other relationships like health providers or families and possibly even things outside of the relationships formset. This post will demonstrate how to create a URL form variable to launch the collaterals wizard but you should be able to apply the same steps to other formset members and achieve the same results.

Adjust Your Browser Settings

myEvolv creates popup windows just like any other website by opening a new browser window with it’s own URL. The default browser settings for Internet Explorer allow myEvolv to hide the URL of those popups but we want to examine the URL because we want create our own URL’s to display on our forms that will open the same windows. To make the URL visible on popups:

1) In Internet Explorer, go to Internet Options
2) Click on the “Security” tab
3) Make sure you are in the “Trusted Sites” zone and click “Custom level…”
4) In the “Miscellaneous” section of the “Security Settings”, DISABLE “Allow websites to open windows without address or status bars”
5) Click “OK” and then close Internet Explorer Settings

security-settings

With this setting disabled, you will now see the URL for all popups that myEvolv creates. See the image below for the before (top) and after (bottom).

url-vs-no-url

What’s in a myEvolv URL?

I am interested in getting the URL for the popup window that is created when I go to create a New Manual Event for a Personal Collateral so I pick any client and open the form to add a new personal collateral. The URL for that window is long so let’s break it down and see what we can determine about it. Below, I have the URL and have added a line break before each &

https://myagency.netsmartcloud.com/new_person_form.asp?process_code=COLLATERAL
&form_id=NEW_COLLAT_SEARCH
&parentValue=CA333940-AC8A-4DB0-962D-5E70C6DFB13B
&key_value=
&addAllowed=true
&editAllowed=true
&deleteAllowed=true
&isAmendment=false
&isCompleteScheduledEvent=false
&mode=ADD
&sessionID=309a0ab9-74a9-495f-bb67-9b0789939d57
&data=SERVER
&serviceTrack=EE353446-DEC8-4ECF-81AA-D97CA183B0D5
&event_id={2274E0EF-10D8-4341-A75B-490F7947B922}

We want to keep this URL the same as much as we can but there are some variables we need to identify in here so that we can generate a unique URL for each form instance based on whose client record we are working on. If I just dumped this URL onto a form statically, I would always be creating collaterals for the client whose record I had open when I grabbed this URL along with some other problems. The parts we need to examine more closely are anything with a GUID.

The pieces of this URL that we will need to generate dynamically on our form are

  • parentValue – this is the people_id of the client for whom we would be creating the collateral
  • sessionID – this is the id of your current session. If this is not updated for each login session, the popup window will take you to a myEvolv login screen
  • serviceTrack – this is a client-related id similar to the parentValue

event_id does not need to be changed. I am not sure what it is but the value stays the same no matter which client record so its safe to bet you can keep it static.

Form Design – Adding a URL Variable

On your form, insert a new variable wherever you want it to display on your form. You can name the variable whatever you would like and caption it however you would like. I typically make the field not modifiable so that users can’t make changes to the url that might have an adverse effect. You might also want to shorten the display length so that it looks better on the form.

url-properties

We then need to concentrate on generating the URL string that will be our default value for this variable. For those of you who have not done URL string building, it just involves a lot of string concatenation. We first create a variable and assign it a string value that is equal to the first chunk of static text. Then we concatenate our first variable. Then concatenate the next chunk of string that is static and so on until we have our full url.

The first section of the url that is completely static is https://myagency.netsmartcloud.com/new_person_form.asp?process_code=COLLATERAL&form_id=NEW_COLLAT_SEARCH&parentValue= so the first line of our code will be

var myUrl = 'https://myagency.netsmartcloud.com/new_person_form.asp?process_code=COLLATERAL&form_id=NEW_COLLAT_SEARCH&parentValue=';

Then we need to append our variable for parentValue, which is the people_id of the client whose record we are in. That comes to the current form already loaded in a variable called parentValue so we can just plug that in here

myUrl += parentValue;

Then we can append the next chunk of static url

myUrl += '&key_value=&addAllowed=true&editAllowed=true&deleteAllowed=true&isAmendment=false&isCompleteScheduledEvent=false&mode=ADD&sessionID=';

And now we have to append our sessionID, which is also already loaded into a variable by the same name

myUrl += sessionID;

Then the next static chunk

myUrl += '&data=SERVER&serviceTrack=';

And the serviceTrack variable (again, handily available in a variable already)

myUrl += serviceTrack;

And then the last bit of the url

myUrl += '&event_id={2274E0EF-10D8-4341-A75B-490F7947B922}';

Now that we have our url loaded into a variable, we just need to output it so our final line is simply

myUrl;

url-field-on-form

Full Code Block

***Remember to change myagency at the beginning of the url to match your agency’s url if you are copying and pasting this code.***

var myUrl = 'https://myagency.netsmartcloud.com/new_person_form.asp?process_code=COLLATERAL&form_id=NEW_COLLAT_SEARCH&parentValue=';
myUrl += parentValue;
myUrl += '&key_value=&addAllowed=true&editAllowed=true&deleteAllowed=true&isAmendment=false&isCompleteScheduledEvent=false&mode=ADD&sessionID=';
myUrl += sessionID;
myUrl += '&data=SERVER&serviceTrack=';
myUrl += serviceTrack;
myUrl += '&event_id={2274E0EF-10D8-4341-A75B-490F7947B922}';
myUrl;

Troubleshooting Tip

You can see the results of your concatenation in the URL variable on the form so if you keep it modifiable and give yourself a generous display size, you can check to see where you might have left pieces out by mistake.

launching-form-url

Quirky Behavior

If you built your URL string correctly, you should launch the Add Collateral window from your form. One thing I have noticed is that after you fill out the form and hit save, the form does not close or give any indication that the collateral had been added successfully. One challenge in getting the form to behave any different is that these forms are system not-modifiable so we don’t have the ability to go in and add a window.closeAfterSave = true snippet to them. Users must be trained to close the window manually after they have saved the form without triggering an error for things like blank required fields.

How To: Add Additional Links to Formsets on a Form

When you setup a service form in myEvolv, the Link to Person is usually setup in such a way as to make the name display as a link on the form. Users can then click the link and it will take them to a formset where they can look up additional information about the client or complete additional tasks related to the client.

link-to-person

There may be times when you want to add more than one link to a formset on a single form.

If you look at the Link to Person field in the form designer, you will see most of the setup that is required to create these links.

link-to-person-properties

Here, the people_id column is used to get the GUID for the client. Instead of just displaying that GUID, the All People Table is associated with the field. That renders the client’s name instead of the GUID. Then the Client Information Screen is used as the Formset to call. That renders the name as a link that opens the Client Information Screen when clicked.

Setting up another link might seem to be as easy as copying this setup on another field, but you quickly run into a couple hurdles that must be cleared.

Duplicate Fields

You cannot have the people_id column on your form twice so you need another way to add a link to the individual. Fortunately, myEvolv has a way to work around this using variables.

Variables are useful in this situation because we do not need the data stored in it to be saved to the database. We just want to hold some data while the form is rendered in the browser that will allow us to create the link and use it. We could go about this by creating a user-defined field that would be of foreign-key type and store a duplicate people_id GUID, but that would be overkill just to generate the link and clutter the database with redundant information.

When you create your variable, you can set it up similar to how you would set up a user-defined field.

In this case, you want the Data Type to be Foreign Key ID. You can use the All People Table as your Look-Up Table Used. Finally, you can choose the different Formset that you wish to call from this link to the person.

second-link-to-person-variable-properties-1

Default Value

If you saved your form at this point and tried it out, you would notice that your new variable field is empty and if you left it modifiable, you would need to select your client to get the link. That’s because we need to give the variable a default value.

The people_id field has some automatic default value functionality based on the fact that you are entering the event from a client’s record. myEvolv is setup to default some fields automatically based on the service track information – things like client, program and facility will fill in automatically when entering services from the Service Entry area because based on which program band and the client’s facility placement information, myEvolv is able to determine what the default value should be.

Our variable, on the other hand, has no such built-in functionality and so we must explicitly provide it with a default value to pre-populate.

To provide a default value in this case, simply put parentValue in the Default Value property of the variable. parentValue is equal to the selected client’s GUID and it is the value that people_id uses behind the scenes to pre-populate itself.

Now when you open your form from service entry, it should look something like this:

second-link-to-person

Each link to person opens a different formset.

How To: Filter Activity Type and Encounter With Picklists

The activity_type_id and encounter_with_id columns in myEvolv’s Event Log table can come in handy when you are configuring events in myEvolv. If you don’t need to use these columns for their intended purpose, they are easily repurposed to hold other values and since they are event log fields, they can be pulled into the canned reports easily.

The picklist values for these two columns are configured in the Table Maintenance – Extended area of the Setup module.

activity-type-encounter-with-luts

You will notice that unlike the other lookup tables in myEvolv, these two have a Filter Code column.

filter-code-highlighted

Since these lookup tables are connected to Event Log fields that will be available to all events, the picklist could end up holding many more values than would apply to certain events or just more than you would want to display for a particular event. myEvolv provides the Filter Code column so that you can filter the picklist options on particular forms. The following is a guide for how to configure a filtered picklist.

Configure the Lookup Table

In my example, I am going to use the activity_type_id column to capture the method by which a clinician has contacted a family: Phone, Email, Text Message or In-Person

In the table maintenance for Services: Activity Types for Clients, I add an entry for each option and give all of the options a Filter Code of FN_ACT_TYPE

activity-type-lut-with-filter-code

Configure Form

Without filtering, I have the activity_type_id field on my form with the Activity Types for client services Look-up Table selected. When I go to open the picklist, I see the activity type look up table with all active options. The clinicians will need to search through the whole list to find one of the intended options.

unfiltered-picklist

In order to apply the filter, I first need to add a variable to the form. The variable should have a regular string Data Type. In my example, I have given the variable the name activity_type_filter and a caption of FN_ACT_TYPE. The variable also has a default value of ‘FN_ACT_TYPE’ (remember to include the single quotes when setting the default value). The default value must match the filter code that you used in the lookup table. I also toggled the Is Visible setting off so that it is not shown on the form.

variable-properties

Next I need to make the activity_type_id field on the form depend on the value of the variable.

In the Depends On (other) attribute, I add the following code:
getElementFromXML(formXML, 'activity_type_filter')
Note that the second argument is the name of the variable I created.

activity-type-properties

Now when I go to open the picklist, I will only see the options that have the filter code “FN_ACT_TYPE”.

filtered-picklist

Canned Reports

Because I used the activity_type_id, the values in this field will show up in many of the canned reports in myEvolv.

canned-report-activity-type

We are using cookies on our website

Please confirm, if you accept our tracking cookies. You can also decline the tracking, so you can continue to visit our website without any data sent to third party services.