
How To: Setup Multiple Subforms from the Same Form Family on a Single Parent Form

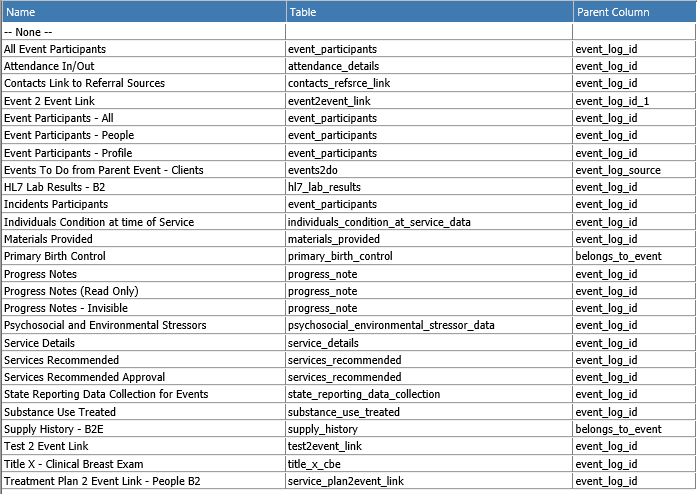
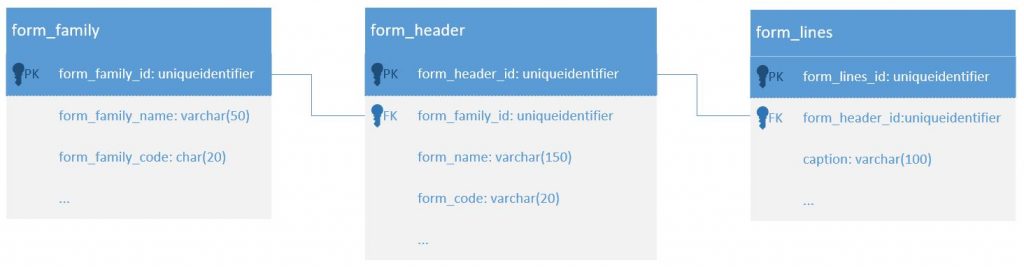
When you put a Non Event Based Subform on Form, the database link between the parent form and the subform occurs on event_log_id. For example, if you have a Materials Provided subform on your event form, each row in that subform will create a row in the materials_provided table and the materials_provided table will have the event_log_id of the event it was added from. myEvolv uses that link to know which of the materials_provided rows to display on the parent form – only those that were entered on that specific event with the matching event_log_id.

When you use two or more subforms from the same form family on the same parent form, a complication arises.  If you do not change the default behavior of the subforms, all of the subforms from the same form family show all of their rows from the form family table regardless of which specific subform was used to enter the information.

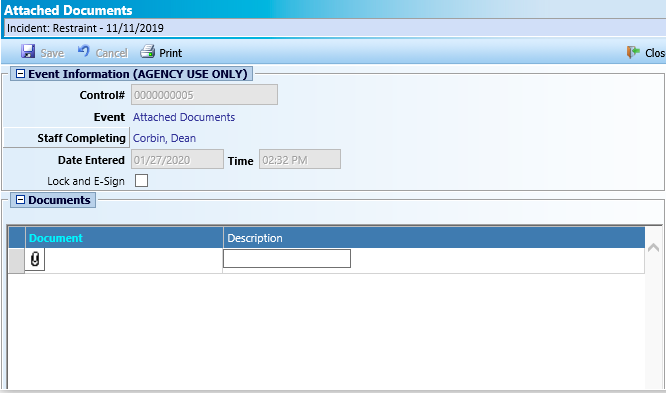
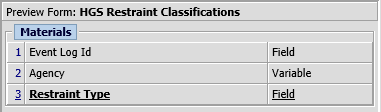
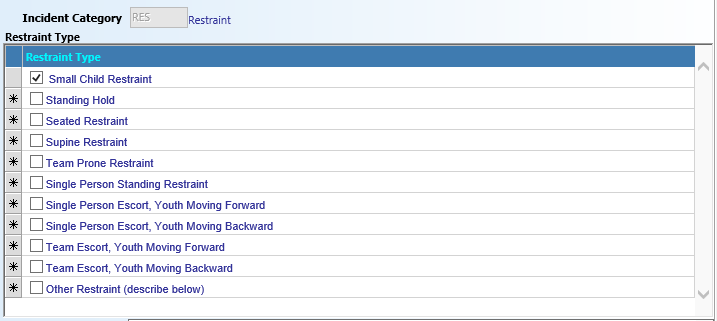
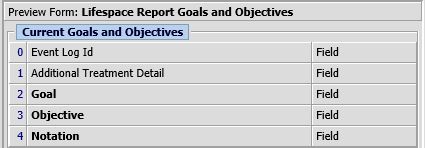
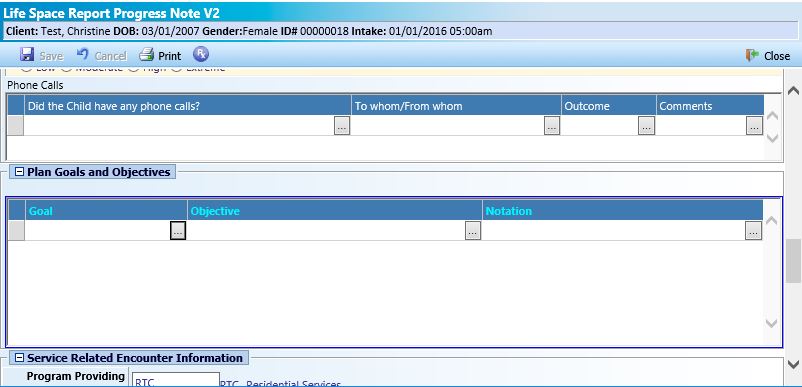
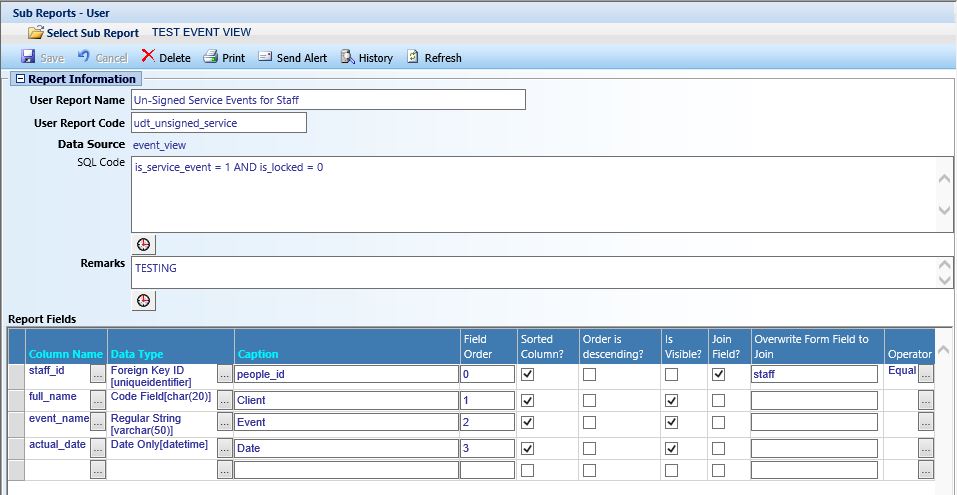
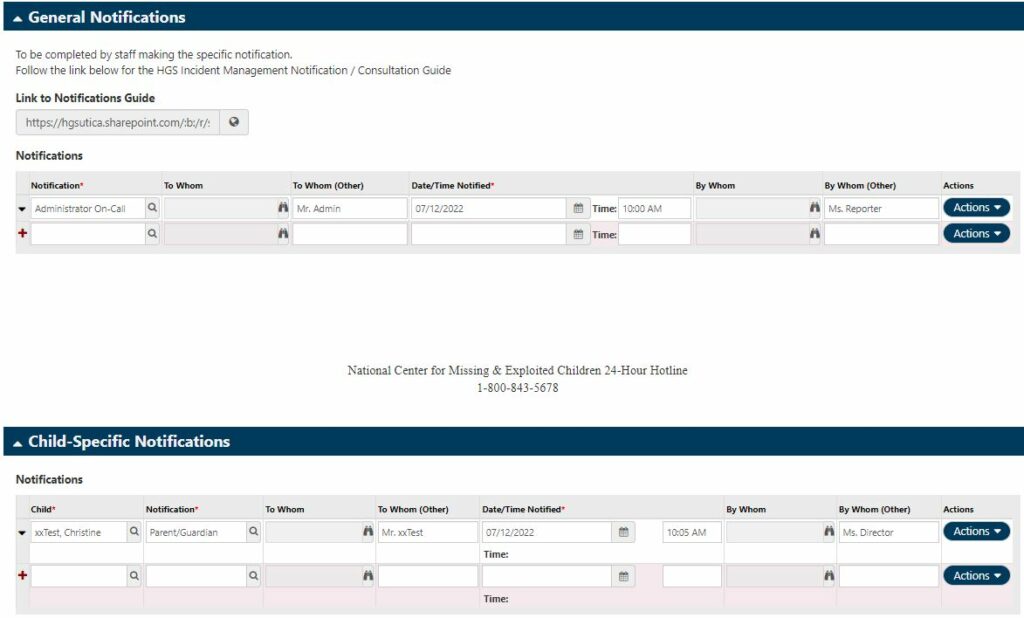
Here is an example.  This form has two subforms on it – the top one is used to track the notifications that were made once per event.  The bottom one is used to track notifications that must be made per child who were involved in the incident.  Both of these subforms are created in the Materials Provided form family.

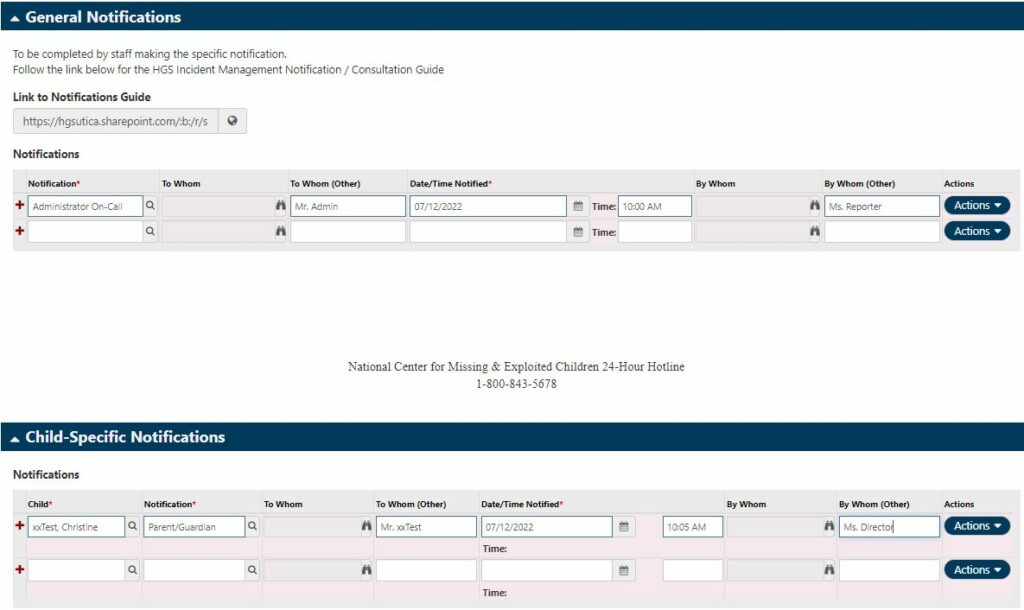
This is the form filled in but not saved. Each type of notification is in its rightful subform and there is one row per subform. After Save, the problem arises:

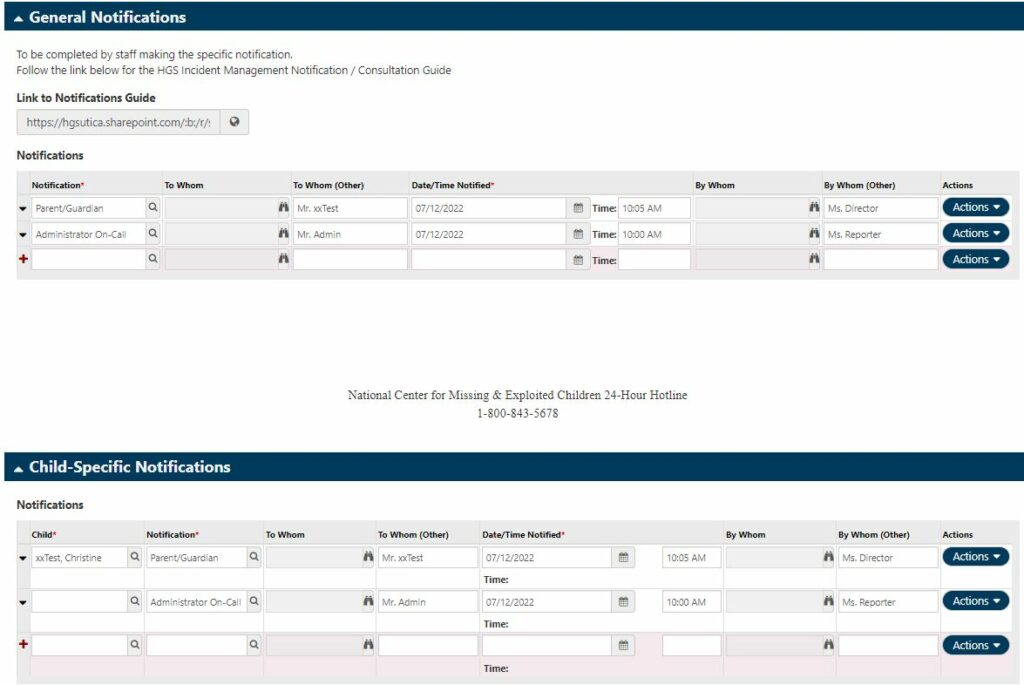
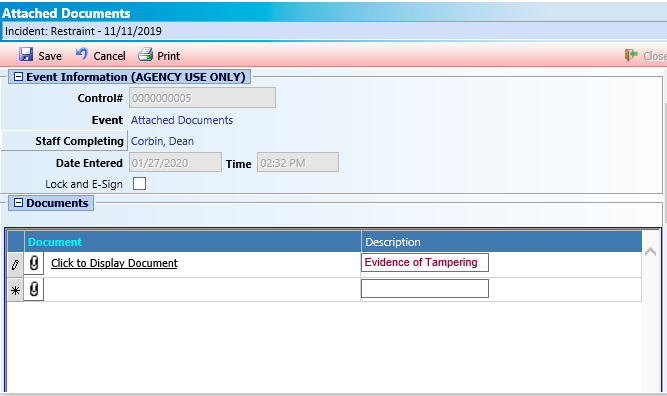
Both subforms now have both rows listed in them, each showing only the fields that are defined in their respective subform design (see the lack of Child column in the first subform). So what’s happening here?

“Out of the box”, a Materials Provided subform will pull all of the materials_provided database table rows that belong to this event – and both rows do because both subform rows were added on this parent event.  But we want them to stay in their own subforms so that a user looking at this event after save can see the data organized in the intended manner. 

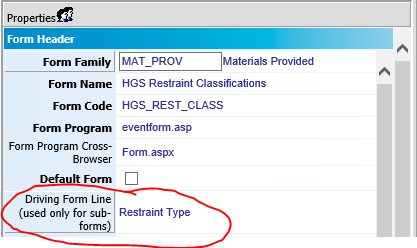
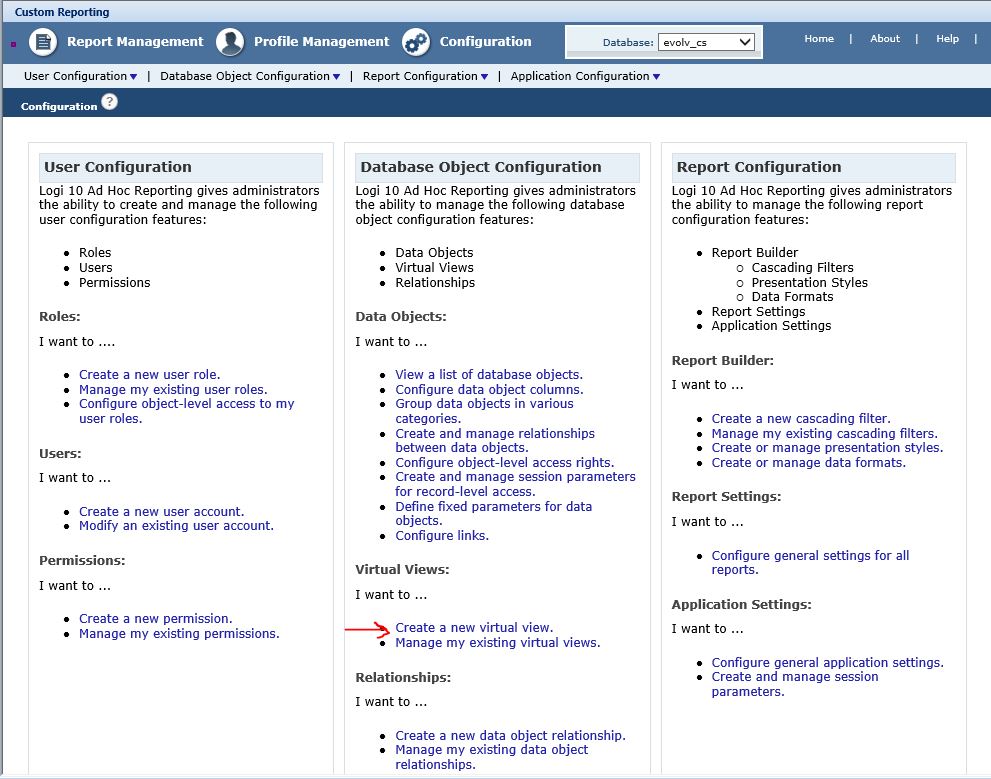
Thankfully, myEvolv has a way to do this and it involved using the List Condition attribute for the form header used on these subforms.

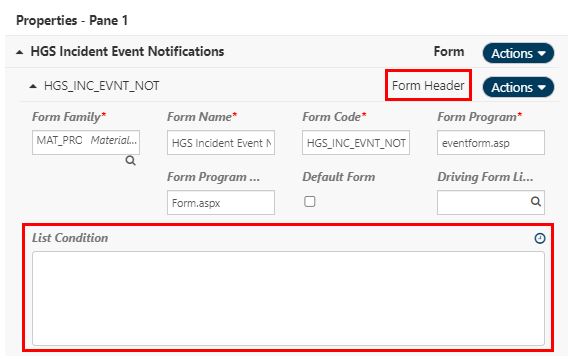
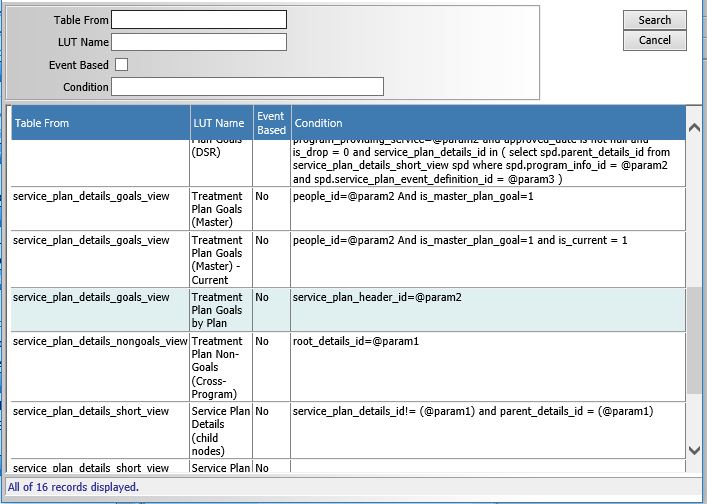
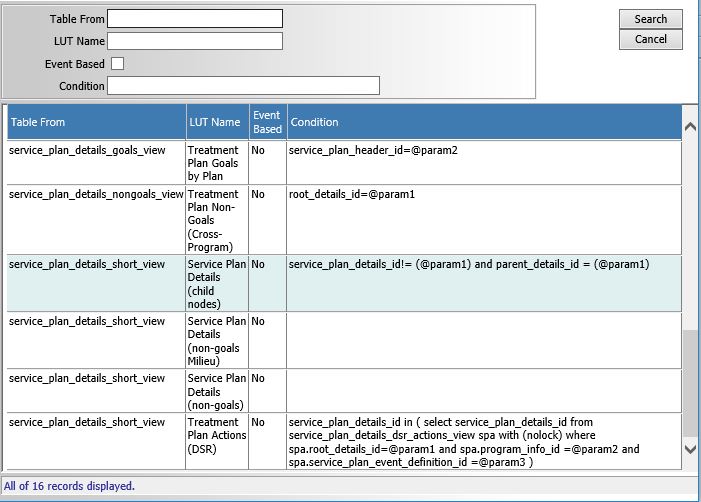
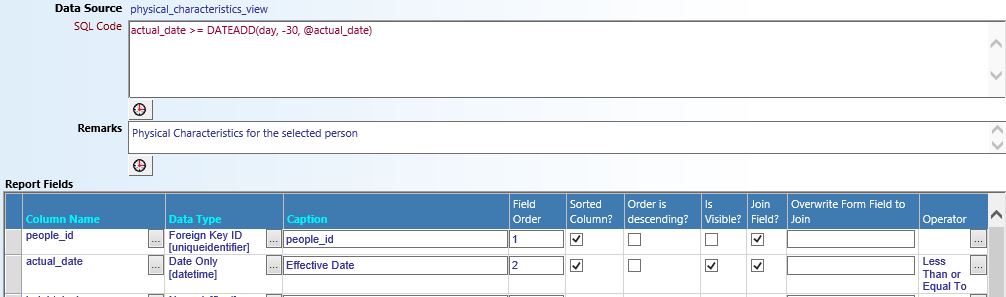
The List Condition attribute allows you to put further filtering on the query that determines which rows will pull in on the subforms.   It is literally the conditions for when to list a row in the subform and it acts like everything after “WHERE” in a SQL where clause.  This means that there are a lot of possibilities for filtering – you can use any of the columns in the form family table to filter on and combinations of them.

For our example, I want to keep the event-level notifications in one subform and the child-specific notifications in the other subform.

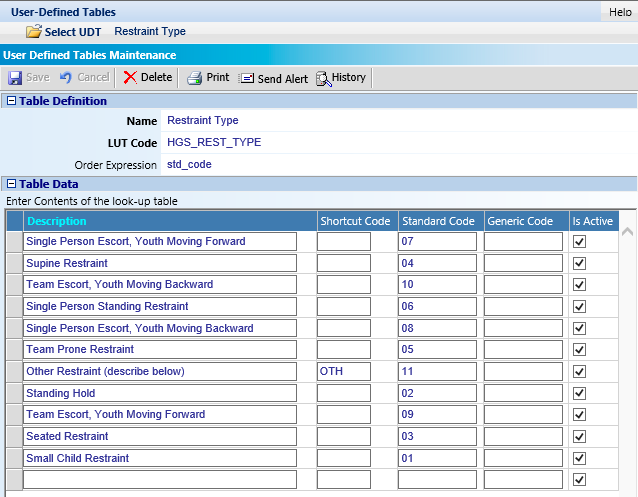
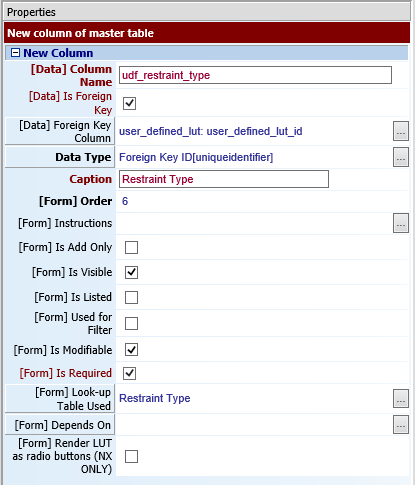
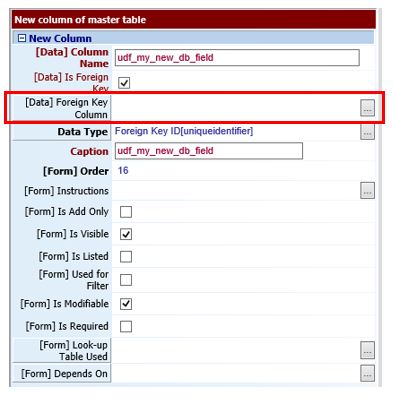
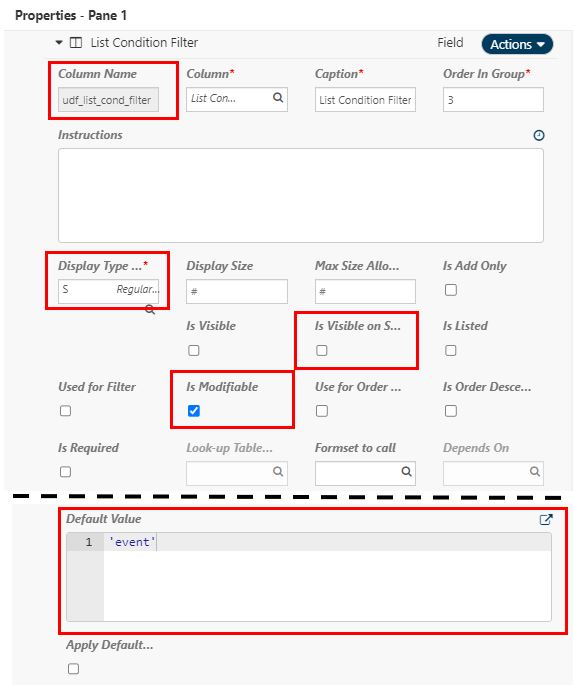
To do this, I create a user-defined field of Regular String type in the Materials Provided form family and add it to both of my subforms.  It can be left not visible on subform so that users don’t see it.

My custom database column is called udf_list_cond_filter

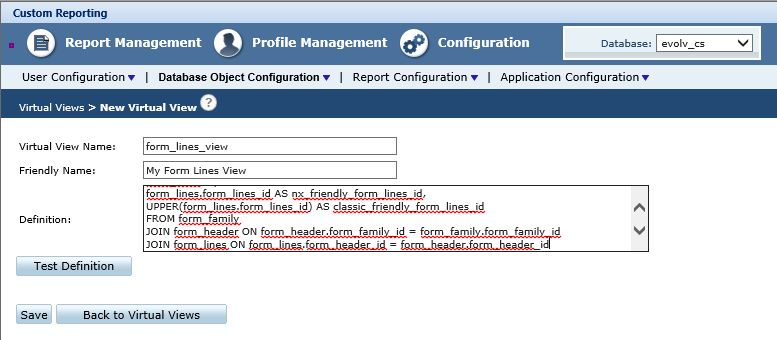
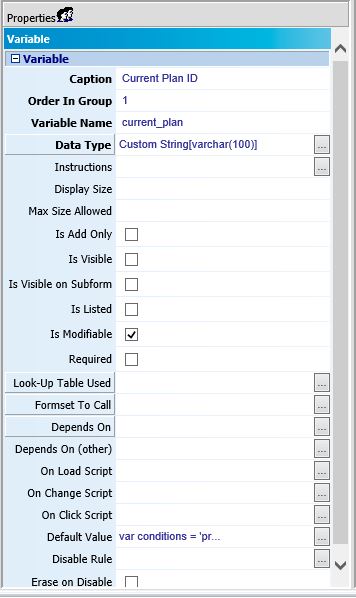
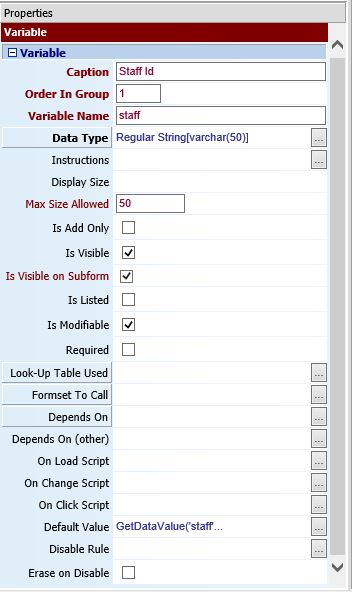
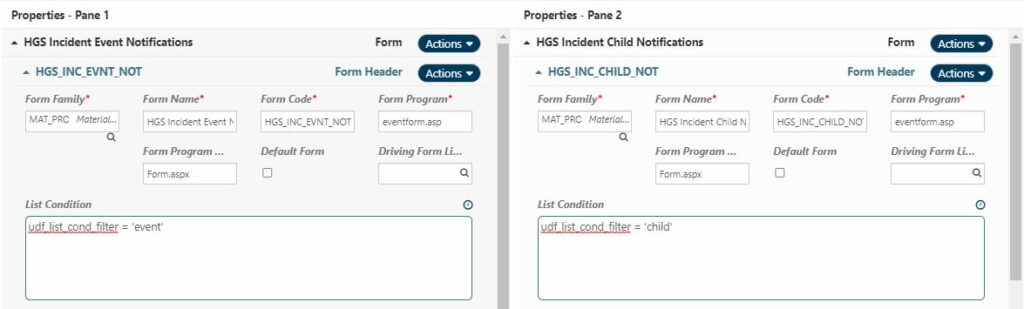
For the event-level notification subform, I give this column a default value of ‘event’ (see image below)

And for the child-specific notification subform, I use the same field setup the same way, but I give this column a default value of ‘child’

Now when a new row is added in one of the subforms, this column is getting the value of ‘child’ or ‘event’, depending on which subform is used.  We will use that fact to filter using the subform’s list condition attribute.NOTE:  you can use whatever terms you want for your default value and list condition logic, these are just what I chose for my example.  The important thing is that it will match between the forms list condition and the default value.

On the event-level notification subform, my List Condition value will be

udf_list_cond_filter = 'event'

and on the child-specific notification subdorm, my List Condition value will be

udf_list_cond_filter = 'child'

This is telling the subform to only list a row from the materials_provided table if the event_log_id matches the parent event (already happening automatically) AND if the udf_list_cond_filter column has the matching value in it.

With this all setup, when I enter a new event with the same values as before, it will look the same after saving as it did before saving.

To make it clear what is at work here, the image below shows the udf_list_cond_filter fields visible on both subforms so you can see how they look behind the scenes.

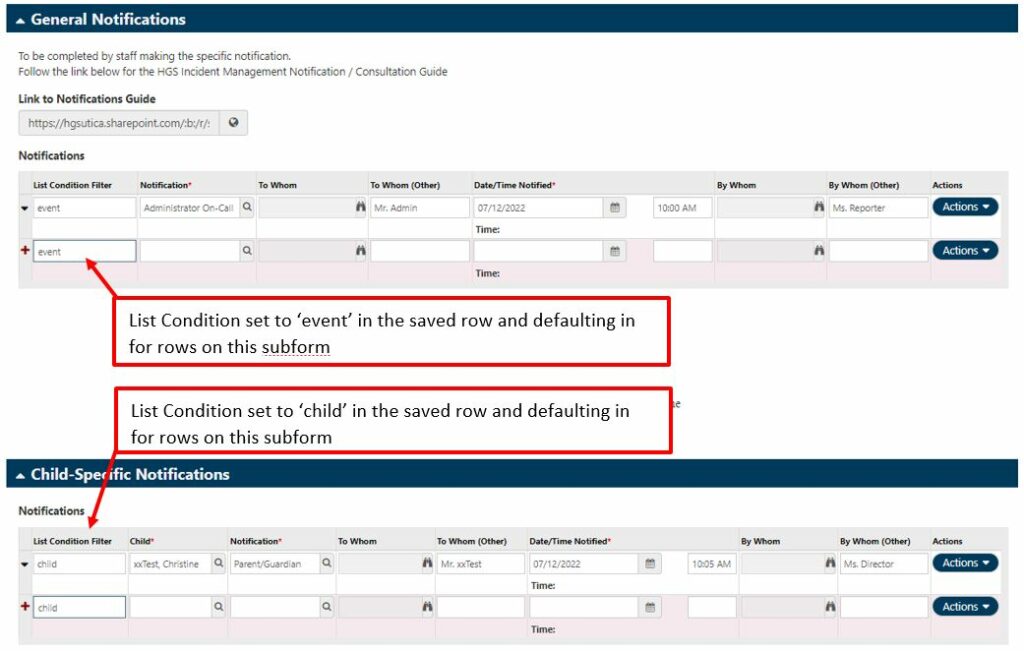
This setup is extensible, allowing you to setup as many subforms from the same form family as you need to achieve your desired effect.

NOTE: This setup will not work retroactively on already-saved events because the new udf_list_cond_filter value on all rows that exist until you do this setup will not have a value set in them to filter on.

How To: Default Value for Picklist Field

You may find that a myEvolv form that you wish to use contains a picklist field that cannot be done away with, even though the user is always going to be selecting the same item.  For instance, you may have a treatment plan for a program where there is only one category of goals, but you have to select that category on each and every component anyway.  Just like other fields in myEvolv, you have the option of setting a default value for a picklist field, but it is a little trickier to setup than it is for text and date fields.  Defaulting values for picklist fields where there are no real options will save your users time when completing their work in myEvolv.

For my example, I have a service event for Attendance Documentation that requires a Service Location field. My user-defined look-up table for Location has 9 options to select, but for my Day Care program, only one location should ever be used for this service event: Day Care. My Day Care staff are sometimes erroneously selecting a different location and are complaining about having to do the extra clicking required to fill in a field that is always the same value.

The simplest way to handle this is to use the default value on my service location field in order to make sure the value we want to be there is always selected, but when I enter ‘Day Care’ in the default value for the picklist field, it doesn’t work. What gives?

Simplest Method: Hard-coded GUID

When you use Picklist fields on your form, the underlying data type is a Foreign Key ID, which means the data value actually being stored in the database is the GUID for the picklist item that you are selecting, NOT the description, shortcut code or any other column from the table being referenced. What we need to do here is provide the GUID for the picklist item that we want selected.

There are a few different ways to find the GUID for your intended picklist item. See Tips and Tricks: Two Methods for Finding a GUID for two methods.

Assuming you have the GUID, then all you need to do in the default value field of the service_location is enter the GUID surrounded by quotes.

Now the form defaults with “Day Care” selected for this field.

NOTE: When hard-coding with GUIDs, myEvolv Classic requires all upper-case letters in the GUID and myEvolv NX requires all lower-case letters in the GUID. If you are still using classic and intend to use the method below.

More Robust Method: getDataValue

This method is more robust because it works in both Classic and NX, though the over-use of getDataValue can cause system performance to slow.

Instead of hard-coding the GUID, we will use a getDataValue() call to lookup the correct GUID using the description of the item we wish to default.

For this method, you need to know some things about the lookup table you need to fetch the GUID from. In my example, I know that the LUT is a user-defined LUT, so the table is going to be user_defined_lut. I know that the primary key column for that table, the column I want the GUID from, is therefore user_defined_lut_id. And I also know that the column that contains the name of the item in that table is called description. With those bits of information, I can put together a getDataValue() call that will return the correct GUID and I can put that call into the Default Value attribute for my Service Location field.

getDataValue('user_defined_lut', 'description', 'Day Care', 'user_defined_lut_id');

The result is the same as above, with “Day Care” defaulting into the field on the form.

Other Possibilities

The possibilities are endless when it comes to default value logic, since the Default Value attribute accepts any JavaScript code that you might concoct. Whatever code you come up with, the end result must be a single GUID that is a primary key value from a record in the table being used as your picklist field’s LUT.

How To: Create Multi-Select Form Controls using Driving Form Line

As good as drop-down pick lists are, there are times when you might want the ability to addset of multi-select checkboxes to one of your forms. A set of multiselect checkboxes can make for much faster service entry for your users and is useful in form design to show views of the form what options were available so that they can see what was selected as well as what was not selected.

Creating a multiselect checkbox is not as easy as adding other types of control to your form in the form designer. You will need to create a subform for your main form and perhaps a user-defined look-up table.

The instructions below are going to go through the entire process of setting a fully user-defined multiselect form control but you can use the driving form line in other scenarios if it suits your purpose.

Step 1 – User Defined Lookup Table

For my scenario, I need to create a multi-select checkbox list of types of restraints that my agency uses to support clients. This type of control is a good candidate in this situation because I cannot predict how many of the types of restraints may be used in a single incident. I do not want to have 2,3, 4 or more(?) picklist fields on my form just in case there is a situation where more than one restraint is used.

The first step is to create the list of restraints as a user-defined table.

I simply set mine up like this:

Note that I changed the Order Expression to std_code. This changes the sorting on the lookup table to use the standard code field. I then just simply numbered my options in the order I wanted them to appear on the form. The sorting is alphabetical, not numerical, which means you need leading 0’s or 17 will render before 7.

Step 2 – Subform Design

In order to create something like a multi-select checkbox control, we need to leverage a subform. Subforms have the ability to add new rows as additional selection are needed. For example, here is a subform for one or more attached documents that I have added to forms where we cannot predict how many separate document may end up being attached:

If I add an attached document, a new row is added to the subform for me to add an additional scanned document.

Instead of a document link form element on my subform, I could use a foreign key field that uses my new user-defined table and then I could add as many rows as needed to capture the multiple types of restraints that may have been employed in the incident.

In order to create my sub form, I need to select the right form family. There are a few options for this. You can see them in the form designer when you add a Sub Form to a form (NOT an Event Based Subform) As of this post, there are 26 form families at your disposal, although some may not actually be useful for this:

I usually choose Materials Provided because my agency does not use the materials provided functionality that myEvolv intended so there’s little danger of obtaining weird results somewhere down stream from adding materials provided to random events.

Copy the default form from the top of the list and then on your new form, you can remove all of the fields except the Event Log Id and Agency variable.

Then add a new database field to the form like this:

Note that I am entering user_defined_lut: user_defined_lut_id as the Foreign Key Column — this will allow me to re-use this user-defined column again on other forms. This new field is now linked to my user defined table Restraint Type.

After saving, make sure that only this field is visible on subform. The other two may be hidden or at least hidden on the subform. This is what you should be left with, if using Materials Provided:

Add this subform to your main form. It should look something like this now:

This setup could technically get the job done. Users can select the gray ellipses button and add a row for every type of restraint used. However, there’s a lot of clicking involved and nothing prevents them from selecting the same one twice. Furthermore, we don’t have a sense of what all of the options are to know what was not used, only what was used.

Step 3 – Form Driving Line

There is a setting that has been available for a while but seldom used called Driving Form Line available in the form header properties.

What is does is allows you to select a foreign key field that is on your form and use it to “drive” the creation of subform rows. It will pre-populate your subform with one row per active item in the lookup table associated with the foreign key field you selected and render each with a checkbox next to it. In the database, only those items with a checkbox checked in it will be considered selected.

In my scenario, we will have a row per restraint type in our subform when it renders. Note that you will likely want to increase the size of the subform on your main form to accommodate all of the rows that will be rendered so that users do not need to scroll. My list has 11 items and I have found that you need 25px per item so I will use a height of 275:

Beware: because of this height aspect, you may want to limit your driving form lines to lookup tables with manageable number of options.

P.S. — Other Considerations

The scenario above is the most basic but keep in mind that you can include other columns in the subform. For example, I have another subform that gets the classification of an incident and also asks the use to select if the classification is primary or secondary.

I have a third subform using driving form line that handles information about notifications that have been made.

When you use this method with subforms that contain additional rows, keep in mind that ONLY those rows where the driving form line checkbox is checked will save to the database. This presents a risk for data loss on save that can drive users crazy. They fill in all of the columns but forget to check the box and now they have to re-enter everything.

It is therefore recommended that you use the following JavaScript in the subform design to disable all of the other columns unless the driving line checkbox is checked.

This code should be on the disable rule property for every column that is not the driving form line column. You must provide the correct column name for the code, which is the column name for the driving form line column.

!SubDisableRule('udf_restraint_type', 'checked')

How To: Get and Set Form Field Values

One of the challenges of working with myEvolv and myEvolv NX is that the Document Object Model (DOM) is different between the two views. That means that if you are using JavaScript, or even jQuery, to manipulate form fields, you code for one version will not necessarily work in the other. myEvolv includes JavaScript libraries that are used to facilitate some common form manipulations and that are safe to use in either version.

A couple of the most common things you might want to do on you forms is get the value of a field or set the value of a field. Getting the value that a user has entered allows you to validate the form or drive form field behavior with disable rules. Being able to set form values can help make the user experience faster and more enjoyable. You can do a lot with the simple ability to get and set form field values. The following post will get into the myEvolv functions getFormElement and setFormElement.

getFormElement()

The getFormElement function returns the value that is entered in a form field. The function takes a single argument– elementName

getFormElement(elementName);

The elementName is the name of the column used for the form field, NOT the caption. So for example, if I want to get the value of the Actual Date/Time field on the form, I would use

getFormElement('actual_date');

Keep in mind that when you get the value of a foreign key id field, you will be retrieving the GUID and not the caption of the picklist item. For dates, you will get a date string– in order to do date manipulation, you will need to convert it into a JavaScript Date object (I covered this topic in this post).

setFormElement()

The setFormElement function sets a form field’s value. The function takes two arguments — elementName and elementValue

setFormElement(elementName, elementValue);

The elementName is the name of the column used for the form field, just as with getFormElement. The elementValue is the value you want to set the form field to. If I wanted to set the remarks field to “Approved!”, I would use

setFormElement('generic_remarks', 'Approved!');

Some additional considerations are again needed with dates and times – the elementValue must be a formatted date string. And for a lookup table, you must provide the GUID of the item you want to be select.

Where to use?

You can execute JavaScript in several places on a form and on form fields. Where you use the JavaScript depends on what you are trying to do and the code properties of forms and fields are pretty self descriptive.

Form-Level

Before Save Code

This code executes right after the user clicks the Save button on the form but before the Save function executes. This makes it a good trigger for code that you want to run one time after the user has entered values in all of the fields. This might be a good candidate for code that will calculate a value based on the values entered in several fields on the form. You might not be able to trust the order that the users will fill in the values so triggering them at the field level might be tricky.

Note that at the point this code executes, you can no longer manipulate the DOM of the form and have those values become part of the Save function so you have to instead use the setElementFromXML() function (I will cover in another post) to get the calculated value into the save.

After Save Code

This code executes just after the Save function executes in the system. Because of this it is mostly used for popping up alerts or keeping windows open after saves.

After Delete

This code will execute after the Delete function executes. I have not used this one yet. It could be useful for popping up alerts.

Before Load Code

This code will execute before the form XML is rendered into HTML and displayed on the screen. There is a note that this code does not run on forms when they are used as subforms.

After Load Code

This code will execute after the DOM is fully loaded and the form is displayed on the screen. This trigger would be good for popping up alerts when the form is first opened.

Field-Level

On Load Script

This code will trigger when the form field loads in the browser — the browser will load the form fields in the order they appear. If I recall correctly, you cannot target DOM elements until the full form is rendered, but you can set JavaScript timers that will delay execution of code until the DOM elements you wish to target are loaded.

On Click Script

This code triggers when the form element is clicked. It works best for checkboxes but you can get it to fire for other form fields as well.

On Change Script

This code triggers when the form element’s value is changed. This one does not work great with checkboxes but is perfect for date/times, strings, foreign key id fields.

Default Value

You can use JavaScript in the default value property in order to generate your default value. The code in this property executes before the HTML DOM loads and the calculated default values exist in the formXML layer.

Disable Rule

You can use getFormElement() in the disable rule property to determine if a field should be disabled or not disabled based on the values retrieved. You return true if you want the field to be disabled and false if you want it to be enabled.

What about Memo fields?

Memo fields are a little more complicated than the other form fields in how they generate in the DOM and so setFormElement() does not work on them. Instead, you must use the setMemoField() function.

setMemoField(formLinesId, updateText);

The difference between this function and setFormElement is that the first argument here is for the GUID of the Memo field’s form field id and not the column name. So to make this usable, you should pair it with a getDataValue() call to grab that form_lines_id.

The following code will get the form_lines_id of a memo field on the form (form_code = “MY_TEST_FORM”) that is captioned ‘My Memo’. It then uses that GUID value in the setMemoField() function to set MyMemo to ‘Updated text value.’

var formLineId = getDataValue('form_view', 'caption', 'My Memo', 'form_lines_id', 'form_code=\'\'MY_TEST_FORM\'\'');
setMemoField(formLineId, 'Updated text value.');

When reusing this code on your form, you just need to change the caption (‘My Memo’) to be the caption of your memo field, the form_code (‘MY_TEST_FORM’) to be the form code of the form you are putting this code on and then your updateText (‘Updated text value.’). You must be sure that your Memo field has a unique caption on the form you are using– you cannot return more than one value with getDataValue().

How To: Create a Data Insight Report to Get Form Information

I was asked by a reader about how I figure out the form_line_id assigned to elements on a form. There are a few ways, but this is probably the easiest and it provides a tool that can be used over and over again. However, since it does require writing a custom report, I figured I would use the opportunity to walk through designing a Data Insight report using a custom virtual view.

Step 1: Writing the SQL Query

Before we get to Data Insight, we need a query to use for our virtual view. The report that I want to create is going to need to include the name of the form field (caption) so that I know I am getting the right GUID. I want to filter on the form name so that I can more quickly find the right form and form field. And if your system is anything like mine, you have multiple forms with the same or similar names, possibly even across various form families. So I am also going to want to bring in the form codes and the form family information.

All of these items are stored in just 3 tables: form_family, form_header and form_lines.

UML Diagram

The form_header table holds information about each form. Each form_line belongs to a single form_header and gets a unique form_line_id per form that it is on. In other words, even if you have actual_date on all of your forms, each actual_date element has a different form_line_id for each form it is on. Also be aware that if you remove a form element form a form and re-add it to the same form, it will be assigned a new form_line_id when it is re-added.

Forms (form_headers) belong to a single form_family and so they have a form_family_id. Similar to the above statements about form_lines, if you delete a form in the form designer and then recreate it, it will have a new form_header_id. If you import a form from development into your production system, myEvolv is going to give your form and all of the form_lines (elements) therein a new id as part of the import process. Once your production is later copied over to development, that imported form’s elements and header will have matching ids.

So here’s the SQL query we will use for this report:

SELECT
form_family.form_family_name,
form_family.form_family_code,
form_header.form_name,
form_header.form_code,
form_lines.caption,
form_lines.form_lines_id AS nx_friendly_form_lines_id,
UPPER(form_lines.form_lines_id) AS classic_friendly_form_lines_id
FROM form_family
JOIN form_header ON form_header.form_family_id = form_family.form_family_id
JOIN form_lines ON form_lines.form_header_id = form_header.form_header_id

You will notice that I selected the form_lines_id column twice and that in on one of them, I used the UPPER() SQL function. GUIDs are returned from myEvolv in lower case format like this:

494eed56-36fb-4fda-b54f-a86f1d150b38

These work fine in your JavaScript for NX, but if you are working in classic, your JavaScript requires the GUIDs to be in upper-case so the UPPER() function takes care of that for you and returns that same GUID like this:

494EED56-36FB-4FDA-B54F-A86F1D150B38

This query will provide you with both options and you can choose to use one or both on the final report.

Step 2: Create Data Insight Virtual View

Now to Data Insight to create the virtual view we will use to create the report. In order to add or manage a virtual view in Data Insight, you must be assigned to a role with “Access Configuration Area” in Data Insight. If you haven’t played with Data Insight roles at all, then this is the same as saying you must be an Admin in Data Insight. if you have the proper permissions, you will see the “Configuration” option in your Data Insight menu.

Click the “Configuration” option and then in the center column, under “Database Object Configuration”, click the hyperlink for “Create a new virtual view.”

Give your new virtual view a name and a friendly name. The name must be letters, numbers and underscores. The friendly name can have spaces.

Copy and paste your query into the Definition field and then click the “Test Definition” button. You can ignore the red underlining here since that is just Internet Explorer’s spell check at work. It does not indicate that the SQL is malformed.

If your query is valid SQL, you should see a list of the selected columns from your query appear. If not, you may have errors in your SQL to fix.

Once you have a query that passes the test, click “Save” to save that virtual view.

Step 3) Create Data Insight Report

Navigate to the Report Writing area of Data Insight by clicking the “Report Management” option in the top menu. Then click “Add” and select “Report” from the drop down menu.

Select a “Tabular Report with Header” from the Report Template options and click “OK”

When the Data Source pop-up window appears, make sure the “Data Objects in:” drop down menu has “(All)” selected. Then check the box next to your virtual view to select it and then click “OK”.

Since the data we are looking at includes 3 tiers of information– Form Families that contain Form Headers (forms) that contain Form Lines (elements), it makes sense to ad some groupings so we can see more easily what all belongs to what.

Click the “Grouping Tab”, select the “Grouped Flat-Table” radio button and then click the “Add Grouping Layer” button.

On your first layer, add the form_family_name and form_family_code field and click “OK”.

Click the “Add Grouping Layer” button again to create the next grouping. For this grouping add the form_name and form_code fields and then click “OK”. When this step is done, you should have a grouping screen that looks like this:

Go back to the “Table Columns” tab and add caption, nx_friendly_form_lines_id and classic_friendly_form_lines_id to the “Assigned Columns” list. It should look like this:

Your report preview pane at the bottom should spit out a report that includes every form line in every form in every form family in your system. It probably takes a while to load. We don’t want such an unwieldy report so we will add a filter on the form name by clicking “Modify Data Source” on the left side of the preview.

PRO TIP: Hiding the Live Preview is a good idea if you have a report that runs very slowly to avoid having to wait for the report to complete upon each change made to the report.

In the pop-up window, click to view the “Filter” tab and then click “Add a Parameter”. Select the column form_name. Change the operator value to “Contains” and check the “Ask in Report” checkbox. Make a caption for your parameter prompt and then click “OK” to close the parameter details popup and then “OK” again to close the data source details popup.

Your live preview pane should now be blank but prompting you to enter a form name (or part of one). Test your report by searching for one of your forms.

You should see something like this in the results:

The first result in my report searching for “Compass” is for form lines on the Compass Address Information form in the Address Info for People form family. If I look at the form in form designer, I will see all of the same elements listed. Keep in mind the groups are also form elements and therefore are include on the form_lines_id. That is what “Address Information” is on the Compass Address Information form.

At this point, you can make the report look and work to your liking by changing the column captions, adding sorting, removing pagination, etc. Be sure to save your report and move or copy it from your personal reports folder to the Shared Reports if you want to allow others to use the report too.

myEvolv Tips: Reusable User-Defined Picklist Fields

When you are building forms and have to create new database fields, best practice is to give the columns generic names so that you can use them again on other forms in the same form family. For example, if you need to link a tenth diagnosis (yes, the event_log has 9 diagnosis columns!) on a People Activities form, you should name it something like udf_diagnosis10_id rather than for the specific form like udf_extradiagnosisforclinicprogressnote. This will allow you to keep your database neat and help prevent running out of columns in your _x tables.

You may have run into a situation where you setup a user defined foreign key field on one form and had it working beautifully. However, when you went and tried to re-use it on a second form, you found that you could not select any look-up tables to use with it. What happened there?

You missed a crucial step in creating a user-defined database field. Here’s how to avoid making that same mistake going forward.

When you got to create a user defined foreign key field, use the [Data] Foreign Key Column attribute. Like the column name and data type, this attribute is only available when you first create the new column. If you forget this step, you cannot go back, and it is the reason that you cannot link a look-up table on subsequent uses of this column on other forms.

What to choose?

This depends on what picklist(s) you want to use with this column.

For example, if we go with the initial scenario, the picklist I want to use will consist of diagnoses so the foreign key column I want to select is diagnosis_id. This will allow me to reuse the column on additional forms as long as I use a picklist that is diagnosis-based.

User defined fields are commonly paired with a user defined look-up table. In order to re-use these, you should select the user_defined_lut_id foreign key column. Since all of your user defined look up tables use the user_defined_lut table, they all use the same column as their primary key.

If you need help figuring out which column to select, first select the look-up table you intend to use. In the picklist for look up tables, there is a column called “Table From”. Many of these will be views, but you should be able to figure out what the underlying table is in most cases. In our example, I want to use a look-up table from the diagnoses_view and so I know that the diagnosis table and therefore the diagnosis_id column is what I should select.

myEvolv Tips: Subform Field Manipulation

Credit for figuring these out/discovering them goes to Perry. I find myself referring to them in a training binder I got from last year’s NY Training Summit and figured it would be easier to just get them up on the web so I don’t have to go hunting for that binder every time. The following code works for Classic.

Subform Considerations

Subforms have to be handled differently than forms when it comes to JavaScript because while in the form designer, the two things look identical, the way that myEvolv renders a subform in the browser is very different from how it renders a form. But it isn’t radically different and the main changes account for the fact that a subform can have one or more rows and so you need to be more specific about which field you are trying to manipulate so that you don’t change every line simultaneously.

Scenario 1: Get the Value of a Subform Field

This code is for use within the subform, e.g. if you want to default the value of one field based on the value of another on the same subform.

self.getElementFromXML(currentRowXML, 'column_name');

Note the self object is being used here. This is the subform object as distinguished from the parent form object. The parameter currentRowXML then further narrows it down to the current record/row on the subform that you are concerned with.

Scenario 2: Set the Value of a Subform Field

Again, for use within a subform, this code can be used to set the value of a field in the same subform, e.g. when you want the On Change event to auto-populate a field.

this.form.'column_name'.value;

If you are checking a checkbox, use this code:

this.form.'column_name'.checked = true;

Note that in this code, you do keep the single quotes in the code for it to work properly. All you change is the column_name

Scenario 3: Get the Value of a Parent Form Field

With this code, you can get the value of a field in the parent form based on an action in the subform.

window.parent.getFormElement('column_name');

Note the window.parent is the only difference from the code you would use on the parent form. This is what allows your code to ‘jump up out of the subform’.

Scenario 4: Set the Value of a Parent Form Field

Maybe you figured it out by now but you can use the same small change to set values on the parent form from the subform.

window.parent.setFormElement('column_name', value);

Scenario 5: Trigger an Alert from the Subform

Alerts are useful in guiding user activity and you can trigger them from subforms. Similar to the last two, the trick is moving back up the DOM to the parent form to trigger it.

window.parent.window.alert('Alert Message');

Other Possibilities

It is possible to go the other way and get and set values on subform records from the parent form, however, it becomes a much more complex problem that requires very specific solutions for very specific challenges. That is because of the One-to-Many relationship that the subforms have with the parent form. For these types of situations, you will probably be targeting the subform itself and then looping through each record to get or set values.

How To: Create a Better Treatment Link Subform

One of the most powerful aspects of an electronic health record is the ability to link service documentation to a client’s goals and objectives and to ensure that the services provided are related to the clients current goals and objectives.

myEvolv provides a simple toggle setting to add a Treatment Plan Link on service documentation in the event setup.

This setting adds a system subform to the bottom of your service documentation forms that includes a Treatment Link column for selecting a goal from the client’s treatment plan, an Additional Treatment Detail column for selecting a child objective or method from that goal and a Notation column for capturing a note.

After attempting to use the system subform for several months, we noticed a couple of things about it that we didn’t like. The main issue is that the subform does not filter to list only goals from the most recent approved plan. It lists all of the goals that ever existed for the client. In our programs, plans must be reviewed as often as monthly so the list begins to grow very quickly and we were finding that users were often linking old goals to their current documentation. Also, you are stuck with the subform being way at the bottom of your form, which isn’t always ideal.

I used the following method to create a better subform for our direct care workers to link their service documentation to treatment goals without having to sort through a huge list of goals and ensure they always picked goals that were currently in place.

Step One: Get the service_plan_header_id of the most recent completed treatment plan onto the service documentation form.

For this task, we can use a variable since we only need to filter at the point where the service documentation is being added. If someone opens last year’s event and the variable (which will not be visible anyway) has the current treatment plan’s service_plan_header_id in it, that doesn’t affect anything other than the subform’s Goal picklist, which will be locked since the event is complete.

I added a Custom String variable to my form with the name current_plan

In order to get the service_plan_header_id of this client’s most recent treatment plan, I used the following JavaScript code for the Default value property:

var conditions = 'program_providing_service=\'\''+programPS+'\'\' AND actual_date = (SELECT MAX(actual_date) AS most_recent FROM service_plan_event_view WHERE people_id = \'\''+parentValue+'\'\' AND program_providing_service=\'\''+programPS+'\'\' AND approved_date IS NOT NULL)';
var plan_id = getDataValue('service_plan_event_view','people_id', parentValue, 'service_plan_header_id', conditions);
if (plan_id == null) {{
plan_id = 'NONE ON FILE'
}}
plan_id;

The first line of this code is setting up the SQL conditions that will be passed along in a WHERE clause query executed by the getDataValue() function. In my case, I wanted to be sure I got the most recent service plan event that matches the client for whom this service documentation is to be entered and matches the program providing service of the service documentation. The latter is necessary in case the client has more than one treatment plan at a time in different programs. The approved_date IS NOT NULL clause ensures that if there is a treatment planner working on a draft, the draft goals do not list for the direct support staff doing service documentation.

In the second line, we use this condition statement as the fifth argument in the getDataValue call. Here we are looking for a treatment plan in the service_plan_event_view that has the matching values from above and returns the service_plan_header_id

Then I checked to make sure a service_plan_header_id is returned. If one is not returned, I set the variable plan_id to be ‘NONE ON FILE’ mostly as a way to make sure my code was executing. This will be the value that fills in if someone goes to add service documentation for someone who has no plans on file for that program providing service.

Finally, I echo the value of plan_id so that the value will populate the form field.

Step 2: Create a subform similar to the system version to add to your service documentation form.

For my purposes, the subform didn’t need to be much different than the system subform. We wanted the direct support staff to select the Goal and Objective that was worked on and then enter a note related to the specifics of the objective selected.

I copied the default form in the Treatment Plan 2 Event Link – People B2E form family and made modifications.

This is what the overall form looked like in Form Designer when I was done:

Event Log Id and Additional Treatment Detail were from the original form. I left them on but pushed them to the top and made them not visible. Notation is also the same field as from the original form but we decided to make it required.

Goal is the Treatment Link from the old form. I changed it to use the Treatment Plan Goals by Plan Look-up Table so that I could use the service_plan_header_id as a parameter.

For the Depends On Other property, I used the code

getParentFormElement('current_plan')

This gets the value of the variable we created in step one and uses it as that @param2 shown in the Look-up Table Picklist’s Condition column. This is the piece that will filter the Goals picklist on the subform to only list the Goals from the treatment plan with the service_plan_header_id we supply it.

Finally, I created a new database field to use for our Objective field. I set it up as a Foreign Key type of field and I used the Service Plan Details (child nodes) Look-up Table.

This look-up table uses the service_plan_details_id to filter for a list of objectives that belong to that service_plan_detail . In this case, we are selecting a service plan detail in the Goal field, so we can filter this LUT to only show the Objectives that belong to that goal. To do that, I just select the Goal field as the Depends On property.

***Note: You can go one level deeper and add a picklist field to the subform for the methods by repeating the steps for making the Objective field except selecting the Objective field for Depends On since Methods belong to Objectives the same way that Objectives belong to Goals.***

Once you have your subform ready (remember to check the box for Is Visible on Subform!), add it to your service documentation form. Assuming your variable from step one is pulling correct service_plan_header_id’s, you should see only the most recent active goals in your Goal field and then only the objectives for that goal in your Objective field.

How To: Anchor Sub Report Data to the Parent Event

myEvolv sub reports can be very useful despite their limitations. Their most useful out-of-the-box application is in something like a face sheet, where you want to bring in the current information available, perhaps with some filtering.

In the first draft of some of our form designs, we used the current location sub report to display a client address. What we did not anticipate was that the address on previously entered notes would change when the individual’s address changed. We wanted that address to be locked on the form once it was saved. A few years later some of the Audit Snapshot functionality came out but that still didn’t work for us because of how audit snapshots worked. We needed a way to have the data on the sub report be based on the date of that event, not today’s date.

In subsequent years, I have figured out a few ways to accomplish this, depending on what columsn the sub report views provide and what we are trying to accomplish. I will try to lay out a few different methods below as I have time.

Method 1: Using a Join Column as a Parameter in the SQL Code

This method is good for when you want a sub report that will show you events within a time range from the parent event’s date. For example, you are creating a monthly report type event and need to list all of the progress notes from the 30 days prior to the monthly report date so that you can display them for the monthly report writers to summarize without running a separate report or opening them individually.

In this example, I will create a sub report using the physical_characteristics_view. I want to only show the physical characteristics from any and all events that occurred in the 30 days leading up to the event on which the sub report will display.

Configure Join Columns

When I first copy the system sub report to make my user sub report, the only join column is the people_id. If I display the sub report with this as the only join column, the subreport will show all of the physical characteristics in the system for all time for that person. If I save the event today, when I open it in a year, it will have an additional year’s worth of physical characteristics showing. The first thing we need to do is also use actual_date as a join field.

Check the box for Join Field? and select Less Than or Equal To for Operator.

With this step done, the subreport will now only ever show the physical characteristics for this client that have an actual_date prior to the actual date of the event it is being displayed on. Half of the problem is solved but this report does not cut off at 30 days prior– it would show all of the events prior, going back to the first one entered for this client.

Custom SQL Code

Values entered in the SQL Code field act as a WHERE clause in a SQL query. We already took care of filtering future events through a Less Than or Equal To join so now we just need to limit the past events in the WHERE clause.

I found that if you are using a field as a join field in the previous step, you can actually bring it in as a parameter value (though I have not used it enough to be sure this will hold for all cases, it seems to work here consistently). This allows us to use the same date value that we are using to filter on the join in our WHERE clause. We will combine it with the DATEADD function to go back 30 days and filter for those physical characteristics with an actual_date Greater Than or Equal To that date.

The first actual_date is the actual_date of events in the physical characteristics view. The @actual_date is a parameter that will get its value from the actual_date field on the parent form at the time the form is generated.

The DATEADD calculates thirty days prior to that parameter value and we are looking for anything that happened after that 30-days-ago-date and the parent event’s date.

actual_date >= DATEADD(day, -30, @actual_date)

More Methods to Come!

How To: Create an Events to Complete Subreport

EDIT 3/16/2018: Reader Jen G. pointed out that a staff member’s staff_id != people_id in all cases and therefore my approach would not always work for all staff. She proposed a different form to copy for this setup that will work 100% of the time so I have updated the post to reflect her proposed changes and fix my approach. Thank you, Jen!

This comes from a reader request. The goal was to create a subreport in the Agency > Staff & Security > Staff Information formset that would list the service events that a selected staff member had not fully completed. The subreport could be useful for supervisors to follow up on events that their supervisees needed to e-sign or otherwise complete, especially in the event where a staff member was transitioning out of the agency. The following is my proposed solution to that problem:

Step One: Create a User Sub Report

Navigate to Setup > User Tools > Sub Reports – User > User Sub Reports and create a new User Sub Report. Give the sub report whatever name and code you wish. For System Sub Report, select any report that has event_view as a Data Source Name. In my case, I chose the “Compass (Initial) Peer Delivered Services” report.

When you are selecting from this list, the only critical thing is the data source name. Everything else only speaks to how that particular report had been configured with the data source for that particular system report. It will tell you which columns were used to join and the remarks column will give you and idea of how it might be used “out of the box” but you can change all of those properties once you have the data source linked to your user sub report.

On your new sub report, change the following properties:

SQL Code: is_service_event = 1 AND is_locked = 0

This will filter the event log to only show events that are service event and only those that are not locked. The event_view has many columns in it that will allow you to customize this filtering to get exactly what you want to see. Some other options are: completed, is_amended, is_billed, is_deleted, is_e_signed, is_final

Report Fields: Pick any that you want to display. For my subreport, I wanted to show the client (full_name), the event (event_name), and the date of the event (actual_date).

The one that you need to have for sure is staff_id, which we will mark as a join column. In the Overwrite Form Field to Join, put some value (I used “staff”) and for the operator, choose “Equal”. Remember the Form Field to Join that you used for later. Below is a screenshot of my setup:

Step Two: Create Form

You don’t have to create a whole new form to house this subreport. You might choose to add the subreport to one of the already existing forms in the Staff Information formset. The important thing for this step is that the form you end up putting this subreport on MUST have the staff’s people_id staff_id on it. Maybe the form already has it on there or maybe you need to add it in the form of a variable. I will show you how to add it if it doesn’t already exist.

In my case, I am adding the subform to a custom version of the Personal Info formset member. So in form designer, under the Personal Information form family, I copied the Staff Personal Information Form. On my custom form, I hid all of the fields that I did not want users to see and I added the subreport that I created in part one. Now I need to make sure there is a staff_id named “staff” for the subreport to join on.

To do this, add a regular string variable to the form. Caption it whatever you want but give the variable name the same name as your used for your Overwrite Form Field to Join on the subreport created above. We need this variable to default in with the staff member you select’s staff_id so in the default value field, we will put the following code:

keyValue

Edit: Because I used a form from the Personal Information form family, the keyValue in this case will be a people_id and not a staff_id. Therefore it will only work right on those staff who have the same value for their staff_id as they do for their people_id and this is not always the case. If you copy a form from the Staff form family, you can simply use keyValue because it is the staff_id. But if you are copying a Personal Information form, use the following code to get the staff_id:

getDataValue('staff', 'people_id', keyValue, 'staff_id');

Here is a screenshot of my variable’s configuration:

Once you have confirmed that this field is pulling in a GUID, you can make this field invisible on the form.

Step Three: Create a New Formset Member

With your new form created, you can now associate it with a new formset member so that you can display it for users.

Navigate to Setup > User Tools > Formset Maintenance > FormSet Members and select the Staff Information Formset from the Agency module.

Create a new formset member, name it what you’d like and then select the Personal Information form Family and your new form as the Default Form. Make sure Is Active is checked and then save. Remember to go through the Navigation scheme setup and turn on the new formset for the users who will need access.

The Final Product

With everything setup above, you can navigate to your new formset member and select a staff member. Your form variable should get a default value of the staff you selected’s staff_id and your sub report should be joining on the that staff_id, thereby filtering the event_view to that staff member’s events. Your SQL Code statement on the user sub report will further filter the event_view to just those you are interested in seeing. In our case, the service events that are not locked.

We are using cookies on our website

Please confirm, if you accept our tracking cookies. You can also decline the tracking, so you can continue to visit our website without any data sent to third party services.