
How To: Anchor Sub Report Data to the Parent Event

myEvolv sub reports can be very useful despite their limitations. Their most useful out-of-the-box application is in something like a face sheet, where you want to bring in the current information available, perhaps with some filtering.

In the first draft of some of our form designs, we used the current location sub report to display a client address. What we did not anticipate was that the address on previously entered notes would change when the individual’s address changed. We wanted that address to be locked on the form once it was saved. A few years later some of the Audit Snapshot functionality came out but that still didn’t work for us because of how audit snapshots worked. We needed a way to have the data on the sub report be based on the date of that event, not today’s date.

In subsequent years, I have figured out a few ways to accomplish this, depending on what columsn the sub report views provide and what we are trying to accomplish. I will try to lay out a few different methods below as I have time.

Method 1: Using a Join Column as a Parameter in the SQL Code

This method is good for when you want a sub report that will show you events within a time range from the parent event’s date. For example, you are creating a monthly report type event and need to list all of the progress notes from the 30 days prior to the monthly report date so that you can display them for the monthly report writers to summarize without running a separate report or opening them individually.

In this example, I will create a sub report using the physical_characteristics_view. I want to only show the physical characteristics from any and all events that occurred in the 30 days leading up to the event on which the sub report will display.

Configure Join Columns

When I first copy the system sub report to make my user sub report, the only join column is the people_id. If I display the sub report with this as the only join column, the subreport will show all of the physical characteristics in the system for all time for that person. If I save the event today, when I open it in a year, it will have an additional year’s worth of physical characteristics showing. The first thing we need to do is also use actual_date as a join field.

Check the box for Join Field? and select Less Than or Equal To for Operator.

With this step done, the subreport will now only ever show the physical characteristics for this client that have an actual_date prior to the actual date of the event it is being displayed on. Half of the problem is solved but this report does not cut off at 30 days prior– it would show all of the events prior, going back to the first one entered for this client.

Custom SQL Code

Values entered in the SQL Code field act as a WHERE clause in a SQL query. We already took care of filtering future events through a Less Than or Equal To join so now we just need to limit the past events in the WHERE clause.

I found that if you are using a field as a join field in the previous step, you can actually bring it in as a parameter value (though I have not used it enough to be sure this will hold for all cases, it seems to work here consistently). This allows us to use the same date value that we are using to filter on the join in our WHERE clause. We will combine it with the DATEADD function to go back 30 days and filter for those physical characteristics with an actual_date Greater Than or Equal To that date.

The first actual_date is the actual_date of events in the physical characteristics view. The @actual_date is a parameter that will get its value from the actual_date field on the parent form at the time the form is generated.

The DATEADD calculates thirty days prior to that parameter value and we are looking for anything that happened after that 30-days-ago-date and the parent event’s date.

actual_date >= DATEADD(day, -30, @actual_date)

More Methods to Come!

myEvolv Sub Reports MEGAPOST

Last Updated: September 10th, 2016

Sub reports were one of the most confusing things to me when I started out with myEvolv. They represent one of the best ways by which you can pull data that is already in the system onto your event forms but they are also one of the parts of myEvolv that are frustratingly limited. Knowing how they work and their limitations can save you some headaches when you go about configuring forms.
This post will be an attempt to layout everything I know about sub reports in myEvolv. As with all MEGAPOSTS, I will update this post with new information as I come across is. If you have any additions, corrections or elucidations, please send them along!

Table of Contents
Use & Purpose
Limitations & Security Considerations
Sub Report Maintenance
Creating a New user Defined Sub Report
Customizing a Sub Report

Use & Purpose

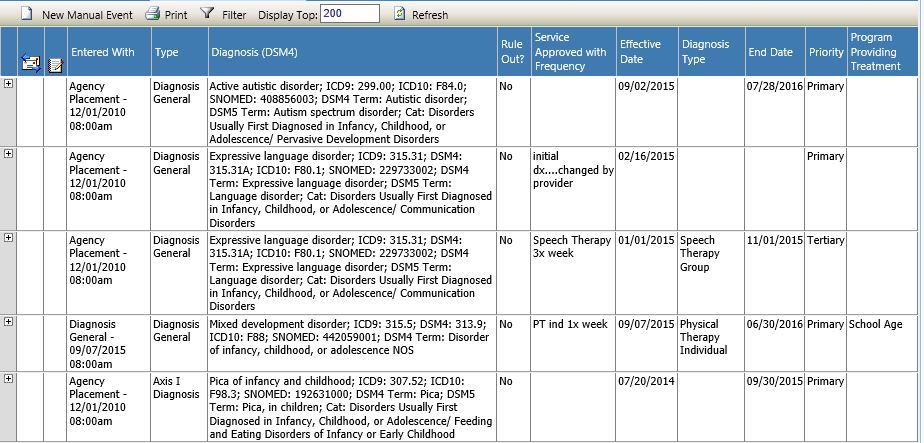
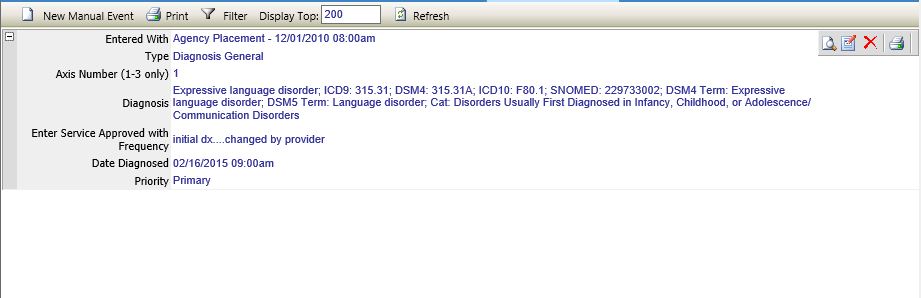
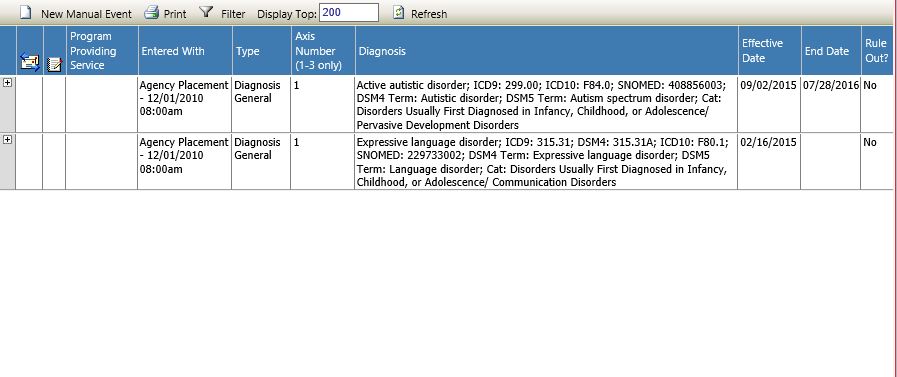
Sub reports are used to pull data that is already in myEvolv onto forms. In the form designer, you can add a UDF Report to any form as a method of displaying relevant information from other areas of the system. Some basic examples of when you might use a sub report are to list a person’s active diagnoses, allergies or demographic information that is fairly static. You might also have sub reports that are more dynamic and pull in service notes for a date range based on fields on the form.

Limitations & Security Considerations

All sub reports in myEvolv are based on views that were created by Netsmart, therefore you cannot pull data from user defined fields into a subreport because your user-defined fields are not known by Netsmart and were not included in the select statement that generates the view. In other words, none of the views available for sub reports include any columns from an _x table, where your user defined columns live.

This turns out to be a very annoying limitation but one that you can sometimes get around if you don’t mind re-purposing Event Log fields. My post on How To: Filter Activity Type and Encounter With Picklists gets into this a little bit and I will post more about where I have used this in upcoming posts.

Another thing to keep in mind with subreports is that there is no security applied to the data that pulls in on the sub report besides the customization that you put into the report. It is therefore possible for users to see data for clients that they are not assigned to through sub reports. Be careful that you are only pulling in data that the end-user should be seeing when you use a sub report.

Sub Report Maintenance

sub-reports-nav-pane

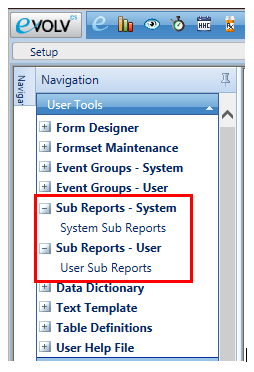
There are two Formsets related to Sub Reports in the Setup module: Sub Reports – System and Sub Reports – User

Sub Report – System > System Sub Reports

This area will allow you to see all of the system sub reports that exist. These are the sub reports that are used on default system forms throughout the system. You cannot delete or create new system sub reports. You also cannot modify any of these sub reports and because of this, you also cannot see what additional Report Fields are available without creating a User Sub Report based on the same Data Source.

The Select Sub Reports picklist will show you the Report Name, Data Source Name, Remarks to explain the purpose of the sub report and a list of the Join Columns
select-sub-reports-picklist

Sub Report – User > User Sub Reports

This area is where you can view and edit user defined sub reports. The Select Sub Report picklist for this formset member will only show the Report Name and the Report Code, both of which are set by the user.
select-sub-reports-user-picklist

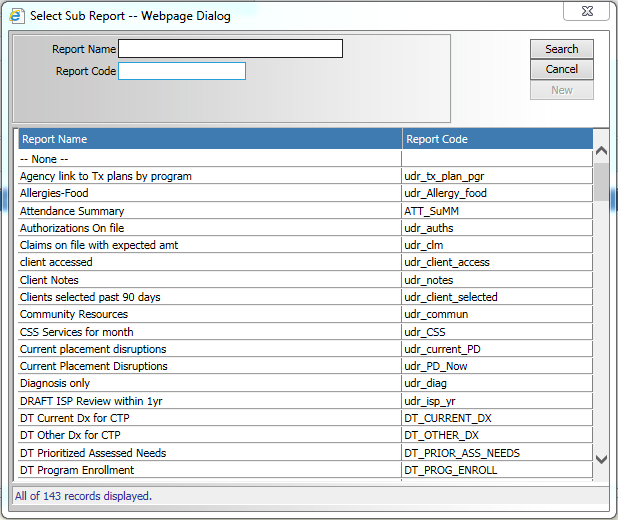
Creating a New User Defined Sub Report

When you create a user defined sub report, as when you create new user defined database fields, it is recommended that you use a prefix like ‘udr’ to distinguish it from system sub reports. The reason for this is avoiding name collisions in the event that Netsmart adds a new system sub report with the same name.

The trick with creating a new user defined sub report is finding a view that contains all of the columns that you would need for your sub report, again keeping in mind that you will not have access to anything in a user defined column. Since you cannot see all of the report fields available for each data source in the System Sub Reports area, you will either need to create a user defined sub report for each data source to see all of the columns available or if you can link to your database with Crystal Reports, you can check out all of the views to see what columns are included in each.

Customizing a Sub Report

User Report Name and User Report Code are editable so you can rename and recode your report as you like.
Remarks are useful for keeping notes about what the sub report is designed to do so I strongly using it.

SQL Code

sql-code

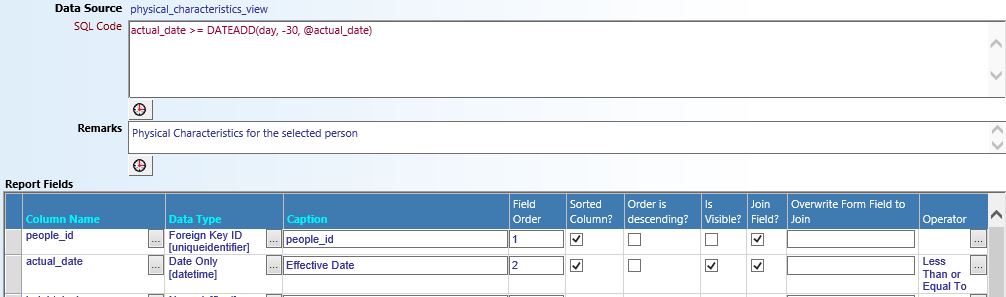
The SQL Code field allows you to add some customization to the SQL that is used to pull data into the subreport. From what I can tell, the SQL that you enter into this field executes as though it is the search condition of a WHERE clause in the SQL statement. This allows you to filter the results in a multitude of ways.

For example, a sub report related to services for a client would pull in all services for the client regardless of program so you may want to filter for a specific program. You can do that by using program_name = 'My Program' in the SQL Code box.

You might want to be more specific and select only services of a certain type so you could use event_name = 'My Service'.

You can create filters on any of the Report Fields available in the view and you can add complexity using AND and OR operators.

You can also use SQL Server functions. For example, if you want to get all of the services that have occurred within the last 3 months of today, you could use actual_date > DATEADD(MONTH, -3, GETDATE())

Report Fields

report-fields

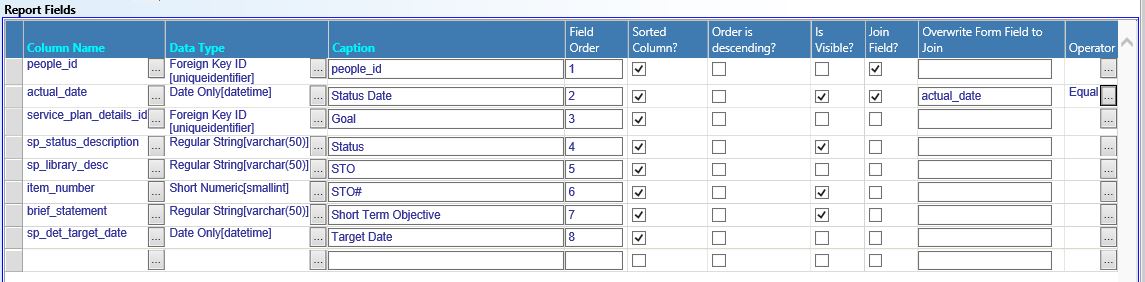
This sub form allows you to customize the look of the sub report on the form and also allows you to do some more filtering of the data based on the parent form fields.

Column Name
The Column Name is used to select which columns from the data source will be used in the subreport. When you click the build button for this field, you will be able to see all of the columns that have been included in this view by Netsmart. These are all of the columns that you can include in the report. The picklist popup will show you the column name and the data type for the column. Many of the columns that are included in the views are uniqueidentifier data type. These are the GUIDs that are used for primary keys in myEvolv’s tables. These are not useful to be displayed but come into play if you want to filter data through a join.

Data Type
The Data Type allows you to display the data from the column in a different format. For the most part, you will want to display the data in your sub report using the same data type that the data is stored in. One place where this might be different is displaying a DateTime as Date Only if you do not wish to display the time.

Caption
The Caption allows you to determine the column header on the displayed sub report.

Field Order
The Field Order allows you to determine the order that the columns render in the sub report table.

Sorted Column
If this box is checked, the subreport will be sorted by this column in ascending order. If more than one column has this box checked in the subreport, the columns will be ordered in priority based on their Field Order.

Order is descending?
If this box is checked, the sort will be in descending order rather than ascending order for this column.

Is Visible?
If this checkbox is checked, the column will display in the sub report on the form.

Join Field
When this box is checked, the sub report will filter based on the value of this field on the parent form.
For example, if people_id is included in the sub report and used as a Join Field and this sub report is used on a form that has a people_id field on it, the sub report will only select rows from the view where the people_id‘s match, effectively filtering the sub report to display only data for the client that the form is for. people_id is a commonly used EventLog field on activities for people and is often configured to default to the value for the client whose record is selected.

Overwrite Form Field to Join
This field allows you to designate a different form field from the parent form to join on. If you simply check the Join Field checkbox, the sub report will look for a parent form field that matches the sub report form field. Instead, you can designate a different field here. As an example of where this might come into play, say you have a monthly summary event where the summary’s actual_date will be the month after that being summarized. The actual_date on the parent form will be June when you are summarizing May’s services. In order to filter the sub report to May’s notes, you will not be able to simply use actual_date as a Join Field since that would pull in June’s notes. Instead, you would add another date field to the summary (for example udf_summarized_date and then use it to overwrite the form field to join with the sub report’s actual_date.

Operator
The Operator allows you to choose a different operator to use with your join. By default, the operator is equal. You can use this to filter a sub report with a join on a date field using greater than or less than to get entries that occurred before or after a date field on the parent form.

How To: Create a Custom Formset Member that Shows Only Active Diagnoses

My agency has a program that requires that clients have a script for service on file in order for services to be billable.  Since a script for service requires a diagnosis, we configured the program’s services to require an active diagnosis in order to generate a claim.  As a result, we have client diagnoses expiring on the same date as the script for service.  When a client gets a new script for service, the same diagnosis is re-entered with a new start and end date.  After a few years enrolled in this program, a client’s diagnosis screen begins to get cluttered with inactive diagnoses so our clinicians asked for a way to just see the current diagnoses that were on file rather than all of the diagnoses that had been entered for the client over the years.

myEvolv includes as “Diagnosis – Active” formset member that looks like it was created to serve exactly this function but it would not list any diagnoses that have end dates on them (even future end dates).   Our program’s diagnoses are entered with end dates since we need them to expire at the same time as the script for service.  We were able to get what we wanted by creating a custom formset that uses a custom default form with a modified list condition.  I have outlined the steps we took to accomplish this for our specific scenario but you could apply this in other situations where you want to customize the listing in a formset member.

Step 1: Create a New Default Form for Active Diagnoses

myEvolv’s Active Diagnosis formset member used the “Diagnosis form for listing – active only” form as its default form so we used it as the basis for our new form.

In the form designer, open the “Diagnosis Information” form family.

Right-click to copy the “Diagnosis form for listing – active only”.  Give the new form a name and code.  Ours is called “Active Dx for MyEvolv Launcher”


Step 2:  Modify the List Condition

In the new form’s header properties, edit the “List Condition Property”

list-condition-edit

Change the list condition code as shown below

list-condition-code

Explanation of Code and the List Condition Property

myEvolv’s code: event_log.end_date is null and event_log.is_deleted = 0

The List Condition property allows you to use SQL statements to manipulate the data that will be listed on the formset member.  Anything you put in the list condition property will be executed as though it is part of the “WHERE” clause on a SQL query.  In the code above, you can see that myEvolv’s list condition was designed to only list diagnoses that have no end_date and have not been deleted.

We adjusted the list condition to also show us diagnoses with end_dates in the future so I modified the code to:

(event_log.end_date IS NULL OR event_log.end_date > GETDATE()) AND event_log.is_deleted = 0

I used SQL’s GETDATE() function to get today’s date so now in order for the diagnosis to list, it must either have no end_date or an end_date that is greater than today’s date and not have been deleted.

Step 3:  Create a Custom Formset Member

We now need a place to apply the new form we created in myEvolv so that it can be used.  We could just swap put the form for the myEvolv-supplied active diagnosis formset member but since other programs might be using it, we decided to create a custom formset member that was only visible to the clinicians in this program.   Our clinicians use myEvolv Launcher as their home pages in myEvolv.  They are used to clicking on their clients from the My Client’s widget, which launches the My Client Information standalone formset so that is where we wanted to add our custom formset.

Go to Setup > User Tools > Formset Maintenance > FormSet Members and select the ‘My Client Information’  FormSet (it is in the “My Evolv” module)

Create a New “Formset Member – User Defined”.

list-condition-formset-member-setup

You can give the tab any caption or description you would like.  Because we are working with the Diagnoses, we have to pick “Diagnosis” for the Event Category that will allow us to pick the “Diagnosis Information” form family and our default form, “Active Dx for MyEvolv Launcher”.

NB: Once this is setup, remember to give users access to the new form in the Navigation Access Setup.  In this example, the new formset member is listed in the My Evolv Module -> My Client Information section.

Results

The screenshots below were taken on 7/11/2016 so active diagnoses would be those that have no end date or an and date after 7/11/2016.

diagnoses-all

This is the generic “Diagnosis Information” formset member.  It is showing all of the diagnoses (except those that have been deleted) for the client.  You can see that the first two would be active by our program’s definition since we have one with a future end date and one with no end date.  The other three are expired diagnoses and those are the ones that we do not wish to display in our custom formset member.


diagnosis-filtered-poorly

This is myEvolv’s “Diagnosis – Active” formset member.  It is only listing the active diagnosis that has no end date.


diagnoses-active

This is our “Script for Service – Active Only” formset member.  Both active diagnoses are listed.  Success!


List Condition Overwrite on Upgrade?

We have noticed that the list condition on this formset member has been overwritten after upgrading our system.  We have a support case about the phenomenon and hopefully it will be resolved in a future release but until then, beware and be sure to save a backup of your custom list condition code to re-apply after upgrades.

We are using cookies on our website

Please confirm, if you accept our tracking cookies. You can also decline the tracking, so you can continue to visit our website without any data sent to third party services.