How To: Enforce ZIP+4 in Client Demographics

Some payors are beginning to require that client addresses utilize the ZIP+4 ZIP code in order to get paid.  The ZIP code field in myEvolv has a datatype of Zip Code which appears to be a string field that allows up to 10 characters.  This means that you can store a 5-digit ZIP code or a ZIP+4 in the field.  Furthermore, the functionality for auto-filling the city and state fields based on the ZIP code will work with either type of ZIP code.

One thing that is lacking is the ability to force users to input a ZIP+4 in the ZIP code field.  The following guide will show how you can add some form validation to the Client Demographics form that will help to prevent users from entering only the 5-digit ZIP code.  While we will be looking at only one set of forms, you should be able to apply the same changes to other forms and address subforms to achieve the desired result elsewhere in the system that addresses are collected or edited.

Setup New Demographics Formset Member

For the purposes of this demo, we are going to modify the Client Demographics form.

This is a system form and we cannot directly make changes to it so instead, we must create a custom demographics form, address subform and formset member so that we can make the changes we want.

Copy the ‘Address by ZIP code‘ Form

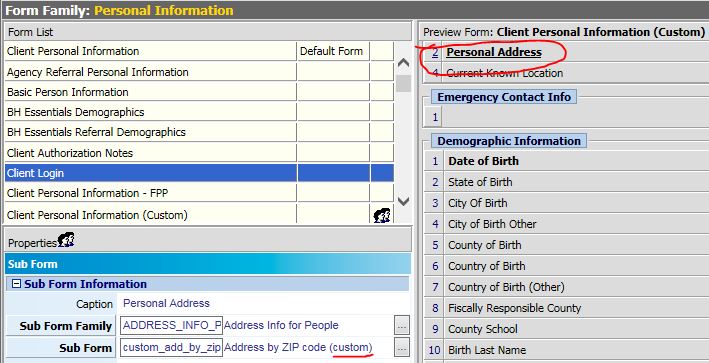
This form is in the Address Info for People form family. This is the form that is used for the Personal Address subform on the Client Demographics.

Copy the ‘Client Personal Information‘ Form

This form is in the Personal Information form family and is listed at the top as the default form. This is the main form that loads when you go to the Client Demographics formset.

On your newly-copied, custom version of this form, swap your custom Address by ZIP code subform in for the default Address by ZIP code subform.
Remember that when you copy and begin editing these system forms, a good rule of thumb is to only add to the form or carefully edit what is on the form so that you do not have downstream effects. Avoid deleting elements. If you don’t want them to be visible, simply hide them.

Create New Formset Member

Select the Client Personal Information FormSet in Formset Maintenance. By Default, the Client Demographics formset member is ordered #1. Add a new formset member and copy the settings for it just like the system default Demographics formset member EXCEPT that we will be using our custom Client Personal Information form instead of the system form in the Default Form field.
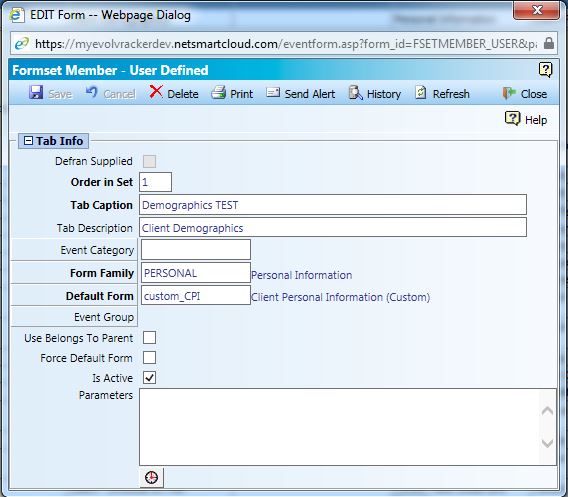
With the new formset created, remember to make it available to all navigation schemes which need the ZIP+4 validation. In order to avoid confusion, you can make the default formset member unavailable to those with the new formset.

Pro Tip: I temporarily put “TEST” in the Tab Caption of my custom formset so that I could find it easily when adding it to the navigation schemes.

You now have a separate and customizable Client Demographics formset to play with in your system

Modify Forms to Validate for ZIP+4

We will need to make changes to both of our forms in order to cover all of our bases. Our method for validating is to check the subform zipcode field when it is changed and determine if the zipcode entered is comprised of 10 characters. If the zip code is other than 10 characters, we will alert the user that they must enter a ZIP+4. If they ignore the warning and attempt to save anyway, we will prevent the save and alert them again that a ZIP+4 must be entered.

Custom ‘Client Personal Information’ Form

Step 1) Add a variable to the form just above the Personal Address subform. This variable will be used to store our ZIP code validation state that we will check before saving.
I named my variable is_zip_invalid and gave it a Regular Numeric datatype. You can set your variable to be not visible.
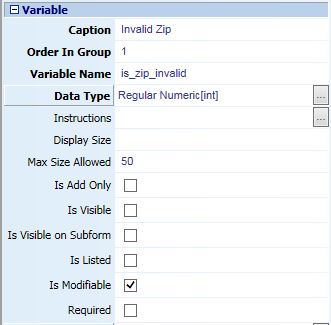
Step 2) Add the following code to the form’s “Before Save Code” property:

if(getFormElement('is_zip_invalid') == '1'){{
alert('You must use ZIP+4');
formValid = false;
}}

The code above checks to see if the value of the variable we just created is ‘1’. If it is, then it gives an alert and tells myEvolv to abort the save because this form is not valid. On the subform, we will add code that will set the value this variable based on what is entered in the zip code fields.

Custom ‘Address by ZIP Code’ Form

Step 1) Add the following code to the ZIP Code field’s “On Change” property:
This code can go under the setAddressFromZip(this); line.

var zip = self.getElementFromXML(currentRowXML, 'zip_code');
if(zip.length != 10){{
window.parent.window.alert('You must use a ZIP+4');
window.parent.setFormElement('is_zip_invalid', 1);
}} else {{
window.parent.setFormElement('is_zip_invalid', 0);
}}

The code above creates a variable named zip and assigns it the value that user enters into the ZIP Code field. The script then checks to see if the value is 10 characters long. If it is not, the code produces an alert to remind the user that a ZIP+4 is required and then sets the value of is_zip_invalid on the parent form to 1. If the value is 10 characters long, the script sets the value of is_zip_invalid on the parent form to 0.

Step 2) Add the following code to the form’s “Before Save Code” property:
Since it is possible for users to open the subform in a new window, we also need to do some validation on the subform itself in case a user ends up adding or editing addresses via this method/

var zip = getFormElement('zip_code');
if(zip.length != 10){{
alert('You must enter a ZIP+4 in order to save');
formValid = false;
}}

The above code does the the same thing that the “Before Save Code” from the other form does. The only difference here is that we have direct access to the value entered in the ZIP code field so we use that to validate the form rather than the variable flag.
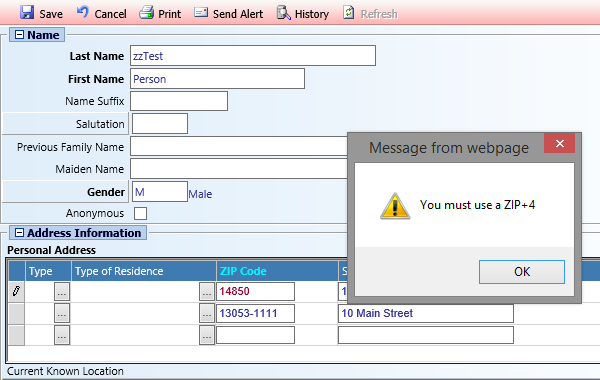
When put altogether, you will have a custom Client Demographics formset that will warn users at the time of changing a ZIP code field if they are not entering a ZIP+4 and will not allow saving until the ZIP code is fixed.

One Vulnerability

The way that this is setup, the value of our variable is_zip_invalid is changed any time a zip code is updated so if the last zip code altered is valid, all zip codes will be accepted as valid. So for example, let’s say that I edit two zip codes on the form. On the first one, I only put in the 5-digit ZIP code. I get an alert telling me to use the ZIP+4 and my variable gets assigned a value of ‘1’. Next, I close the alert and alter the second ZIP code and this time I enter the ZIP+4. Our code executes to check that the ZIP code I entered here is valid. It sees that it is and assigns our variable a value of ‘0’. The form will successfully save even though I still have a 5-digit zip in the first address that I edited.

More complicated code might be able to do a more thorough job of validating multiple zip codes before save but I haven’t figured that out yet.

How To: Default a Date Field Value Based on Another Date Field

NOTE: THIS POST IS AN UPDATED VERSION OF THIS POST

When working on treatment plans in myEvolv, you will notice that many of the treatment plan component forms contain both a start date and a target completion date.  One of the programs I was building a treatment plan for wanted to have the target completion date on the form but always wanted it to be 90 days from the start date.  Instead of making each clinician calculate 90 days from the start date and fill it in themselves, I used this method to take the date value from the start date and update the target completion date field with a value that is 90 days later.  I will walk you through the JavaScript that I used so that you can make adjustments based on your needs.  The full snippet of JavaScript will be at the end.

two-fields

Where does the code go?

The first consideration is where to put the JavaScript.  In this case, used the ‘On Change Script’ field property on the field that will be modified by the clinician, ‘start_date’.  myEvolv provides us with access to 3 events that we can use to trigger our JavaScript handlers (the code we want to execute):  ‘On Change’, ‘On Click’ and ‘On Load’.  The ‘On Change’ event is fired when the value of the field has been changed.  This is the most suitable event to use in this situation since I do not want the new date value to calculate until there is a value in the first date field.  Furthermore, if a clinician makes a mistake entering the start date, I want the new date to recalculate when the clinician makes an adjustment.  Both of these scenarios are covered when using the ‘On Change’ event.

Get the ‘start_date’

The first line of JavaScript code’s purpose is to get the value that has been placed into the ‘start_date’ field and convert it into a proper JavaScript Date object so that we can manipulate the date easily. I declared a variable named date and set it to be a new Date object passing the value of the ‘start_date’ field as its argument:

var date = new Date(getFormElement('start_date'));

Calculate the ‘target_date’

Now with the date entered by the clinician converted to a Date object, I can perform some calculations on the date using the ‘getter’ and ‘setter’ methods built in to JavaScript Date objects. In my scenario, I need the ‘target_date’ field to be +90 days from the ‘start_date’ so I used the getDate() and setDate() methods:

date.setDate(date.getDate() + 90);

If I wanted to do +3 months instead, I would use the getMonth() and setMonth() methods:

date.setMonth(date.getMonth() + 3);

If I wanted to do +1 year, I would use the getFullYear() and setFullYear() methods:

date.setFullYear(date.getFullYear() + 1);

There are also methods for getting and setting hours, minutes, seconds, and milliseconds, but I am dealing with Date Only fields in this scenario.

Format the ‘target_date’

Now that the date object has my new date stored in it, I need to put that value into the ‘target_date’ field. However, the date in the date object is not formatted in a way that myEvolv’s date fields like so I need to pull the individual date elements from the object and build a string value to place in the date field. I accomplish this first by declaring variables for the month, day and year:

var mm = date.getMonth() + 1;//+1 is needed because in JavaScript Date objects, January is 0
var dd = date.getDate();
var yyyy = date.getFullYear();

Now I declare a new variable called formatted_date and set its value to a concatenated myEvolv-friendly string:

var formatted_date = mm + '/' + dd + '/' + yyyy;

Set the ‘target_date’

setFormElement(‘target_date’, formatted_date);


One Caveat

You may be inclined to disable the ‘target_date’ form field so that clinicians cannot change the value after it has been calculated. I was unable to get that to work, however. When a form field is disabled, it is excluded from being saved so for now it would seem that you have to keep the form field modifiable. If you used this same similar* code in the ‘On Change Script’ property for ‘target_date’, you could prevent the ‘target_date’ from being changed by effectively reverting any attempts at changing the ‘target_date’ manually.

*You will need to also add some JavaScript to validate that the ‘target_date’ has been changed because if you just put this exact same code in the ‘On Change Script’ property for ‘target_date’, you will end up in an infinite loop when ‘actual_date’ is changed on the form and you will crash the browser.

The Full Code

var date = new Date(getFormElement('start_date'));
date.setDate(date.getDate() + 90);
var mm = date.getMonth() + 1;
var dd = date.getDate();
var yyyy = date.getFullYear();
var formatted_date = mm + '/' + dd + '/' +yyyy;
setFormElement('target_date', formatted_date);

Tips and Tricks: Two Methods for Finding a GUID

In a previous post I used Crystal Reports to find the GUID associated with a program in my tables. Since Crystal Reports is not an option for everyone, I thought I would share two methods that everyone has for discovering the GUID of a picklist item in myEvolv.

Method 1: Form Field Manipulation

If you are trying to determine the GUID value for a picklist field, you can make a quick change in the for designer to expose the GUID.

In this example, I am going to try to figure out the GUID for my Preschool – Classroom program. On the form below, I have the program_providing_service field which uses the “Program Listing – All” lookup table. I have selected ‘Preschool – Classroom’ on the form and will save the form with this value.

program providing service field as foreign key

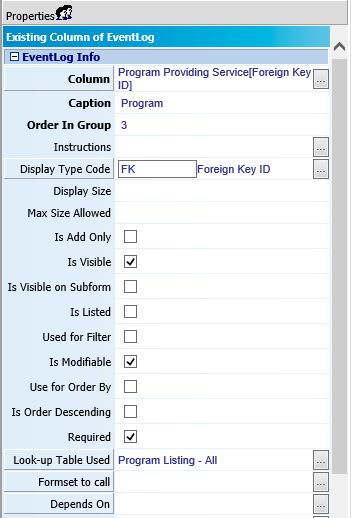
Next step is to go to the form designer and edit this form. The program_providing_service field on the form is a Foreign Key field and it is associated with a lookup table. This accounts for how it displays on the form as a picklist field where instead of seeing the GUID of the program providing service, you see its description value from the lookup table.

program providing service field properties

If we change the Display Type Code of the field to Regular String and clear the value for the lookup table, the Program field will display on the form as a text field and expect the user to type in a GUID. However, on forms where the value already has been entered and saved, the value will display as the GUID of the item selected. So we will change the Display Type Code to Regular String and then Save the form.

Upon re-opening the saved event from before, we see the GUID of ‘Preschool – Classroom’ program displayed in the Program column. Once you have your GUID, you can revert the changes made to the form.

program providing service displayed as guid

Method 2: Data Insight Report

This method requires a little knowledge about the tables in myEvolv but works when you can’t edit the form to use method 1.

Navigate to Reports >Data Insight Report Writer >Custom Reporting >Custom Reporting

Click Configuration then Click “Create a new virtual view”

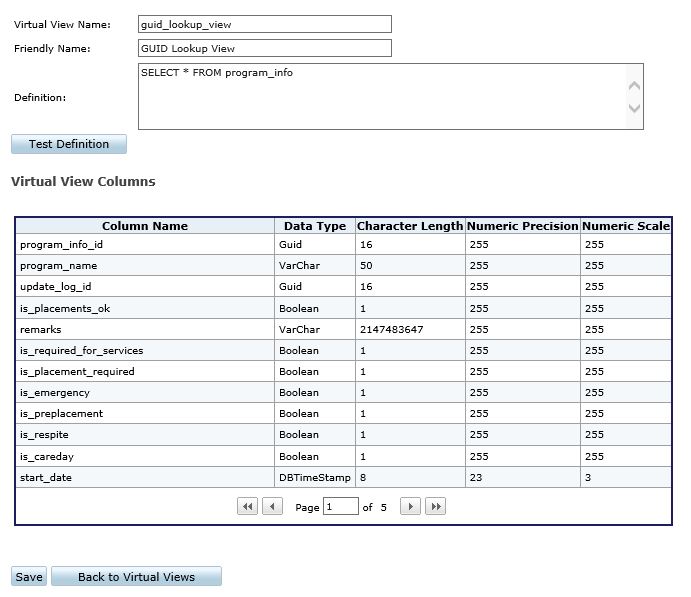
Give your virtual view a name and friendly name and then use a simple SQL statement to get everything from the table that contains GUID. In my example, I am looking for everything from the program_info table because that is where all of the programs are kept. user_defined_lut contains all of the user defined lookup table values combined together.

So I will use SELECT * FROM program_info

virtual view

Save the view and then click “Report Management” and click “Add”. Select “Tabular Report With Header”

Select your virtual view as the data source and click “OK”.

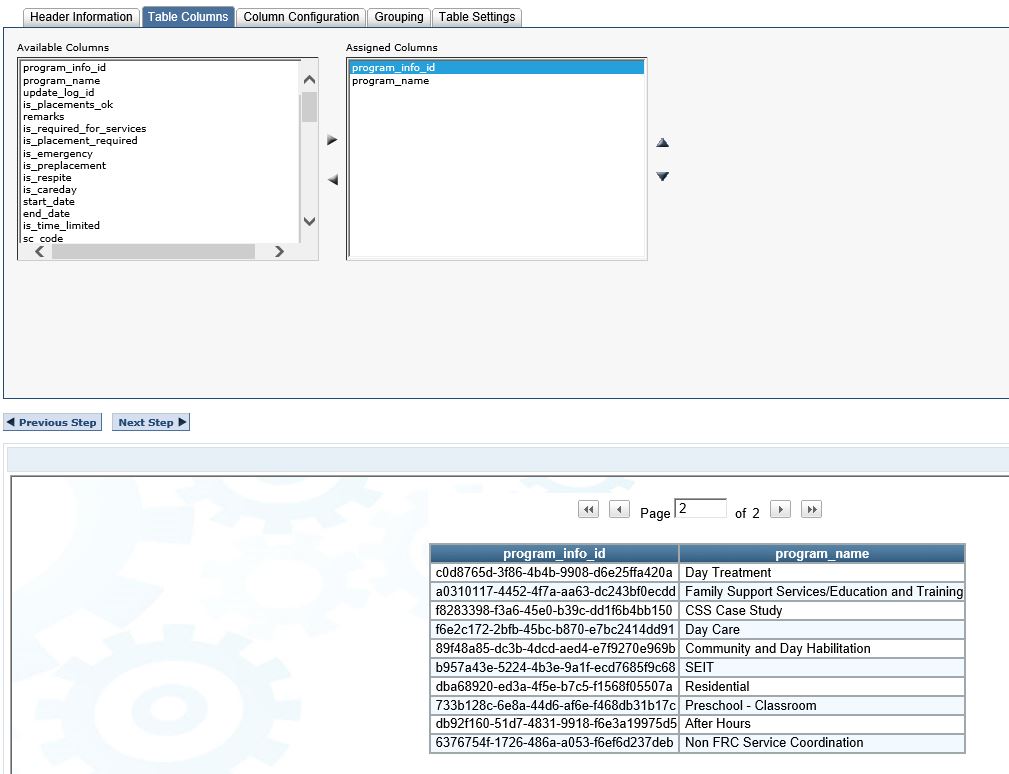
In the Report designer, add the Primary Key Column (in this case program_info_id) – it is usually the one with the same name as the table and then _id at the end.
Also add the description column – in some cases this column might have a different name – for my example, the column I want is program_name.

At the bottom of the screen, you will see a preview of your report with the GUID and the Description so that you can tell which GUID belongs to which item.

report results

*ARCHIVE* How To: Default a Date Field Value Based on Another Date Field

NOTE: THIS POST CONTAINS OBSOLETE CODE THAT WILL NOT WORK IN NX. I WILL KEEP THE POST AVAILABLE SINCE IT MAY PROVIDE SOME INSIGHT IN HOW TO USE JAVASCRIPT TO MANIPULATE MYEVOLV FORMS. YOU CAN FIND THE UPDATED VERSION OF THIS POST HERE.

When working on treatment plans in myEvolv, you will notice that many of the treatment plan component forms contain both a start date and a target completion date.  One of the programs I was building a treatment plan for wanted to have the target completion date on the form but always wanted it to be 90 days from the start date.  Instead of making each clinician calculate 90 days from the start date and fill it in themselves, I used this method to take the date value from the start date and update the target completion date field with a value that is 90 days later.  I will walk you through the JavaScript that I used so that you can make adjustments based on your needs.  The full snippet of JavaScript will be at the end.

two-fields

Where does the code go?

The first consideration is where to put the JavaScript.  In this case, used the ‘On Change Script’ field property on the field that will be modified by the clinician, ‘start_date’.  myEvolv provides us with access to 3 events that we can use to trigger our JavaScript handlers (the code we want to execute):  ‘On Change’, ‘On Click’ and ‘On Load’.  The ‘On Change’ event is fired when the value of the field has been changed.  This is the most suitable event to use in this situation since I do not want the new date value to calculate until there is a value in the first date field.  Furthermore, if a clinician makes a mistake entering the start date, I want the new date to recalculate when the clinician makes an adjustment.  Both of these scenarios are covered when using the ‘On Change’ event.

Get the ‘start_date’

The first line of JavaScript code’s purpose is to get the value that has been placed into the ‘start_date’ field and convert it into a proper JavaScript Date object so that we can manipulate the date easily. I decalred a variable named date and set it to be a new Date object passing the value of the ‘start_date’ field as its argument:

var date = new Date(document.getElementById('start_date').value);

Calculate a New Date

Now with the date entered by the clinician converted to a Date object, I can perform some calculations on the date using the ‘getter’ and ‘setter’ methods built in to JavaScript Date objects. In my scenario, I need the ‘target_date’ field to be +90 days from the ‘start_date’ so I used the getDate() and setDate() methods:

date.setDate(date.getDate() + 90);

If I wanted to do +3 months instead, I would use the getMonth() and setMonth() methods:

date.setMonth(date.getMonth() + 3);

If I wanted to do +1 year, I would use the getFullYear() and setFullYear() methods:

date.setFullYear(date.getFullYear() + 1);

There are also methods for getting and setting hours, minutes, seconds, and milliseconds, but I am dealing with Date Only fields in this scenario.

Format the New Date

Now that the date object has my new date stored in it, I need to put that value into the ‘target_date’ field. However, the date in the date object is not formatted in a way that myEvolv’s date fields like so I need to pull the individual date elements from the object and build a string value to place in the date field. I accomplish this first by declaring variables for the month, day and year:

var mm = date.getMonth() + 1;//+1 is needed because in JavaScript Date objects, January is 0
var dd = date.getDate();
var yyyy = date.getFullYear();

Now I declare a new variable called formatted_date and set its value to a concatenated myEvolv-friendly string:

var formatted_date = mm + '/' + dd + '/' + yyyy;

Set the ‘target_date’

Next I can put this string into the field on the form. Since I will do a few things to the ‘target_date’ field, I am going to create a variable called target_date to refer to it more quickly:

var target_date = document.getElementById('target_date');
target_date.value = formatted_date;

Awaken the ‘target_date’ Field

You might think that you are done here because the new date has been loaded into the form, however, because I used JavaScript to update the value of ‘target_date’, the form itself does not recognize that a change has been made to ‘target_date’ which is indicated by the form label and field value text turning red. Even though the value is in the form field, upon saving, the form will not recognize the field as having a new value and will not include it in its save operation. One way to fix that is to manually click in the ‘target_date’ field and then click out of it so that the form recognizes a change in the value of the field but that is un-intuitive and error-prone. Luckily, JavaScript provides a method for simulating this with the focus() and blur() methods to use on form fields:

target_date.focus();
target_date.blur();

With these two lines at the end, after the new date value has been filled in on the ‘target_date’ field, the field label turns red which means that the form has recognized that its value has changed and it will include the change when the form is saved.

two-fields-filled

One Caveat

You may be inclined to disable the ‘target_date’ form field so that clinicians cannot change the value after it has been calculated. I was unable to get that to work, however. When a form field is disabled, it is excluded from being saved so for now it would seem that you have to keep the form field modifiable. If you used this same similar* code in the ‘On Change Script’ property for ‘target_date’, you could prevent the ‘target_date’ from being changed by effectively reverting any attempts at changing the ‘target_date’ manually.

*You will need to also add some JavaScript to validate that the ‘target_date’ has been changed because if you just put this exact same code in the ‘On Change Script’ property for ‘target_date’, you will end up in an infinite loop when ‘actual_date’ is changed on the form and you will crash the browser.

The Full Code

var date = new Date(document.getElementById('start_date').value);
date.setDate(date.getDate() + 90);
var mm = date.getMonth() + 1;
var dd = date.getDate();
var yyyy = date.getFullYear();
var formatted_date = mm + '/' + dd + '/' +yyyy;
var target_date = document.getElementById('target_date');
target_date.value = formatted_date;
target_date.focus();
target_date.blur();

We are using cookies on our website

Please confirm, if you accept our tracking cookies. You can also decline the tracking, so you can continue to visit our website without any data sent to third party services.