myEvolv Sub Reports MEGAPOST

Last Updated: September 10th, 2016

Sub reports were one of the most confusing things to me when I started out with myEvolv. They represent one of the best ways by which you can pull data that is already in the system onto your event forms but they are also one of the parts of myEvolv that are frustratingly limited. Knowing how they work and their limitations can save you some headaches when you go about configuring forms.
This post will be an attempt to layout everything I know about sub reports in myEvolv. As with all MEGAPOSTS, I will update this post with new information as I come across is. If you have any additions, corrections or elucidations, please send them along!

Table of Contents
Use & Purpose
Limitations & Security Considerations
Sub Report Maintenance
Creating a New user Defined Sub Report
Customizing a Sub Report

Use & Purpose

Sub reports are used to pull data that is already in myEvolv onto forms. In the form designer, you can add a UDF Report to any form as a method of displaying relevant information from other areas of the system. Some basic examples of when you might use a sub report are to list a person’s active diagnoses, allergies or demographic information that is fairly static. You might also have sub reports that are more dynamic and pull in service notes for a date range based on fields on the form.

Limitations & Security Considerations

All sub reports in myEvolv are based on views that were created by Netsmart, therefore you cannot pull data from user defined fields into a subreport because your user-defined fields are not known by Netsmart and were not included in the select statement that generates the view. In other words, none of the views available for sub reports include any columns from an _x table, where your user defined columns live.

This turns out to be a very annoying limitation but one that you can sometimes get around if you don’t mind re-purposing Event Log fields. My post on How To: Filter Activity Type and Encounter With Picklists gets into this a little bit and I will post more about where I have used this in upcoming posts.

Another thing to keep in mind with subreports is that there is no security applied to the data that pulls in on the sub report besides the customization that you put into the report. It is therefore possible for users to see data for clients that they are not assigned to through sub reports. Be careful that you are only pulling in data that the end-user should be seeing when you use a sub report.

Sub Report Maintenance
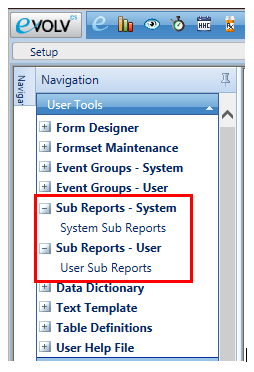
sub-reports-nav-pane

There are two Formsets related to Sub Reports in the Setup module: Sub Reports – System and Sub Reports – User

Sub Report – System > System Sub Reports

This area will allow you to see all of the system sub reports that exist. These are the sub reports that are used on default system forms throughout the system. You cannot delete or create new system sub reports. You also cannot modify any of these sub reports and because of this, you also cannot see what additional Report Fields are available without creating a User Sub Report based on the same Data Source.

The Select Sub Reports picklist will show you the Report Name, Data Source Name, Remarks to explain the purpose of the sub report and a list of the Join Columns
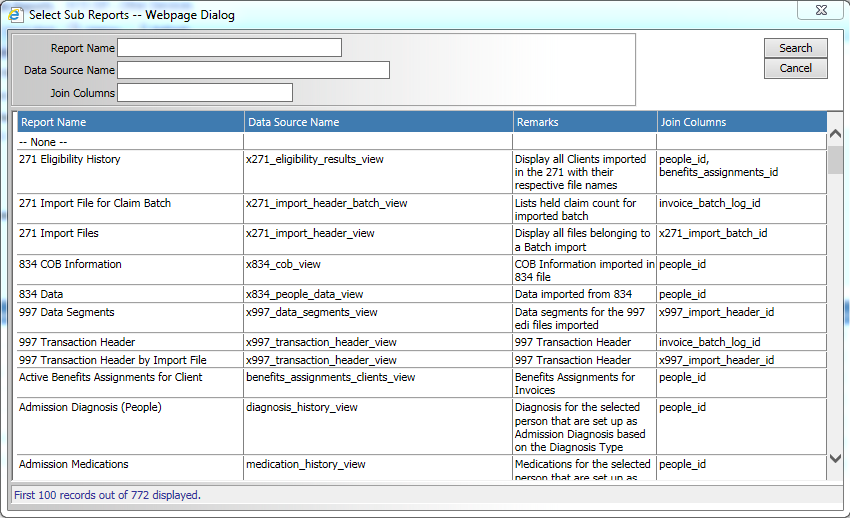
select-sub-reports-picklist

Sub Report – User > User Sub Reports

This area is where you can view and edit user defined sub reports. The Select Sub Report picklist for this formset member will only show the Report Name and the Report Code, both of which are set by the user.
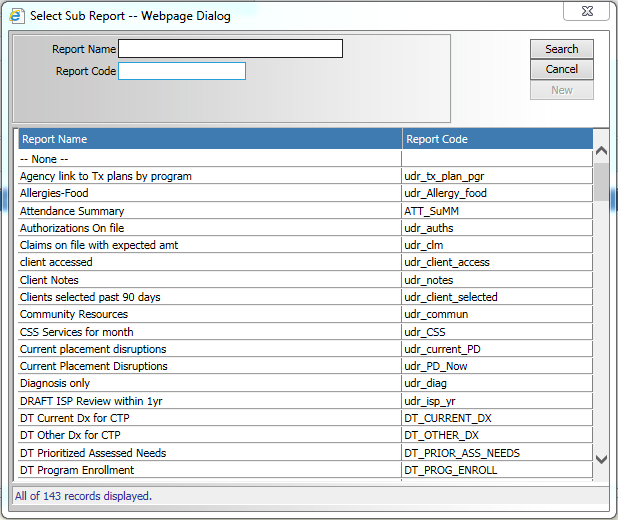
select-sub-reports-user-picklist

Creating a New User Defined Sub Report

When you create a user defined sub report, as when you create new user defined database fields, it is recommended that you use a prefix like ‘udr’ to distinguish it from system sub reports. The reason for this is avoiding name collisions in the event that Netsmart adds a new system sub report with the same name.

The trick with creating a new user defined sub report is finding a view that contains all of the columns that you would need for your sub report, again keeping in mind that you will not have access to anything in a user defined column. Since you cannot see all of the report fields available for each data source in the System Sub Reports area, you will either need to create a user defined sub report for each data source to see all of the columns available or if you can link to your database with Crystal Reports, you can check out all of the views to see what columns are included in each.

Customizing a Sub Report

User Report Name and User Report Code are editable so you can rename and recode your report as you like.
Remarks are useful for keeping notes about what the sub report is designed to do so I strongly using it.

SQL Code

sql-code

The SQL Code field allows you to add some customization to the SQL that is used to pull data into the subreport. From what I can tell, the SQL that you enter into this field executes as though it is the search condition of a WHERE clause in the SQL statement. This allows you to filter the results in a multitude of ways.

For example, a sub report related to services for a client would pull in all services for the client regardless of program so you may want to filter for a specific program. You can do that by using program_name = 'My Program' in the SQL Code box.

You might want to be more specific and select only services of a certain type so you could use event_name = 'My Service'.

You can create filters on any of the Report Fields available in the view and you can add complexity using AND and OR operators.

You can also use SQL Server functions. For example, if you want to get all of the services that have occurred within the last 3 months of today, you could use actual_date > DATEADD(MONTH, -3, GETDATE())

Report Fields

report-fields

This sub form allows you to customize the look of the sub report on the form and also allows you to do some more filtering of the data based on the parent form fields.

Column Name
The Column Name is used to select which columns from the data source will be used in the subreport. When you click the build button for this field, you will be able to see all of the columns that have been included in this view by Netsmart. These are all of the columns that you can include in the report. The picklist popup will show you the column name and the data type for the column. Many of the columns that are included in the views are uniqueidentifier data type. These are the GUIDs that are used for primary keys in myEvolv’s tables. These are not useful to be displayed but come into play if you want to filter data through a join.

Data Type
The Data Type allows you to display the data from the column in a different format. For the most part, you will want to display the data in your sub report using the same data type that the data is stored in. One place where this might be different is displaying a DateTime as Date Only if you do not wish to display the time.

Caption
The Caption allows you to determine the column header on the displayed sub report.

Field Order
The Field Order allows you to determine the order that the columns render in the sub report table.

Sorted Column
If this box is checked, the subreport will be sorted by this column in ascending order. If more than one column has this box checked in the subreport, the columns will be ordered in priority based on their Field Order.

Order is descending?
If this box is checked, the sort will be in descending order rather than ascending order for this column.

Is Visible?
If this checkbox is checked, the column will display in the sub report on the form.

Join Field
When this box is checked, the sub report will filter based on the value of this field on the parent form.
For example, if people_id is included in the sub report and used as a Join Field and this sub report is used on a form that has a people_id field on it, the sub report will only select rows from the view where the people_id‘s match, effectively filtering the sub report to display only data for the client that the form is for. people_id is a commonly used EventLog field on activities for people and is often configured to default to the value for the client whose record is selected.

Overwrite Form Field to Join
This field allows you to designate a different form field from the parent form to join on. If you simply check the Join Field checkbox, the sub report will look for a parent form field that matches the sub report form field. Instead, you can designate a different field here. As an example of where this might come into play, say you have a monthly summary event where the summary’s actual_date will be the month after that being summarized. The actual_date on the parent form will be June when you are summarizing May’s services. In order to filter the sub report to May’s notes, you will not be able to simply use actual_date as a Join Field since that would pull in June’s notes. Instead, you would add another date field to the summary (for example udf_summarized_date and then use it to overwrite the form field to join with the sub report’s actual_date.

Operator
The Operator allows you to choose a different operator to use with your join. By default, the operator is equal. You can use this to filter a sub report with a join on a date field using greater than or less than to get entries that occurred before or after a date field on the parent form.

myEvolv EventLog Date and Time Fields MEGAPOST

Last Updated:  August 23rd, 2016

When you are configuring forms in myEvolv, it can be tricky determining how to handle dates and times. Different myEvolv date and time fields are used within the system in different ways. Some of the implications of using one EventLog date or time field over another might not be apparent until the form has been in use for a while, at which point it might be too late.

This post will be an attempt to layout everything I figure out about the way the various EventLog date and time fields work in myEvolv to aid in making a more informed choice about which to include on forms.

Date and Time Columns Available in the EventLog

As of v9.0.6994.136, the EventLog table contains the following date and time columns:
You can click a column caption to skip down to the details for that column

Caption Column DataType
Actual Date actual_date DateTime
Amended Date amended_dt_tm DateTime
Approval Date Internal QI/MIS approved_qi_date Date Only
Approval External Date approved_external_date Date Only
Approved Date approved_date Date Only
Date Entered date_entered DateTime Updated
Date Locked date_locked DateTime
Date timestamp timesheet was submitted date_submitted DateTime
End date end_date DateTime
Expiration Date expiration_date Date Only
Final Approval Date final_approval_date Date Only
Proc Discontinued Date proc_discontinued_date DateTime
Procedure Completion Date proc_completed_date DateTime
Reconciliation Date reconciliation_date DateTime
Target End Date target_end_date Date Only
Verified Date verified_date DateTime
Duration duration Time Duration
Duration Other duration_other Time Duration
Planning Time planning_time Time Duration
Travel Time travel_time Time Duration

DataTypes and Display Code Type

Date and Time data can be displayed and captured in a few different ways on forms depending on the Display Type Code that is indicated in the form field’s properties

DateTime Displays a date field and a time field datetime-display
Date Only Displays a date field with no time field date-only-display
Time Displays a time field with no date field time-display
Time Duration Displays a time duration field time-duration-display

Default Display Code Type

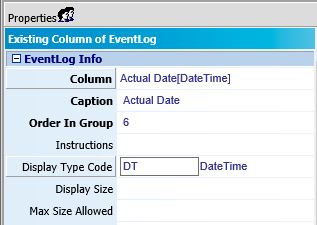
date-field-properties

In the form designer, the default Display Code Type is based on the DataType of the column:

  • If you select a DateTime column, the Display Type Code will default to DateTime
  • If you select a Date Only column, the Display Type Code will default to Date Only
  • If you select a DateTime Updated column, the Display Type Code will default to DateTime
  • If you select a Time Duration field, the Display Type Code will default to Time Duration
  • If you select a Time Only field, the Display Type Code will default to Time (there are currently no Time Only columns in the EventLog table but you may wish to create a user-defined field column of this type so it is included here)

Changing Display Code Type

In some cases, you can change the display type for the field.

  • You CAN use a Date Only Display Code Type on DateTime and DateTime Updated columns
    • This will allow you to display or capture dates without a time when you want to use one of the DateTime columns.
    • When a DateTime column is captured using Date Only Display Code Type, the time will be inserted into the database as 00:00 AM
      • This has implications for service overlaps – multiple services with no captured specific time for a client in a single day will have the same time


  • You CAN* use a Time Display Code Type on DateTime and DateTime Updated columns
    • *myEvolv will not prevent you from saving a form with a field setup this way, however it is not terribly useful (see below)
    • This will allow you to capture times without a date, however it will display a date/time string.
      • datetime-disp-time-after-save
    • When a DateTime column is captured using Time Display Code Type, the date will be inserted into the database as 1/1/1900


  • You CANNOT use a DateTime Display Type Code on a Date Only column
    • Date Only columns do not have a corresponding _tzo column in the database to store the time value that you are capturing on the form. Upon attempting to save, you will receive an error that will prevent the save.


  • It is UNKNOWN whether you can use a DateTime Display Type Code on a Time Only column
    • I will investigate this soon.


  • You CAN use a Time Display Type Code on a Time Duration column
    • This will allow you to capture a time without needing a date value.
    • This may have unforseen consequences elsewhere in myEvolv since the system expects this data to represent a duration, not a timestamp — requires more investigation

Individual Column Details

Actual Date | actual_date

The actual_date is an important date field in the EventLog when it comes to events. It is meant to represent the actual date and time that an event occurred.

Where else is it used?

It is the date and time that displays in the Service Entry listing in the “Actual Date-Time” column
service-entry-actual-date

The actual date also displays in the Treatment Plans listing in the “Start Date” column
plan-development-actual-date

The actual_date appears in the “Actual Date” column in the Service/Case notes & Planning Approval area of myEvolv. It is displayed as Date Only
actual-date-supervisor-module

Service Overlaps

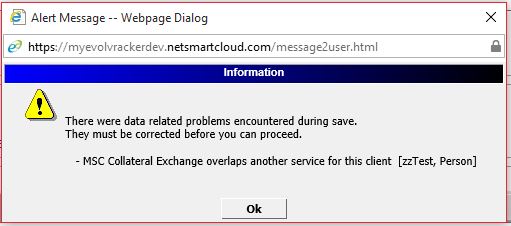
myEvolv does not allow service events of the same type to overlap for a client. Therefore if you are setting up an event that could occur multiple times in a single day, you must display the actual_date as a DateTime field on the form and have clinicians input a time. If you display the actual_date as Date Only, all services will be put into the database at 00:00 AM and myEvolv is prevent the second service of the same type from saving because of an overlap. If you do not wish to have the time displayed on the events after the initial entry, you could use a different “Edit Form” in the event configuration which displays the actual_date as Date Only.

service-overlap-error


Amended Date | amended_dt_tm


Approved Date Internal QI/MIS | approved_qi_date


Approval External Date | approved_external_date


Approved Date | approved_date

The approved_date appears in the “Approved Date” column in the Service/Case notes & Planning Approval area of myEvolv. It is displayed as Date Only
approved-date-supervisor-module


Date Entered | date_entered

The date_entered column is used by myEvolv to store a timestamp for when an event is first saved in the system.

This column is displayed on the Clients Services & Treatment canned reports, which show both the actual_date that clinician’s enter on their services and the entered_date that the system generates so that supervisors can check for contemporaneity of entries.

The difference between the entered_date and the actual_date is used to determine if a service has been documented contemporaneously based on the contemporaneous rule defined in the billing setups and when running a Contemporaneous Rule Report canned report.

Since this column is intended to store system-generated timestamps, it is not recommended that you add this field to a form except in the case that you would like to display the date and time that an entry was entered into the system by a clinician. In this case, the field should be made not-modifiable.

Where else is it used?

The date_entered appears in the “Entry Information” column in the Service/Case notes & Planning Approval area of myEvolv.
date-entered-supervisor-module


Date Locked | date_locked

The date_locked column is used by myEvolv to store a timestamp for when a service is last e-signed by the entering clinician this locking the event from being edited.

The system generates the timestamp when a service event is electronically signed which can occur in three circumstances:

  1. Upon saving a service if the service is configured to “Auto-Submit/Sign”. In this case, the date_locked column will have the same timestamp as the date_entered column.
  2. Upon clicking the “Electronically Sign” button if the service is configured for “Electronically Signed”
  3. Upon clicking the “Submit” button if the service is configured for “Can Submit”

If a clinician clicks the “Remove Electronic Signature” button on an electronically signed service, the date_locked column will become NULL.

Since this column is intended to store system-generated timestamps, it is not recommended that you add this field to a form. The date_locked will display on electronically-signed services automatically (see below).

Where else is it used?

The date_locked displays as the “Date” with the signature image on electronically signed
locked-date-sig-image

and submitted services for the “Signed by” signatures
locked-date-sig-image-approved

[the “Date” for the “Approved by” signatures come from the approved_date column]

The date_locked appears in the “Submission Date” column in the Service/Case notes & Planning Approval area of myEvolv. It is displayed as Date Only
locked-date-supervisor-module


Date timestamp timesheet was submitted | date_submitted


End date | end_date


Expiration Date | expiration_date

The expiration_date column is intended to be used to indicate the expiration date of a treatment plan in myEvolv.

Where else is it used?

The expiration_date appears in the “Expiration Date” column in the Plan Development area of myEvolv.
expiration-date-plan-development


Final Approval Date | final_approval_date

The final_approval_date column is used by myEvolv to store a timestamp for when the final step of a route has been completed.

Since this column is intended to store system-generated timestamps, it is not recommended that you add this field to a form. The final_approval_date will display in the Routing History of routed treatment plans.

Where else is it used?

The final_approval_date appears in the “Final Approval Date” column in the Plan Development area of myEvolv.
final-approval-date-treatment-plans


Proc Discontinued Date | proc_discontinued_date


Procedure Completion Date | proc_completed_date


Reconciliation Date | reconciliation_date


Target End Date | target_end_date


Verified Date | verified_date


Duration | duration


Duration Other | duration_other


Planning Time | planning_time


Travel Time | travel_time


We are using cookies on our website

Please confirm, if you accept our tracking cookies. You can also decline the tracking, so you can continue to visit our website without any data sent to third party services.