How To: Setup Multiple Subforms from the Same Form Family on a Single Parent Form

When you put a Non Event Based Subform on Form, the database link between the parent form and the subform occurs on event_log_id. For example, if you have a Materials Provided subform on your event form, each row in that subform will create a row in the materials_provided table and the materials_provided table will have the event_log_id of the event it was added from. myEvolv uses that link to know which of the materials_provided rows to display on the parent form – only those that were entered on that specific event with the matching event_log_id.

When you use two or more subforms from the same form family on the same parent form, a complication arises.  If you do not change the default behavior of the subforms, all of the subforms from the same form family show all of their rows from the form family table regardless of which specific subform was used to enter the information.

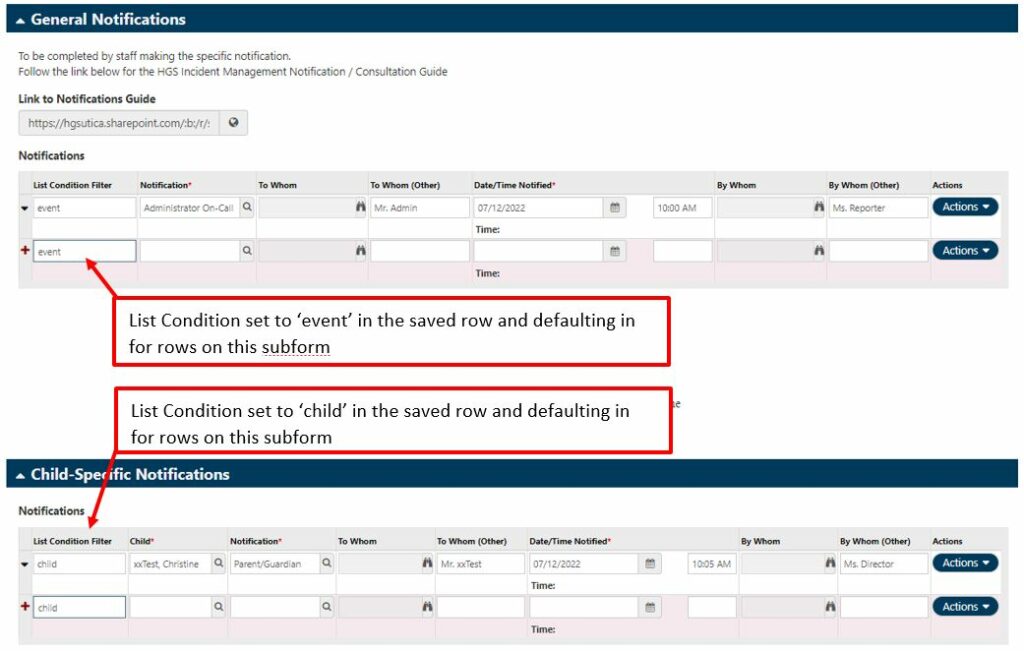
Here is an example.  This form has two subforms on it – the top one is used to track the notifications that were made once per event.  The bottom one is used to track notifications that must be made per child who were involved in the incident.  Both of these subforms are created in the Materials Provided form family.
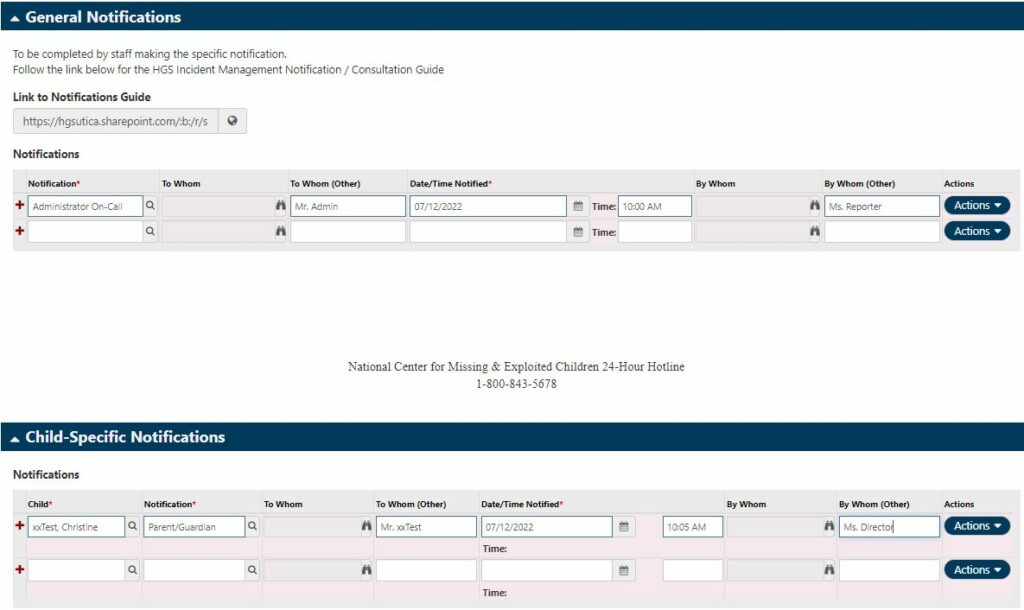
This is the form filled in but not saved. Each type of notification is in its rightful subform and there is one row per subform. After Save, the problem arises:
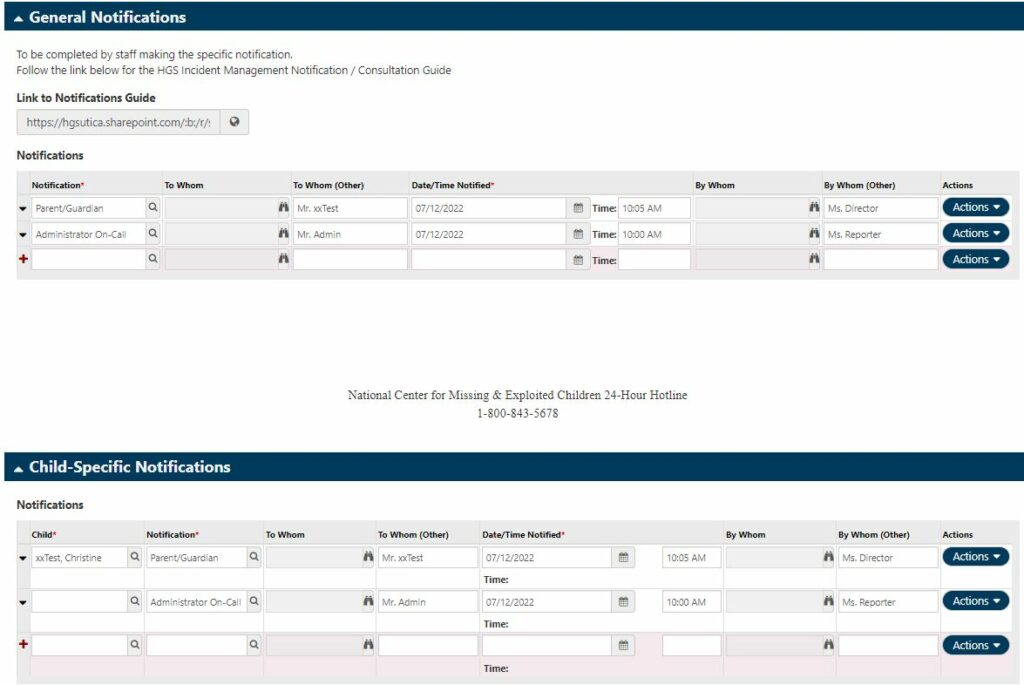
Both subforms now have both rows listed in them, each showing only the fields that are defined in their respective subform design (see the lack of Child column in the first subform). So what’s happening here?

“Out of the box”, a Materials Provided subform will pull all of the materials_provided database table rows that belong to this event – and both rows do because both subform rows were added on this parent event.  But we want them to stay in their own subforms so that a user looking at this event after save can see the data organized in the intended manner. 

Thankfully, myEvolv has a way to do this and it involved using the List Condition attribute for the form header used on these subforms.
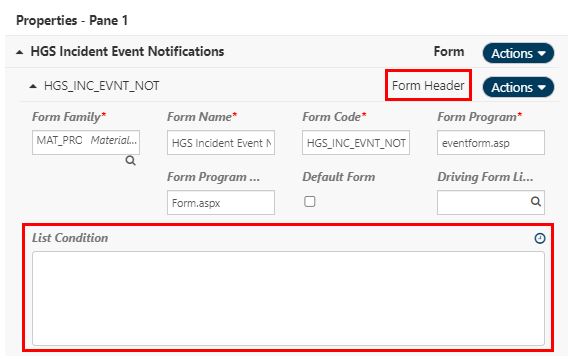
The List Condition attribute allows you to put further filtering on the query that determines which rows will pull in on the subforms.   It is literally the conditions for when to list a row in the subform and it acts like everything after “WHERE” in a SQL where clause.  This means that there are a lot of possibilities for filtering – you can use any of the columns in the form family table to filter on and combinations of them.

For our example, I want to keep the event-level notifications in one subform and the child-specific notifications in the other subform.

To do this, I create a user-defined field of Regular String type in the Materials Provided form family and add it to both of my subforms.  It can be left not visible on subform so that users don’t see it.

My custom database column is called udf_list_cond_filter

For the event-level notification subform, I give this column a default value of ‘event’ (see image below)

And for the child-specific notification subform, I use the same field setup the same way, but I give this column a default value of ‘child’
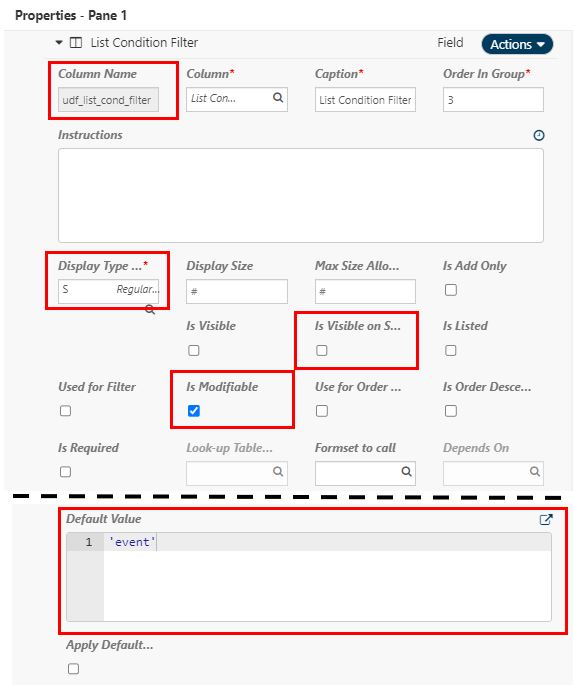
Now when a new row is added in one of the subforms, this column is getting the value of ‘child’ or ‘event’, depending on which subform is used.  We will use that fact to filter using the subform’s list condition attribute.NOTE:  you can use whatever terms you want for your default value and list condition logic, these are just what I chose for my example.  The important thing is that it will match between the forms list condition and the default value.

On the event-level notification subform, my List Condition value will be

udf_list_cond_filter = 'event'

and on the child-specific notification subdorm, my List Condition value will be

udf_list_cond_filter = 'child'

This is telling the subform to only list a row from the materials_provided table if the event_log_id matches the parent event (already happening automatically) AND if the udf_list_cond_filter column has the matching value in it.

With this all setup, when I enter a new event with the same values as before, it will look the same after saving as it did before saving.
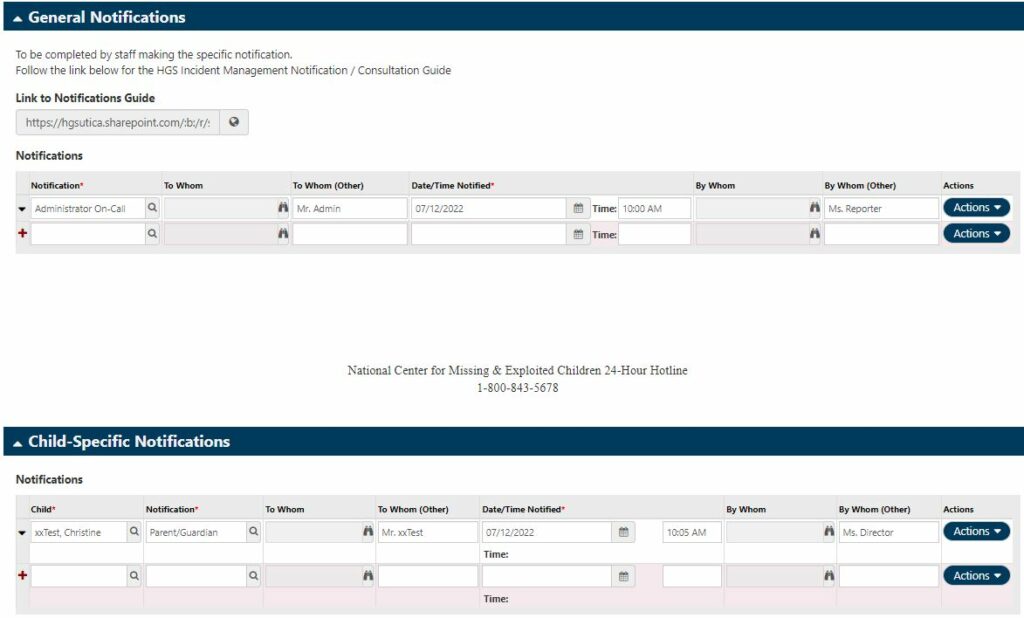
To make it clear what is at work here, the image below shows the udf_list_cond_filter fields visible on both subforms so you can see how they look behind the scenes.
This setup is extensible, allowing you to setup as many subforms from the same form family as you need to achieve your desired effect.

NOTE: This setup will not work retroactively on already-saved events because the new udf_list_cond_filter value on all rows that exist until you do this setup will not have a value set in them to filter on.

How To: Create a Custom Formset Member that Shows Only Active Diagnoses

My agency has a program that requires that clients have a script for service on file in order for services to be billable.  Since a script for service requires a diagnosis, we configured the program’s services to require an active diagnosis in order to generate a claim.  As a result, we have client diagnoses expiring on the same date as the script for service.  When a client gets a new script for service, the same diagnosis is re-entered with a new start and end date.  After a few years enrolled in this program, a client’s diagnosis screen begins to get cluttered with inactive diagnoses so our clinicians asked for a way to just see the current diagnoses that were on file rather than all of the diagnoses that had been entered for the client over the years.

myEvolv includes as “Diagnosis – Active” formset member that looks like it was created to serve exactly this function but it would not list any diagnoses that have end dates on them (even future end dates).   Our program’s diagnoses are entered with end dates since we need them to expire at the same time as the script for service.  We were able to get what we wanted by creating a custom formset that uses a custom default form with a modified list condition.  I have outlined the steps we took to accomplish this for our specific scenario but you could apply this in other situations where you want to customize the listing in a formset member.

Step 1: Create a New Default Form for Active Diagnoses

myEvolv’s Active Diagnosis formset member used the “Diagnosis form for listing – active only” form as its default form so we used it as the basis for our new form.

In the form designer, open the “Diagnosis Information” form family.

Right-click to copy the “Diagnosis form for listing – active only”.  Give the new form a name and code.  Ours is called “Active Dx for MyEvolv Launcher”


Step 2:  Modify the List Condition

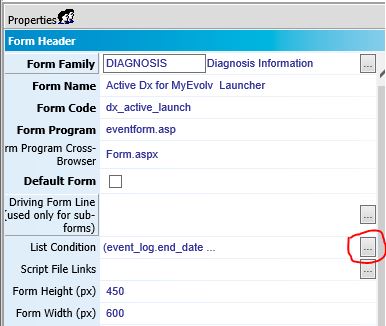
In the new form’s header properties, edit the “List Condition Property”

list-condition-edit

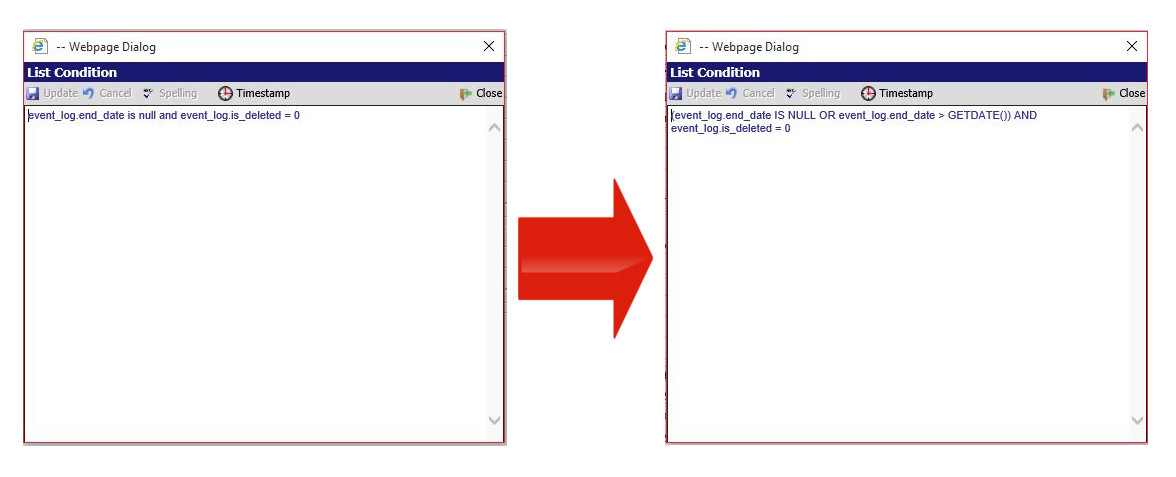
Change the list condition code as shown below

list-condition-code

Explanation of Code and the List Condition Property

myEvolv’s code: event_log.end_date is null and event_log.is_deleted = 0

The List Condition property allows you to use SQL statements to manipulate the data that will be listed on the formset member.  Anything you put in the list condition property will be executed as though it is part of the “WHERE” clause on a SQL query.  In the code above, you can see that myEvolv’s list condition was designed to only list diagnoses that have no end_date and have not been deleted.

We adjusted the list condition to also show us diagnoses with end_dates in the future so I modified the code to:

(event_log.end_date IS NULL OR event_log.end_date > GETDATE()) AND event_log.is_deleted = 0

I used SQL’s GETDATE() function to get today’s date so now in order for the diagnosis to list, it must either have no end_date or an end_date that is greater than today’s date and not have been deleted.

Step 3:  Create a Custom Formset Member

We now need a place to apply the new form we created in myEvolv so that it can be used.  We could just swap put the form for the myEvolv-supplied active diagnosis formset member but since other programs might be using it, we decided to create a custom formset member that was only visible to the clinicians in this program.   Our clinicians use myEvolv Launcher as their home pages in myEvolv.  They are used to clicking on their clients from the My Client’s widget, which launches the My Client Information standalone formset so that is where we wanted to add our custom formset.

Go to Setup > User Tools > Formset Maintenance > FormSet Members and select the ‘My Client Information’  FormSet (it is in the “My Evolv” module)

Create a New “Formset Member – User Defined”.

list-condition-formset-member-setup

You can give the tab any caption or description you would like.  Because we are working with the Diagnoses, we have to pick “Diagnosis” for the Event Category that will allow us to pick the “Diagnosis Information” form family and our default form, “Active Dx for MyEvolv Launcher”.

NB: Once this is setup, remember to give users access to the new form in the Navigation Access Setup.  In this example, the new formset member is listed in the My Evolv Module -> My Client Information section.

Results

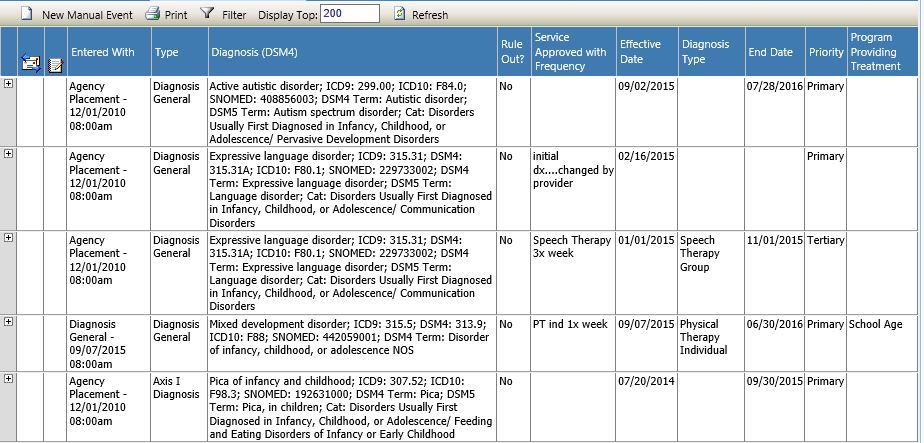
The screenshots below were taken on 7/11/2016 so active diagnoses would be those that have no end date or an and date after 7/11/2016.

diagnoses-all

This is the generic “Diagnosis Information” formset member.  It is showing all of the diagnoses (except those that have been deleted) for the client.  You can see that the first two would be active by our program’s definition since we have one with a future end date and one with no end date.  The other three are expired diagnoses and those are the ones that we do not wish to display in our custom formset member.


diagnosis-filtered-poorly

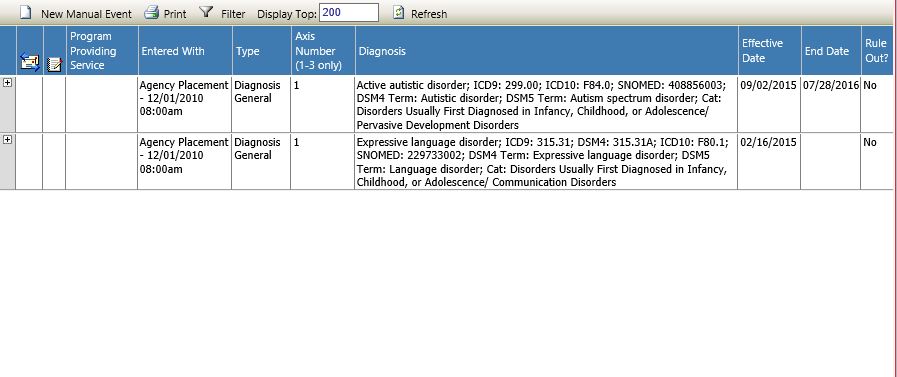
This is myEvolv’s “Diagnosis – Active” formset member.  It is only listing the active diagnosis that has no end date.


diagnoses-active

This is our “Script for Service – Active Only” formset member.  Both active diagnoses are listed.  Success!


List Condition Overwrite on Upgrade?

We have noticed that the list condition on this formset member has been overwritten after upgrading our system.  We have a support case about the phenomenon and hopefully it will be resolved in a future release but until then, beware and be sure to save a backup of your custom list condition code to re-apply after upgrades.

We are using cookies on our website

Please confirm, if you accept our tracking cookies. You can also decline the tracking, so you can continue to visit our website without any data sent to third party services.