Last Updated: August 23rd, 2016
When you are configuring forms in myEvolv, it can be tricky determining how to handle dates and times. Different myEvolv date and time fields are used within the system in different ways. Some of the implications of using one EventLog date or time field over another might not be apparent until the form has been in use for a while, at which point it might be too late.
This post will be an attempt to layout everything I figure out about the way the various EventLog date and time fields work in myEvolv to aid in making a more informed choice about which to include on forms.
Date and Time Columns Available in the EventLog
As of v9.0.6994.136, the EventLog table contains the following date and time columns:
You can click a column caption to skip down to the details for that column
DataTypes and Display Code Type
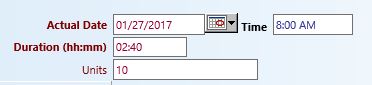
Date and Time data can be displayed and captured in a few different ways on forms depending on the Display Type Code that is indicated in the form field’s properties
| DateTime |
|
Displays a date field and a time field |
 |
| Date Only |
|
Displays a date field with no time field |
 |
| Time |
|
Displays a time field with no date field |
 |
| Time Duration |
|
Displays a time duration field |
 |
Default Display Code Type
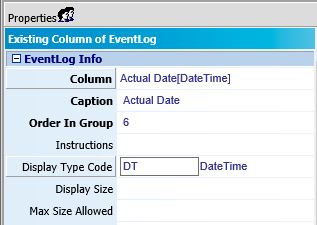
In the form designer, the default Display Code Type is based on the DataType of the column:
- If you select a DateTime column, the Display Type Code will default to DateTime
- If you select a Date Only column, the Display Type Code will default to Date Only
- If you select a DateTime Updated column, the Display Type Code will default to DateTime
- If you select a Time Duration field, the Display Type Code will default to Time Duration
- If you select a Time Only field, the Display Type Code will default to Time (there are currently no Time Only columns in the EventLog table but you may wish to create a user-defined field column of this type so it is included here)
Changing Display Code Type
In some cases, you can change the display type for the field.
- You CAN use a Date Only Display Code Type on DateTime and DateTime Updated columns
- This will allow you to display or capture dates without a time when you want to use one of the DateTime columns.
- When a DateTime column is captured using Date Only Display Code Type, the time will be inserted into the database as 00:00 AM
- This has implications for service overlaps – multiple services with no captured specific time for a client in a single day will have the same time
- You CAN* use a Time Display Code Type on DateTime and DateTime Updated columns
- *myEvolv will not prevent you from saving a form with a field setup this way, however it is not terribly useful (see below)
- This will allow you to capture times without a date, however it will display a date/time string.
- When a DateTime column is captured using Time Display Code Type, the date will be inserted into the database as 1/1/1900
- You CANNOT use a DateTime Display Type Code on a Date Only column
- Date Only columns do not have a corresponding
_tzo column in the database to store the time value that you are capturing on the form. Upon attempting to save, you will receive an error that will prevent the save.
- It is UNKNOWN whether you can use a DateTime Display Type Code on a Time Only column
- I will investigate this soon.
- You CAN use a Time Display Type Code on a Time Duration column
- This will allow you to capture a time without needing a date value.
- This may have unforseen consequences elsewhere in myEvolv since the system expects this data to represent a duration, not a timestamp — requires more investigation
Individual Column Details
Actual Date | actual_date
The actual_date is an important date field in the EventLog when it comes to events. It is meant to represent the actual date and time that an event occurred.
Where else is it used?
It is the date and time that displays in the Service Entry listing in the “Actual Date-Time” column

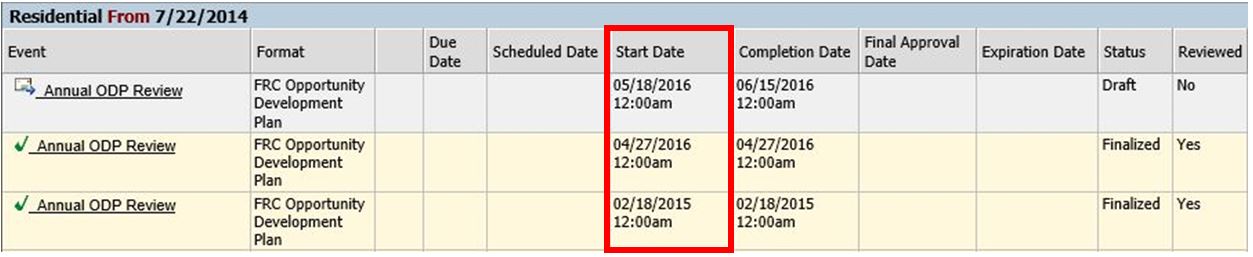
The actual date also displays in the Treatment Plans listing in the “Start Date” column
The actual_date appears in the “Actual Date” column in the Service/Case notes & Planning Approval area of myEvolv. It is displayed as Date Only

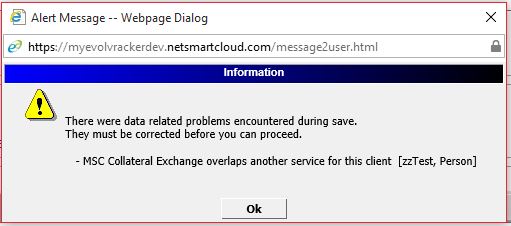
Service Overlaps
myEvolv does not allow service events of the same type to overlap for a client. Therefore if you are setting up an event that could occur multiple times in a single day, you must display the actual_date as a DateTime field on the form and have clinicians input a time. If you display the actual_date as Date Only, all services will be put into the database at 00:00 AM and myEvolv is prevent the second service of the same type from saving because of an overlap. If you do not wish to have the time displayed on the events after the initial entry, you could use a different “Edit Form” in the event configuration which displays the actual_date as Date Only.
Amended Date | amended_dt_tm
Approved Date Internal QI/MIS | approved_qi_date
Approval External Date | approved_external_date
Approved Date | approved_date
The approved_date appears in the “Approved Date” column in the Service/Case notes & Planning Approval area of myEvolv. It is displayed as Date Only

Date Entered | date_entered
The date_entered column is used by myEvolv to store a timestamp for when an event is first saved in the system.
This column is displayed on the Clients Services & Treatment canned reports, which show both the actual_date that clinician’s enter on their services and the entered_date that the system generates so that supervisors can check for contemporaneity of entries.
The difference between the entered_date and the actual_date is used to determine if a service has been documented contemporaneously based on the contemporaneous rule defined in the billing setups and when running a Contemporaneous Rule Report canned report.
Since this column is intended to store system-generated timestamps, it is not recommended that you add this field to a form except in the case that you would like to display the date and time that an entry was entered into the system by a clinician. In this case, the field should be made not-modifiable.
Where else is it used?
The date_entered appears in the “Entry Information” column in the Service/Case notes & Planning Approval area of myEvolv.

Date Locked | date_locked
The date_locked column is used by myEvolv to store a timestamp for when a service is last e-signed by the entering clinician this locking the event from being edited.
The system generates the timestamp when a service event is electronically signed which can occur in three circumstances:
- Upon saving a service if the service is configured to “Auto-Submit/Sign”. In this case, the
date_locked column will have the same timestamp as the date_entered column.
- Upon clicking the “Electronically Sign” button if the service is configured for “Electronically Signed”
- Upon clicking the “Submit” button if the service is configured for “Can Submit”
If a clinician clicks the “Remove Electronic Signature” button on an electronically signed service, the date_locked column will become NULL.
Since this column is intended to store system-generated timestamps, it is not recommended that you add this field to a form. The date_locked will display on electronically-signed services automatically (see below).
Where else is it used?
The date_locked displays as the “Date” with the signature image on electronically signed

and submitted services for the “Signed by” signatures

[the “Date” for the “Approved by” signatures come from the approved_date column]
The date_locked appears in the “Submission Date” column in the Service/Case notes & Planning Approval area of myEvolv. It is displayed as Date Only

Date timestamp timesheet was submitted | date_submitted
End date | end_date
Expiration Date | expiration_date
The expiration_date column is intended to be used to indicate the expiration date of a treatment plan in myEvolv.
Where else is it used?
The expiration_date appears in the “Expiration Date” column in the Plan Development area of myEvolv.

Final Approval Date | final_approval_date
The final_approval_date column is used by myEvolv to store a timestamp for when the final step of a route has been completed.
Since this column is intended to store system-generated timestamps, it is not recommended that you add this field to a form. The final_approval_date will display in the Routing History of routed treatment plans.
Where else is it used?
The final_approval_date appears in the “Final Approval Date” column in the Plan Development area of myEvolv.

Proc Discontinued Date | proc_discontinued_date
Procedure Completion Date | proc_completed_date
Reconciliation Date | reconciliation_date
Target End Date | target_end_date
Verified Date | verified_date
Duration | duration
Duration Other | duration_other
Planning Time | planning_time
Travel Time | travel_time