How To: Anchor Sub Report Data to the Parent Event

myEvolv sub reports can be very useful despite their limitations. Their most useful out-of-the-box application is in something like a face sheet, where you want to bring in the current information available, perhaps with some filtering.

In the first draft of some of our form designs, we used the current location sub report to display a client address. What we did not anticipate was that the address on previously entered notes would change when the individual’s address changed. We wanted that address to be locked on the form once it was saved. A few years later some of the Audit Snapshot functionality came out but that still didn’t work for us because of how audit snapshots worked. We needed a way to have the data on the sub report be based on the date of that event, not today’s date.

In subsequent years, I have figured out a few ways to accomplish this, depending on what columsn the sub report views provide and what we are trying to accomplish. I will try to lay out a few different methods below as I have time.

Method 1: Using a Join Column as a Parameter in the SQL Code

This method is good for when you want a sub report that will show you events within a time range from the parent event’s date. For example, you are creating a monthly report type event and need to list all of the progress notes from the 30 days prior to the monthly report date so that you can display them for the monthly report writers to summarize without running a separate report or opening them individually.

In this example, I will create a sub report using the physical_characteristics_view. I want to only show the physical characteristics from any and all events that occurred in the 30 days leading up to the event on which the sub report will display.

Configure Join Columns

When I first copy the system sub report to make my user sub report, the only join column is the people_id. If I display the sub report with this as the only join column, the subreport will show all of the physical characteristics in the system for all time for that person. If I save the event today, when I open it in a year, it will have an additional year’s worth of physical characteristics showing. The first thing we need to do is also use actual_date as a join field.

Check the box for Join Field? and select Less Than or Equal To for Operator.

With this step done, the subreport will now only ever show the physical characteristics for this client that have an actual_date prior to the actual date of the event it is being displayed on. Half of the problem is solved but this report does not cut off at 30 days prior– it would show all of the events prior, going back to the first one entered for this client.

Custom SQL Code

Values entered in the SQL Code field act as a WHERE clause in a SQL query. We already took care of filtering future events through a Less Than or Equal To join so now we just need to limit the past events in the WHERE clause.

I found that if you are using a field as a join field in the previous step, you can actually bring it in as a parameter value (though I have not used it enough to be sure this will hold for all cases, it seems to work here consistently). This allows us to use the same date value that we are using to filter on the join in our WHERE clause. We will combine it with the DATEADD function to go back 30 days and filter for those physical characteristics with an actual_date Greater Than or Equal To that date.

The first actual_date is the actual_date of events in the physical characteristics view. The @actual_date is a parameter that will get its value from the actual_date field on the parent form at the time the form is generated.

The DATEADD calculates thirty days prior to that parameter value and we are looking for anything that happened after that 30-days-ago-date and the parent event’s date.

actual_date >= DATEADD(day, -30, @actual_date)

More Methods to Come!

How To: Default a Date Field Value Based on Another Date Field

NOTE: THIS POST IS AN UPDATED VERSION OF THIS POST

When working on treatment plans in myEvolv, you will notice that many of the treatment plan component forms contain both a start date and a target completion date.  One of the programs I was building a treatment plan for wanted to have the target completion date on the form but always wanted it to be 90 days from the start date.  Instead of making each clinician calculate 90 days from the start date and fill it in themselves, I used this method to take the date value from the start date and update the target completion date field with a value that is 90 days later.  I will walk you through the JavaScript that I used so that you can make adjustments based on your needs.  The full snippet of JavaScript will be at the end.

two-fields

Where does the code go?

The first consideration is where to put the JavaScript.  In this case, used the ‘On Change Script’ field property on the field that will be modified by the clinician, ‘start_date’.  myEvolv provides us with access to 3 events that we can use to trigger our JavaScript handlers (the code we want to execute):  ‘On Change’, ‘On Click’ and ‘On Load’.  The ‘On Change’ event is fired when the value of the field has been changed.  This is the most suitable event to use in this situation since I do not want the new date value to calculate until there is a value in the first date field.  Furthermore, if a clinician makes a mistake entering the start date, I want the new date to recalculate when the clinician makes an adjustment.  Both of these scenarios are covered when using the ‘On Change’ event.

Get the ‘start_date’

The first line of JavaScript code’s purpose is to get the value that has been placed into the ‘start_date’ field and convert it into a proper JavaScript Date object so that we can manipulate the date easily. I declared a variable named date and set it to be a new Date object passing the value of the ‘start_date’ field as its argument:

var date = new Date(getFormElement('start_date'));

Calculate the ‘target_date’

Now with the date entered by the clinician converted to a Date object, I can perform some calculations on the date using the ‘getter’ and ‘setter’ methods built in to JavaScript Date objects. In my scenario, I need the ‘target_date’ field to be +90 days from the ‘start_date’ so I used the getDate() and setDate() methods:

date.setDate(date.getDate() + 90);

If I wanted to do +3 months instead, I would use the getMonth() and setMonth() methods:

date.setMonth(date.getMonth() + 3);

If I wanted to do +1 year, I would use the getFullYear() and setFullYear() methods:

date.setFullYear(date.getFullYear() + 1);

There are also methods for getting and setting hours, minutes, seconds, and milliseconds, but I am dealing with Date Only fields in this scenario.

Format the ‘target_date’

Now that the date object has my new date stored in it, I need to put that value into the ‘target_date’ field. However, the date in the date object is not formatted in a way that myEvolv’s date fields like so I need to pull the individual date elements from the object and build a string value to place in the date field. I accomplish this first by declaring variables for the month, day and year:

var mm = date.getMonth() + 1;//+1 is needed because in JavaScript Date objects, January is 0
var dd = date.getDate();
var yyyy = date.getFullYear();

Now I declare a new variable called formatted_date and set its value to a concatenated myEvolv-friendly string:

var formatted_date = mm + '/' + dd + '/' + yyyy;

Set the ‘target_date’

setFormElement(‘target_date’, formatted_date);


One Caveat

You may be inclined to disable the ‘target_date’ form field so that clinicians cannot change the value after it has been calculated. I was unable to get that to work, however. When a form field is disabled, it is excluded from being saved so for now it would seem that you have to keep the form field modifiable. If you used this same similar* code in the ‘On Change Script’ property for ‘target_date’, you could prevent the ‘target_date’ from being changed by effectively reverting any attempts at changing the ‘target_date’ manually.

*You will need to also add some JavaScript to validate that the ‘target_date’ has been changed because if you just put this exact same code in the ‘On Change Script’ property for ‘target_date’, you will end up in an infinite loop when ‘actual_date’ is changed on the form and you will crash the browser.

The Full Code

var date = new Date(getFormElement('start_date'));
date.setDate(date.getDate() + 90);
var mm = date.getMonth() + 1;
var dd = date.getDate();
var yyyy = date.getFullYear();
var formatted_date = mm + '/' + dd + '/' +yyyy;
setFormElement('target_date', formatted_date);

How To: Prevent Backdated Entries

This may not be the only or even best way of preventing backdated entries in myEvolv but this method worked for me in a recent configuration.

Scenario

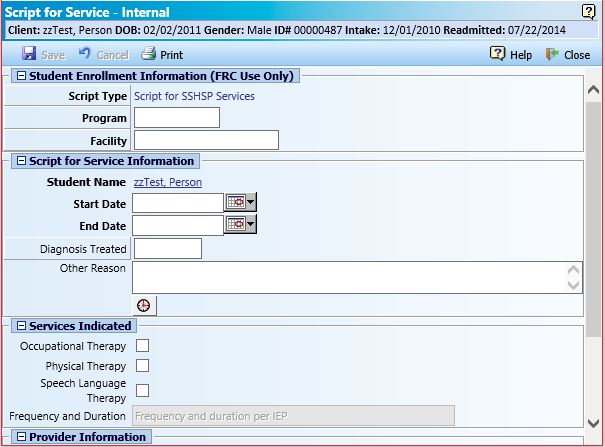
We wanted our prescribers to be able to provide a Script for Therapy Services to children in our preschool services program from myEvolv. Scripts for Service must have a start date on them and that start date needs to be no earlier than the date indicated on the child’s IEP but cannot but previous to the date that the script is being signed.

Further, an administrative assistant was going to be setting up the scripts in myEvolv and then the prescribers were going to be reviewing and e-signing them. We could imagine a scenario where the administrative assistant put a date, for example (9/1) on the script, believing that the prescriber would e-sign it on or before that date but the prescriber does not get into myEvolv to sign it until after that date has passed and then the script gets e-signed as though it were backdated. We needed a way to prevent the start date from ever being previous to the approved date while also allowing the start date to be in the future.

Form Design
script-for-service-form

The actual_date field was not suitable for use as the script start date since we needed to be able have multiple scripts that start on the same day for an individual. If I set the actual date as ‘Date Only’ Display Type Code, then two scripts in the same day would overlap at 00:00 AM. In this case I ended up creating a new database field for my Start Date and kept actual date on the form, receiving todaysDate() as the default value. This more or less prevents the service overlap problem. My new database field is named udf_rx_4_svc_start and is Date Only.

The end date on the script is using the expiration_date column and is also using the Display Type Code “Date Only”.

Before Save Code

The first task to accomplish is to prevent a user from saving the form with a backdate on it. For this I used the Before Save code property on the form. This code executes every time that the form is saved BUT because of the algorithm myEvolv uses to save form data, the udf_rx_4_svc_start column in the database will only be updated if the form field has been flagged as being modified. This is something that I was not able to figure out how to do in the Before Save code yet and is largely responsible for what feels like a more-complex-than-is-strictly-necessary-solution — more on that later.

First step is to get the value that is on the form field and turn it into a JavaScript date object.
var start = new Date(getFormElement('udf_rx_4_svc_start'));

Second step is to get today’s date and turn it into a JavaScript date object. todaysDate() is a myEvolv form function that you can use to get today’s date in a format suitable for placing in a myEvolv form field.
var today = new Date (todaysDate());

With that accomplished, we can compare the two date objects to see if the date on the form is previous to today’s date and if so, set the form field’s value to today’s date.
if(start <= today){{setFormElement('udf_rx_4_svc_start', todaysDate())}};

Note that the { and } brackets are doubled up in the conditional statement. This will prevent the “Not a Valid XSLT or XPath Function” error previously discussed here.

With this code in place, when a new Script for Service is entered or a draft Script for Service has it’s udf_rx_4_svc_start field modified, myEvolv will check to make sure that the start date is not not in the past and if it is, update the start date to today’s date. If the date is today’s date or a future date, it is left as it is.

Full Code Block

var start = new Date(getFormElement('udf_rx_4_svc_start'));
var today = new Date (todaysDate());
if(start <= today){{setFormElement('udf_rx_4_svc_start', todaysDate())}};

On Load Script

Just the Before Save Code alone would not be enough to prevent backdating. We still have the possibility of someone simply opening the draft and e-signing the form as in our scenario where the prescriber gets into myEvolv to e-sign scripts later than intended. Even if the form is edited in some way, if the Start Date is not touched, the Before Save code will execute but the column will not be flagged as modified and myEvolv will ignore it when updating the database. My approach here was to try to update the form as it loads upon viewing or editing so that myEvolv would see the column as modified when saving. I was unable to get the toolbar containing the ‘Save’ button to recongize the change, however, I was able to still get the desired effect another way.

The first thing to keep in mind with the On Load Script is that the form DOM has not loaded yet when this code runs. You can not therefore target the form field with JavaScript, update its value and focus/blur to make myEvolv notice a change to the value as we can with the On Click and On Change Scripts. Instead, you have to manipulate the Record XML Data before it gets loaded into the form.

The first step here is to determine whether the script had been signed. If it has been signed, it will have a non-null date_locked value. We check for this by using the myEvolv form function getDataValue() and then seeing if the form is being opened for viewing or editing.

var locked = getDataValue('event_log', 'event_log_id', keyValue, 'date_locked');
if(locked == '' && formXML.documentElement.getAttribute('formAction') == 'EDIT'){{
...
}}

This code gets the value of date_locked from the event_log table where the event_log_id is equal to keyValue which is a variable equal to the event log id of the current event you are looking at.

Then the code checks to see if there is a locked_date. If the locked date is blank AND the form is opened for editing, then it will execute the rest of the code. So basically, only perform a date manipulation if we are still working with a draft. If you leave this piece out then every time you look at a completed script for service in the future, myEvolv will overwrite the form field value for start date to be today’s date and you will be scratching your head.

Inside the ellipses we start the date manipulation. First we load the node for udf_rx_4_svc_start from the XML Record so that we can manipulate it.
node = formXML.documentElement.selectNodes("form_group/form_item [@column_name = 'udf_rx_4_svc_start']");
node = node[0];
This code returns an Array of all of the nodes in the XML documents with the column_name “udf_rx_svc_start”. There is only one but it is in an array so we load it into our variable directly on the next line.

Then we get the start date value and turn it into a JavaScript date object.
var start = new Date(node.text);

Then we do the same for today’s date.
var today = new Date(todaysDate());

Now we check to see if start date is before today’s date and if so, we will update the text of the node to be today’s date.

if(start < today){{
node.text = todaysDate();
node.setAttribute('modified', 'true');
...
}}

I also set the “modified” attribute to ‘true’ for this node. I don’t know if that makes a difference in this setup but I am including it since that is how my code is and it works.

If you leave the code as it is like this, when the form loads, if the start date is previous to today’s date, the value on the form will have been updated to today’s date AND the form field will be maroon like it is when a form field is changed. However, you will also notice that the “Save” button is nevertheless disabled and a user would be able to e-sign the service without being forced to hit save. And apparently, even though a “saving…” dialog pops up upon e-signing, the form is not saved. I tried a bunch of things to try to get the save button to enable and the e-sign button to disable but it is difficult since the form DOM is not loaded at the time that the On Load script runs. In the end, I decided to just call the save form function directly.

So where the ellipses above are, I put
SaveForm2();

The end result here is that when the form is opened for editing, if the start date is before today’s date, myEvolv will update the start date to be today’s date and then save. The users will see the form start to open and then abruptly close if the conditions are met. When they reopen it, they will find that today’s date has been updated to today’s date and they are free to e-sign.

Full Code Block

var locked = getDataValue('event_log', 'event_log_id', keyValue, 'date_locked');
if(locked == '' && formXML.documentElement.getAttribute('formAction') == 'EDIT'){{
node = formXML.documentElement.selectNodes("form_group/form_item [@column_name = 'udf_rx_4_svc_start']");
node = node[0];
var start = new Date(node.text);
var today = new Date(todaysDate());
if(start < today){{
node.text = todaysDate();
node.setAttribute('modified', 'true');
SaveForm2();
}}
}}

Bonus: After Save Code

Since the form is going to be auto-saving itself, I also added a snippet of code to the After Save Code that keeps the form from closing after save:
window.closeAfterSave = false;

myEvolv EventLog Date and Time Fields MEGAPOST

Last Updated:  August 23rd, 2016

When you are configuring forms in myEvolv, it can be tricky determining how to handle dates and times. Different myEvolv date and time fields are used within the system in different ways. Some of the implications of using one EventLog date or time field over another might not be apparent until the form has been in use for a while, at which point it might be too late.

This post will be an attempt to layout everything I figure out about the way the various EventLog date and time fields work in myEvolv to aid in making a more informed choice about which to include on forms.

Date and Time Columns Available in the EventLog

As of v9.0.6994.136, the EventLog table contains the following date and time columns:
You can click a column caption to skip down to the details for that column

Caption Column DataType
Actual Date actual_date DateTime
Amended Date amended_dt_tm DateTime
Approval Date Internal QI/MIS approved_qi_date Date Only
Approval External Date approved_external_date Date Only
Approved Date approved_date Date Only
Date Entered date_entered DateTime Updated
Date Locked date_locked DateTime
Date timestamp timesheet was submitted date_submitted DateTime
End date end_date DateTime
Expiration Date expiration_date Date Only
Final Approval Date final_approval_date Date Only
Proc Discontinued Date proc_discontinued_date DateTime
Procedure Completion Date proc_completed_date DateTime
Reconciliation Date reconciliation_date DateTime
Target End Date target_end_date Date Only
Verified Date verified_date DateTime
Duration duration Time Duration
Duration Other duration_other Time Duration
Planning Time planning_time Time Duration
Travel Time travel_time Time Duration

DataTypes and Display Code Type

Date and Time data can be displayed and captured in a few different ways on forms depending on the Display Type Code that is indicated in the form field’s properties

DateTime Displays a date field and a time field datetime-display
Date Only Displays a date field with no time field date-only-display
Time Displays a time field with no date field time-display
Time Duration Displays a time duration field time-duration-display

Default Display Code Type

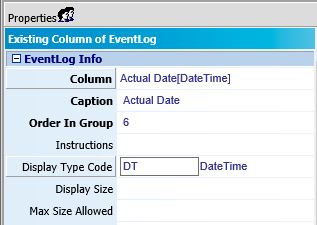
date-field-properties

In the form designer, the default Display Code Type is based on the DataType of the column:

  • If you select a DateTime column, the Display Type Code will default to DateTime
  • If you select a Date Only column, the Display Type Code will default to Date Only
  • If you select a DateTime Updated column, the Display Type Code will default to DateTime
  • If you select a Time Duration field, the Display Type Code will default to Time Duration
  • If you select a Time Only field, the Display Type Code will default to Time (there are currently no Time Only columns in the EventLog table but you may wish to create a user-defined field column of this type so it is included here)

Changing Display Code Type

In some cases, you can change the display type for the field.

  • You CAN use a Date Only Display Code Type on DateTime and DateTime Updated columns
    • This will allow you to display or capture dates without a time when you want to use one of the DateTime columns.
    • When a DateTime column is captured using Date Only Display Code Type, the time will be inserted into the database as 00:00 AM
      • This has implications for service overlaps – multiple services with no captured specific time for a client in a single day will have the same time


  • You CAN* use a Time Display Code Type on DateTime and DateTime Updated columns
    • *myEvolv will not prevent you from saving a form with a field setup this way, however it is not terribly useful (see below)
    • This will allow you to capture times without a date, however it will display a date/time string.
      • datetime-disp-time-after-save
    • When a DateTime column is captured using Time Display Code Type, the date will be inserted into the database as 1/1/1900


  • You CANNOT use a DateTime Display Type Code on a Date Only column
    • Date Only columns do not have a corresponding _tzo column in the database to store the time value that you are capturing on the form. Upon attempting to save, you will receive an error that will prevent the save.


  • It is UNKNOWN whether you can use a DateTime Display Type Code on a Time Only column
    • I will investigate this soon.


  • You CAN use a Time Display Type Code on a Time Duration column
    • This will allow you to capture a time without needing a date value.
    • This may have unforseen consequences elsewhere in myEvolv since the system expects this data to represent a duration, not a timestamp — requires more investigation

Individual Column Details

Actual Date | actual_date

The actual_date is an important date field in the EventLog when it comes to events. It is meant to represent the actual date and time that an event occurred.

Where else is it used?

It is the date and time that displays in the Service Entry listing in the “Actual Date-Time” column
service-entry-actual-date

The actual date also displays in the Treatment Plans listing in the “Start Date” column
plan-development-actual-date

The actual_date appears in the “Actual Date” column in the Service/Case notes & Planning Approval area of myEvolv. It is displayed as Date Only
actual-date-supervisor-module

Service Overlaps

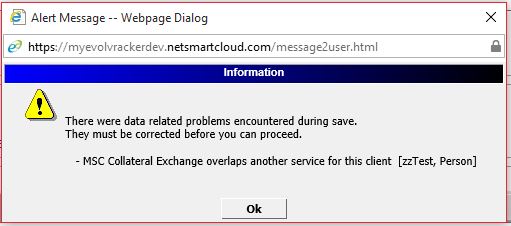
myEvolv does not allow service events of the same type to overlap for a client. Therefore if you are setting up an event that could occur multiple times in a single day, you must display the actual_date as a DateTime field on the form and have clinicians input a time. If you display the actual_date as Date Only, all services will be put into the database at 00:00 AM and myEvolv is prevent the second service of the same type from saving because of an overlap. If you do not wish to have the time displayed on the events after the initial entry, you could use a different “Edit Form” in the event configuration which displays the actual_date as Date Only.

service-overlap-error


Amended Date | amended_dt_tm


Approved Date Internal QI/MIS | approved_qi_date


Approval External Date | approved_external_date


Approved Date | approved_date

The approved_date appears in the “Approved Date” column in the Service/Case notes & Planning Approval area of myEvolv. It is displayed as Date Only
approved-date-supervisor-module


Date Entered | date_entered

The date_entered column is used by myEvolv to store a timestamp for when an event is first saved in the system.

This column is displayed on the Clients Services & Treatment canned reports, which show both the actual_date that clinician’s enter on their services and the entered_date that the system generates so that supervisors can check for contemporaneity of entries.

The difference between the entered_date and the actual_date is used to determine if a service has been documented contemporaneously based on the contemporaneous rule defined in the billing setups and when running a Contemporaneous Rule Report canned report.

Since this column is intended to store system-generated timestamps, it is not recommended that you add this field to a form except in the case that you would like to display the date and time that an entry was entered into the system by a clinician. In this case, the field should be made not-modifiable.

Where else is it used?

The date_entered appears in the “Entry Information” column in the Service/Case notes & Planning Approval area of myEvolv.
date-entered-supervisor-module


Date Locked | date_locked

The date_locked column is used by myEvolv to store a timestamp for when a service is last e-signed by the entering clinician this locking the event from being edited.

The system generates the timestamp when a service event is electronically signed which can occur in three circumstances:

  1. Upon saving a service if the service is configured to “Auto-Submit/Sign”. In this case, the date_locked column will have the same timestamp as the date_entered column.
  2. Upon clicking the “Electronically Sign” button if the service is configured for “Electronically Signed”
  3. Upon clicking the “Submit” button if the service is configured for “Can Submit”

If a clinician clicks the “Remove Electronic Signature” button on an electronically signed service, the date_locked column will become NULL.

Since this column is intended to store system-generated timestamps, it is not recommended that you add this field to a form. The date_locked will display on electronically-signed services automatically (see below).

Where else is it used?

The date_locked displays as the “Date” with the signature image on electronically signed
locked-date-sig-image

and submitted services for the “Signed by” signatures
locked-date-sig-image-approved

[the “Date” for the “Approved by” signatures come from the approved_date column]

The date_locked appears in the “Submission Date” column in the Service/Case notes & Planning Approval area of myEvolv. It is displayed as Date Only
locked-date-supervisor-module


Date timestamp timesheet was submitted | date_submitted


End date | end_date


Expiration Date | expiration_date

The expiration_date column is intended to be used to indicate the expiration date of a treatment plan in myEvolv.

Where else is it used?

The expiration_date appears in the “Expiration Date” column in the Plan Development area of myEvolv.
expiration-date-plan-development


Final Approval Date | final_approval_date

The final_approval_date column is used by myEvolv to store a timestamp for when the final step of a route has been completed.

Since this column is intended to store system-generated timestamps, it is not recommended that you add this field to a form. The final_approval_date will display in the Routing History of routed treatment plans.

Where else is it used?

The final_approval_date appears in the “Final Approval Date” column in the Plan Development area of myEvolv.
final-approval-date-treatment-plans


Proc Discontinued Date | proc_discontinued_date


Procedure Completion Date | proc_completed_date


Reconciliation Date | reconciliation_date


Target End Date | target_end_date


Verified Date | verified_date


Duration | duration


Duration Other | duration_other


Planning Time | planning_time


Travel Time | travel_time


*ARCHIVE* How To: Default a Date Field Value Based on Another Date Field

NOTE: THIS POST CONTAINS OBSOLETE CODE THAT WILL NOT WORK IN NX. I WILL KEEP THE POST AVAILABLE SINCE IT MAY PROVIDE SOME INSIGHT IN HOW TO USE JAVASCRIPT TO MANIPULATE MYEVOLV FORMS. YOU CAN FIND THE UPDATED VERSION OF THIS POST HERE.

When working on treatment plans in myEvolv, you will notice that many of the treatment plan component forms contain both a start date and a target completion date.  One of the programs I was building a treatment plan for wanted to have the target completion date on the form but always wanted it to be 90 days from the start date.  Instead of making each clinician calculate 90 days from the start date and fill it in themselves, I used this method to take the date value from the start date and update the target completion date field with a value that is 90 days later.  I will walk you through the JavaScript that I used so that you can make adjustments based on your needs.  The full snippet of JavaScript will be at the end.

two-fields

Where does the code go?

The first consideration is where to put the JavaScript.  In this case, used the ‘On Change Script’ field property on the field that will be modified by the clinician, ‘start_date’.  myEvolv provides us with access to 3 events that we can use to trigger our JavaScript handlers (the code we want to execute):  ‘On Change’, ‘On Click’ and ‘On Load’.  The ‘On Change’ event is fired when the value of the field has been changed.  This is the most suitable event to use in this situation since I do not want the new date value to calculate until there is a value in the first date field.  Furthermore, if a clinician makes a mistake entering the start date, I want the new date to recalculate when the clinician makes an adjustment.  Both of these scenarios are covered when using the ‘On Change’ event.

Get the ‘start_date’

The first line of JavaScript code’s purpose is to get the value that has been placed into the ‘start_date’ field and convert it into a proper JavaScript Date object so that we can manipulate the date easily. I decalred a variable named date and set it to be a new Date object passing the value of the ‘start_date’ field as its argument:

var date = new Date(document.getElementById('start_date').value);

Calculate a New Date

Now with the date entered by the clinician converted to a Date object, I can perform some calculations on the date using the ‘getter’ and ‘setter’ methods built in to JavaScript Date objects. In my scenario, I need the ‘target_date’ field to be +90 days from the ‘start_date’ so I used the getDate() and setDate() methods:

date.setDate(date.getDate() + 90);

If I wanted to do +3 months instead, I would use the getMonth() and setMonth() methods:

date.setMonth(date.getMonth() + 3);

If I wanted to do +1 year, I would use the getFullYear() and setFullYear() methods:

date.setFullYear(date.getFullYear() + 1);

There are also methods for getting and setting hours, minutes, seconds, and milliseconds, but I am dealing with Date Only fields in this scenario.

Format the New Date

Now that the date object has my new date stored in it, I need to put that value into the ‘target_date’ field. However, the date in the date object is not formatted in a way that myEvolv’s date fields like so I need to pull the individual date elements from the object and build a string value to place in the date field. I accomplish this first by declaring variables for the month, day and year:

var mm = date.getMonth() + 1;//+1 is needed because in JavaScript Date objects, January is 0
var dd = date.getDate();
var yyyy = date.getFullYear();

Now I declare a new variable called formatted_date and set its value to a concatenated myEvolv-friendly string:

var formatted_date = mm + '/' + dd + '/' + yyyy;

Set the ‘target_date’

Next I can put this string into the field on the form. Since I will do a few things to the ‘target_date’ field, I am going to create a variable called target_date to refer to it more quickly:

var target_date = document.getElementById('target_date');
target_date.value = formatted_date;

Awaken the ‘target_date’ Field

You might think that you are done here because the new date has been loaded into the form, however, because I used JavaScript to update the value of ‘target_date’, the form itself does not recognize that a change has been made to ‘target_date’ which is indicated by the form label and field value text turning red. Even though the value is in the form field, upon saving, the form will not recognize the field as having a new value and will not include it in its save operation. One way to fix that is to manually click in the ‘target_date’ field and then click out of it so that the form recognizes a change in the value of the field but that is un-intuitive and error-prone. Luckily, JavaScript provides a method for simulating this with the focus() and blur() methods to use on form fields:

target_date.focus();
target_date.blur();

With these two lines at the end, after the new date value has been filled in on the ‘target_date’ field, the field label turns red which means that the form has recognized that its value has changed and it will include the change when the form is saved.

two-fields-filled

One Caveat

You may be inclined to disable the ‘target_date’ form field so that clinicians cannot change the value after it has been calculated. I was unable to get that to work, however. When a form field is disabled, it is excluded from being saved so for now it would seem that you have to keep the form field modifiable. If you used this same similar* code in the ‘On Change Script’ property for ‘target_date’, you could prevent the ‘target_date’ from being changed by effectively reverting any attempts at changing the ‘target_date’ manually.

*You will need to also add some JavaScript to validate that the ‘target_date’ has been changed because if you just put this exact same code in the ‘On Change Script’ property for ‘target_date’, you will end up in an infinite loop when ‘actual_date’ is changed on the form and you will crash the browser.

The Full Code

var date = new Date(document.getElementById('start_date').value);
date.setDate(date.getDate() + 90);
var mm = date.getMonth() + 1;
var dd = date.getDate();
var yyyy = date.getFullYear();
var formatted_date = mm + '/' + dd + '/' +yyyy;
var target_date = document.getElementById('target_date');
target_date.value = formatted_date;
target_date.focus();
target_date.blur();

We are using cookies on our website

Please confirm, if you accept our tracking cookies. You can also decline the tracking, so you can continue to visit our website without any data sent to third party services.